Detailed Parameters
Section 6
6.13 - autoWarmth
®
Insert
The Fletcher-Munson Equal-Loudness curves show that the perception of low frequency signals decreases
quickly with decreasing volume. The DriveRack 4800 and 4820 offer the AutoWarmth
®
Insert module on
each output (Insert 1) to compensate for this perceived loss in low frequencies. AutoWarmth is a patent
pending process that compensates for the naturally occurring perceived loss of low frequency at low signal
levels. The result of using AutoWarmth is warm and balanced signal even at low signal levels.
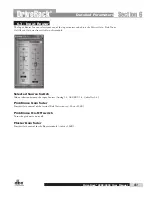
autoWarmth on/off switch
This parameter turns the AutoWarmth function on and off.
threshold fader
The Threshold sets the level at which AutoWarmth begins to work. Signals below the Threshold are pro-
cessed to increase the Bass response in proportion to the overall volume of the signal. Above the Threshold
there is no processing. The Threshold meter will light green when the threshold has been crossed and
AutoWarmth is active. The Threshold range is between -60 and 0 dBFS. To set the Threshold, turn
AutoWarmth off and adjust the Master Gain to the desired listening level. Turn AutoWarmth on and
adjust the Threshold until the Threshold Meter is toggling on and off. Now as the volume decreases below
the Threshold, the bass will gradually increase. Be careful when using AutoWarmth followed by an AGC.
The AGC can add gain when the signal is below the AutoWarmth threshold resulting in overcompensated
Bass.
amount fader
The Amount parameter controls how much bass is added. A setting of 1.00:1 compensates for the per-
ceived loss of bass by inversely matching the Fletcher-Munson Equal Loudness curves. Higher settings
(greater that 1.00) cause more bass compensation; lower settings result is less bass compensation. The
Amount parameter is adjustable between 0.25:1 and 4.00:1.
DriveRack
®
Driverack
®
4800/4820 user Manual
54
Содержание DriveRack 4800
Страница 1: ...User Manual 4800 4820 CompleteEqualization LoudspeakerManagementSystem...
Страница 6: ...DriveRack...
Страница 7: ...features Customer Service Info WARRANTY INFO INTRODUCTION DriveRack Introduction...
Страница 10: ...Introduction DriveRack 4800 4820 User Manual DriveRack iv...
Страница 11: ...Rear panel front panel software installa tion Getting Started Section 1 DriveRack...
Страница 18: ...Getting Started 8 Section 1 DriveRack DriveRack 4800 4820 User Manual...
Страница 19: ...Presets attributes DriveRack Philosophy Section 2 DriveRack...
Страница 21: ...navigation modes Front Panel Operation Section 3 DriveRack...
Страница 29: ...moduleview deviceview venueview Software Operation Section 4 DriveRack...
Страница 40: ...Software Operation 30 Section 4 DriveRack DriveRack 4800 4820 User Manual...
Страница 41: ...31 front panel operation SOFTWARE OPERATION In Use Section 5 DriveRack...
Страница 48: ...In Use 38 Section 5 DriveRack DriveRack 4800 4820 User Manual...
Страница 49: ...Detailed Parameters Detailed Parameters Section 6 DriveRack...
Страница 73: ...UTILITIES Section 7 Utilities DriveRack...
Страница 77: ...DriveRack Appendix...
Страница 80: ...Appendix DriveRack DriveRack 4800 4820 User Manual 70 A 2 Block Diagram...
Страница 86: ...Appendix DriveRack DriveRack 4800 4820 User Manual 76 A 8 ZC 4 Wiring Diagram...
Страница 95: ...Appendix DriveRack DriveRack 4800 4820 User Manual 85...


