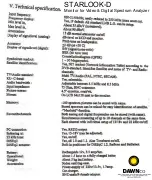
Dawnco STARLOOK- D Скачать руководство пользователя страница 10


(9) 


3.


Analog

. Chose between KU-band and C-band (normal or inverted video). 

4.


Motor.

 Chose the type of actuator to be used; standard DiSEqC 1.2, 

SatSelect or SATSCAN. 

5.


Display

. submenu 

units

:  Select dB-presentation: dbuV, 

Dbm or dBmV. 

Under submenu LCD can contrast (level) and Backlite (on/off) be set. 

6.


AutoOff.

 Chose between some automatic turn-off alternatives (timer). 

7.


Version

. Tells about the units serie-nr and manufactured date. 


7. Beeper  

It might be tricky to install a Sat-dish and, at the same time, try to watch the  


signal-level on the instrument.  


Therefore the instrument has a very useful ”beeper”-function to help finding the  

max-strength signal. It works with a pitch tone that gets higher and higher the 

better the signal gets. 


The beeper is turned on and off with button nr 7. 


Notice that the function works with a narrow bandwith (one transponder) and  


not with the full bandwidth. 

To use the function:  put the cursor on top of a selected ”peak” and align the dish. 


8. Spec

  Special-functions.  Select with button nr 8 in the Mainmenu. 
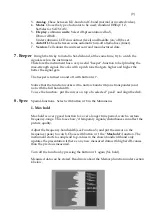


1. Max hold 


Max hold is a very good function for, over a longer time period, watch a certain 

frequency-range. This to see how/if temporary signals/disturbances can affect the 

picture quality.  


Adjust the frequency-bandwidth (see Function 3) and put the cursor on the 

frequency (peak) to watch. Chose with button nr 1 the ”

Max hold

”-function. The 

instrument starts to sample all top-values in the shown bandwidth and only 

updates the presentation if there´s any new measured data with higher dB-values 

than the previous measured.  


Turn off the function by pressing the button nr 1 again (No hold). 


Measured data can be stored. Read more about the Memory-function under section 

4 below. 


Содержание STARLOOK- D

Страница 1: ...ccompanies the product DAWNco makes no additional or independent warranty All other warranties express or implied including the warranties of merchantability and fitness for a particular purpose are d...

Страница 2: ...permanent part of the instrument and should remain with it if it is resold If a problem should arise or if You have any questions about the instrument consult an DAWNco Notice Operating a STARLOOK D...

Страница 3: ...llation diagram QPSK and S N signal noise ratio Switching between TV mode Spectrum mode Digital mode are easily done by pushing a button on the side of the instrument STARLOOK D can handle a lot of me...

Страница 4: ...power On Off RF input via the F connector The instrument also has a RS232 connector for connection with a computer B Connection Use the mainswitch to turn the instrument On and connect an signal sour...

Страница 5: ...screen The most important measured data the dB value is shown in the middle of the monitor Measuring of the tuned in frequency is done continuos and the presentation is being updated a couple of time...

Страница 6: ...os free After selecting a position push button nr 1 YES Notice that even the preselected 13V 18V 22 kHz on off will be memorized Text editor When the channel frequency is saved the Text editor appears...

Страница 7: ...bit stream are shown The other measured data like the S N ratio signal noise ratio och BER bit error rate are displayed just under the constellationdiagram in the shape of Bar graph s thermometer sca...

Страница 8: ...CD and a memory position will be shown in the bottom of the LCD display Step between the stored memory positions with the knob Text editor When the channel frequency is saved the Text editor appears o...

Страница 9: ...r 3 button again span Max gets You back to Max zoom out 4 Atten Attenuation 15dB Manuell on off with button nr 4 Selected position is displayed at the right hand side of the monitor 5 DiSEqC Chose DiS...

Страница 10: ...n and off with button nr 7 Notice that the function works with a narrow bandwith one transponder and not with the full bandwidth To use the function put the cursor on top of a selected peak and align...

Страница 11: ...nmenu section 3 above Push button nr 3 span Min on the keypad The instrument zoom in max at the chosen frequency 250 MHz bandwidth Another push on the nr 3 button span Max takes the instrument back to...

Страница 12: ...99 and push button nr 2 save The data is stored Load measured data by first choosing the memory position with the knob pos 00 99 Push button nr 1 load and the memory is displayed on the monitor Delet...

Страница 13: ...spectrum is saved the Text editor appears on the monitor which makes it possible to enter a name for that memory position ex ASTRA 1D Use the knob to select the first letter ex A and save it with the...

Страница 14: ...should not be exposed for rain or snow as this can damage or shorten the lifetime of the instrument Checking charging the battery As the instrument has been stored for some time before transportation...

Страница 15: ...ext to the monitor Memory 100 spectrum pictures can be stored with name Stored spectrum can be mixed for easy identification of satellite Maxhold function Favorite channels Both analog and digital fre...

Страница 16: ...STARLOOK D Monitor for Video Digital Spectrum Analyzer...

Отзывы: