


26
Picture in Picture Function
The HS-2200 Picture in Picture function allows you to place one or two smaller PIP images over a chosen full size
background image. The smaller PIP images can be set to pre-defined sizes and positioned almost anywhere within
the Preset/Program screen area. These PIP windows can also have a coloured border applied, and can be brought
into the production with a default PIP dissolve transition.
PIP Settings
Before trying to activate the PIP function it is best to understand how to set up or choose the right options for your
production. Press the
ENTER Key
in the
MENU
area of the HS-2200 keyboard. Navigate to the
PIP Settings
option
using the down arrow key. The PIP menu options provided here are:
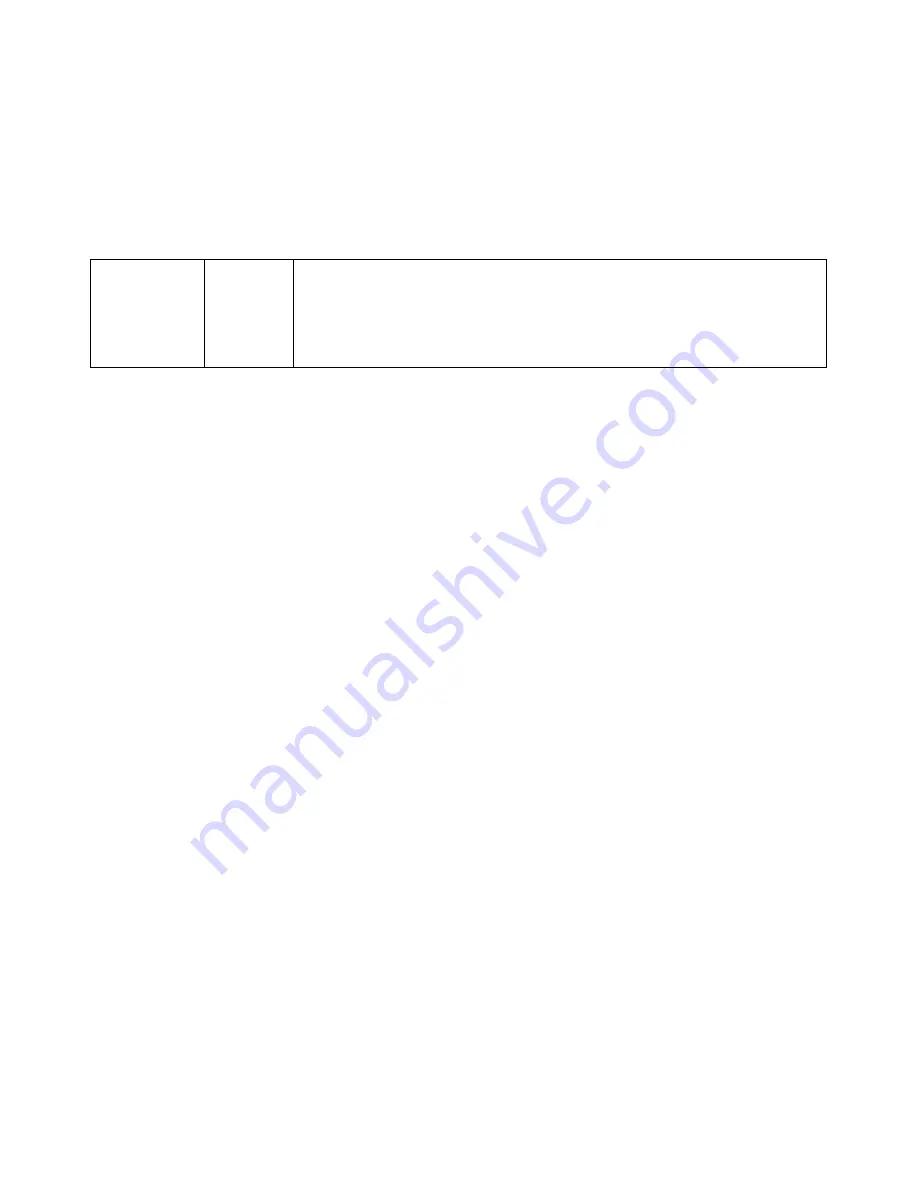
PIP Settings
PIP1
PIP2
Horizontal Position
Vertical Position
Window Size
Border Width
Border Color
= 000 to 107 (Left to right)
= 000 to 108 (Lower to Upper)
= 1 (small) to 33 (large)
= 0 (OFF), 1 (Thin) to 5 (Thick)
1 = White, 2 = Yellow, 3 = Light Blue, 4 = Green,
5 = Purple, 6 = Red, 7 = Dark Blue, 8 = Black.
PIP Preset and PIP Program
When looking at the top right corner of the HS-2200 Control Panel / Keyboard there are four PIP keys. These are
labelled Program and Preset.
The upper PIP1 and PIP2 keys relate to activating Picture In Picture images on the Program outputs.
The lower PIP1 and PIP2 keys relate to activating Picture In Picture images on the Multi-view or Preview outputs.
Assigning a video source input to a PIP
Using the lower PIP1 or PIP2 buttons you can assign a selected video input to the chosen PIP video layer.
1.
First press and hold down the required PIP button on the lower row. The Preset row of input sources will light.
2.
While still holding down the PIP button, press to select the required input from the Preset row.
3.
The input will flash to confirm it is selected.
This selection will also be confirmed on the HDMI Multi-view, with a P1 or P2 label shown next to the selected input image.
Содержание HS-2200
Страница 1: ......
Страница 34: ...34 Example HS 2200 Set Up...
Страница 35: ...35 Dimensions...
Страница 37: ...37 Notes...
Страница 38: ...38 Notes...
Страница 39: ...39 Notes...
Страница 40: ...40...


