background image


Table of Contents


FCC COMPLIANCE STATEMENT ..................................................................................................... 4


WARNINGS AND PRECAUTIONS ................................................................................................... 4


WARRANTY .................................................................................................................................. 5


S

TANDARD 

W

ARRANTY

 ........................................................................................................................... 5 

T

HREE 

Y

EAR 

W

ARRANTY

 ......................................................................................................................... 5 

DISPOSAL ..................................................................................................................................... 5


1.


PRODUCT OVERVIEW ............................................................................................................ 6


2.


FEATURES .............................................................................................................................. 6


3.


CONNECTIONS AND CONTROLS ............................................................................................. 6


4.


HOW TO OPERATE CC-360 FROM MOBILE DEVICE ................................................................. 8


4.1  I

NSTALL 

CC-360


APP ................................................................................................................. 8 

4.2  P

OWER 

ON


C

AMERA

 .................................................................................................................. 8 

4.3  C

ONNECT TO 

W

I

-F

I

 .................................................................................................................... 9 

4.4  R

UN 

CC-360


APP ..................................................................................................................... 9 

5.


CC-360 APP ............................................................................................................................ 9


5.1  S

WITCH 

B

UTTON

 ...................................................................................................................... 10 

5.2  S

HOT 

B

UTTON

 ......................................................................................................................... 10 

Audio Recording .......................................................................................................................... 10


5.3  V

IEW 

A

NGLE 

C

ONTROL 

M

ODES

 ................................................................................................... 10 

5.4  L

IVE 

D

ISPLAY 

O

RIENTATION 

M

ODES

 ............................................................................................. 10 

5.5  S

TATUS 

I

CONS

 .......................................................................................................................... 11 

5.6  S

HORTCUT 

M

ENU

 ..................................................................................................................... 12 

5.7  F

ILE 

S

TORAGE

 .......................................................................................................................... 12 

Tool Bar ....................................................................................................................................... 12


6.


VIEW MODES ...................................................................................................................... 14


6.1  G

LOBAL

 .................................................................................................................................. 14 

6.2  360° ..................................................................................................................................... 14 
6.3  F

RONT

 .................................................................................................................................... 14 

6.4  180° ..................................................................................................................................... 14 
6.5  Q

UAD

 .................................................................................................................................... 15 

7.


CAMERA SETUP ................................................................................................................... 15


7.1  B

RIGHTNESS 

(EV) ..................................................................................................................... 15 

7.2  S

TITCHING

 ............................................................................................................................... 15 

7.3  G

AIN 

(ISO) ............................................................................................................................. 16 

7.4  S

HUTTER 

S

PEED

 ....................................................................................................................... 16 

7.5  S

HARPNESS

 ............................................................................................................................. 17 

7.6  W

HITE 

B

ALANCE

 ...................................................................................................................... 17 

Содержание CC-360

Страница 1: ...CC 360 4K 360 DEGREE CAMERA Instruction manual ...

Страница 2: ... ON CAMERA 8 4 3 CONNECT TO WI FI 9 4 4 RUN CC 360 APP 9 5 CC 360 APP 9 5 1 SWITCH BUTTON 10 5 2 SHOT BUTTON 10 Audio Recording 10 5 3 VIEW ANGLE CONTROL MODES 10 5 4 LIVE DISPLAY ORIENTATION MODES 10 5 5 STATUS ICONS 11 5 6 SHORTCUT MENU 12 5 7 FILE STORAGE 12 Tool Bar 12 6 VIEW MODES 14 6 1 GLOBAL 14 6 2 360 14 6 3 FRONT 14 6 4 180 14 6 5 QUAD 15 7 CAMERA SETUP 15 7 1 BRIGHTNESS EV 15 7 2 STITCH...

Страница 3: ... only At all times Datavideo Technologies will try to give correct complete and suitable information However Datavideo Technologies cannot exclude that some information in this manual from time to time may not be correct or may be incomplete This manual may contain typing errors omissions or incorrect information Datavideo Technologies always recommend that you double check the information in this...

Страница 4: ... this unit where the power cord will be walked on rolled over or otherwise stressed 9 If an extension cord must be used with this unit make sure that the total of the ampere ratings on the products plugged into the extension cord do not exceed the extension cord s rating 10 Make sure that the total amperes of all the units that are plugged into a single wall outlet do not exceed 15 amperes 11 Neve...

Страница 5: ...17 are qualified for a free two years extension to the standard warranty providing the product is registered with Datavideo within 30 days of purchase Certain parts with limited lifetime expectancy such as LCD panels DVD drives Hard Drive Solid State Drive SD Card USB Thumb Drive Lighting Camera module PCIe Card are covered for 1 year The three year warranty must be registered on Datavideo s offic...

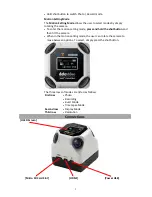
Страница 6: ... Buttons Power Button ON OFF Press power button to power on the camera Press and hold power button for 2 seconds to turn off the camera The OLED screen will display Shutting down Note Please make sure CC 360 is fully charged before use When charging please use the CC 360 proprietary USB power cable Charging through the PC USB port is not recommended Sleep Mode Press and hold power button for at le...

Страница 7: ...e press and hold the shot button and then tilt the camera When in the motion setting mode the user can rotate the camera to move between options To select simply press the shot button The three rows of modes are listed as follows First row Photo Recording Burst Mode Time lapse Mode Second row Display Mode Third row Resolution Connections OLED Screen Micro SD Card Slot HDMI Power USB ...

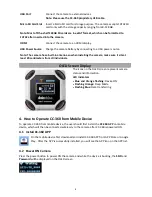
Страница 8: ...eters from all individuals OLED Screen Display The icons on the OLED screen represent camera status and information LED Indicators Blue and Orange flashing Device ON Flashing Orange Sleep Mode Flashing Blue Data transferring 4 How to Operate CC 360 from Mobile Device To operate CC 360 from mobile device the user should first install the CC 360 APP on mobile device which will then be connected wire...

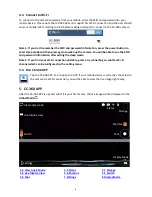
Страница 9: ...tion after exiting the sleep mode Note 2 If you find your Wi Fi connection unstable please try connecting on another Wi Fi channel which can be configured on the setting menu 4 4 Run CC 360 APP Tap the CC 360 APP icon to open the APP If your mobile device is correctly connected to the camera via Wi Fi connection you will be able to view the live image right away 5 CC 360 APP After the CC 360 APP i...

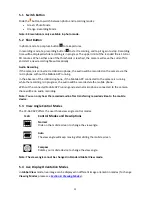
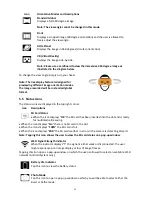
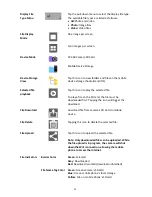
Страница 10: ... of the USB microphone if the Mobile APP connected to the camera is running while the recording is in progress the audio will be recorded via the mobile phone Without the connected Mobile APP running and external microphone connected to the camera there will be no audio recording Note You can only hear the recorded audio after transferring recorded video to the mobile device 5 3 View Angle Control...

Страница 11: ... top right corner Icon Descriptions SD Card Status When the icon displays OK the SD card has been inserted into the slot and is ready for multimedia file saving When the icon displays No there is no SD card in the slot When the icon displays 100 the SD card is full When the icon displays ERR the SD card is either in error or the camera is detecting SD card Note Tapping this icon allows the user to...

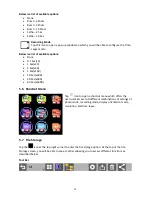
Страница 12: ... Sec x60 5 Sec x150 10 Sec x300 30 Sec x900 60 Sec x1800 5 6 Shortcut Menu Tap icon to open a shortcut menu which offers the user quick access to 9 different combinations of settings of photo mode recording mode display orientation mode resolution and time lapse 5 7 File Storage Tap the icon at the top right corner to enter the file storage option At the top of the File Storage screen you will be ...

Страница 13: ...ile on the SD card the file must be downloaded first Tapping the icon will trigger the download File Download Download file from camera s SD Card to mobile device File Delete Tapping this icon to delete the selected file File Upload Tap this icon to upload the selected file Note Only downloaded files can be uploaded While the file upload is in progress the camera will shut down the Wi Fi connectio...

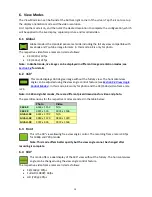
Страница 14: ...l view angle can be adjusted using the view angle control feature see Section 5 3 View Angle Control Modes In this mode 6K is only for photo and the 3K 1536s video frame rate is 24 Note In 360 and global modes there are different pixel dimensions for video and photo The pixel dimensions for the respective modes are listed in the table below Photo Video 360 6K 6144 x 1152 N A 360 3K 3072 x 576 3072...

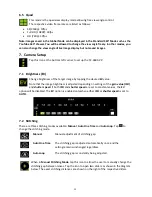
Страница 15: ...ightness is adjusted depending on settings of the gain value ISO and shutter speed If both ISO and shutter speed are set to constant values the EV option will be disabled The EV option is enabled only when either ISO or shutter speed is set to AUTO 7 2 Stitching There are three stitching modes available Manual Auto One Time and Auto Loop Tap to change the stitching mode Manual Manual adjustment of...

Страница 16: ... This option allows the user to adjust the image gain value The larger the gain value the brighter the image However at high gain the image will appear to be noisier If ISO is set to auto the camera will adjust the gain based on the EV value set see Section 7 1 for ways to configure EV 7 4 Shutter Speed Tap on this icon to open a list of available shutter speeds exposure time for selection High sh...

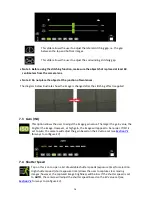
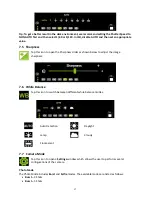
Страница 17: ...rpness slider as shown below to adjust the image sharpness 7 6 White Balance Tap this icon to switch between different white balance modes Auto Detection Daylight Lamp Cloudy Fluorescent 7 7 Camera Mode Tap this icon to open a Settings window which allows the user to perform several configurations of the camera Photo Mode The Photo Mode includes Burst and Selfie modes The available modes are liste...

Страница 18: ...er The available system options are 50 Hz PAL 60 Hz NTSC 7 8 System Format Micro SD Card CC 360 accepts micro SD cards with capacities ranging from 8 GB to 128 GB Format the camera s SD card to FAT32 Note that disk formatting will erase all files on the SD card Sleep The camera enters sleep mode after idle for a period of time This option allows you to set the idle time before the camera enters sl...

Страница 19: ... Chart Show Hide the chart on an HDMI display Camera Version Update Tip Turn ON OFF the notice of camera firmware update Connect camera to Wi Fi Select an SSID and enter the password to connect the camera to a wireless access point The camera s OLED display will show connecting as the connection is being established If successfully connected the OLED display will show the connected SSID and the ca...

Страница 20: ...he camera is connected Manual Static IP configuration By enabling the manual mode the user will be able to enter a custom IP address mask address gateway IP DNS server IP and the port number 8 2 Physical Connections To establish physical connection with a hub or router connect the CC 360 to the hub or router via a Micro USB to RJ45 adapter The connection setup is shown in the diagram below Note To...

Страница 21: ...ice 1 Connect your mobile device to the same network to which the camera is connected 2 Run the CC 360 APP 3 Tap the Wi Fi icon at the top right corner of the screen and on the pop up window select Remote Connection and then enter the IP address along with the port number Note The default Remote Connection port number is 8555 4 Tap Connect after the IP settings are properly entered Once connected ...

Страница 22: ...de we can proceed to set up 360 live streaming on the PC Ethernet Connection The Ethernet Connection offers the user an easy setup and connection stability All you need is a Micro USB to RJ45 to connect the camera to a router Follow the procedure outlined below to set up 360 live streaming on a PC via an RJ45 port 1 Connect a PC to a hub or router 2 Turn ON the camera and connect it to a network h...

Страница 23: ... and then enter the password 4 While connecting the camera s OLED screen will display Connecting indicating that connection is being established 5 After the connection is successfully established the OLED screen will display the AP s SSID and the camera s assigned IP address If the connection fails the OLED screen will prompt the user to return to the HOME screen Please perform steps 1 3 to re con...

Страница 24: ...live streaming on YouTube 1 Login YouTube on PC and click Upload 2 Under LIVE STREAMING click Get started button 3 Select Events and click Schedule a new event 4 Input a title in Basic info and check This live stream is 360 in Advanced settings 5 Create event 6 Set basic ingestion for main camera 7 Select other encoders ...

Страница 25: ...can start streaming after the stream connection is established Facebook Follow the procedure below to set up live streaming on Facebook 1 Open the Facebook Live page https www facebook com live create on the PC and start creating live stream 2 On the right side of the page click Settings and check This live stream is a 360 video 3 Copy Server URL and Stream Key Ex rtmp live 360 facebook com 80 rtm...

Страница 26: ...26 4 Paste the URL Streaming Name into the Server URL Stream Key field in CC 360 APP s RTMP Configuration option 5 As soon as the preview appears you can start streaming live ...

Страница 27: ... as this could result in a non responsive unit 1 Save the firmware update file zip into the root directory of the SD card and make sure that there is no other zip file in the same root 2 Insert the SD card into the camera 3 Turn on the camera and as soon as the SD card is ready the camera will start to upgrade 4 After the upgrade is finished the camera will reboot 5 The firmware update file will b...

Страница 28: ...etting can be adjusted using the slide bar for the main object of shooting 3 Why is there a short loud noise after I turn on the camera The camera is equipped with a cooling fan and while the device is booting the fan will be turned on for a short period of time After the device is booted up the fan will be either turned off or slowed down depending on the fan control setting 4 Why is it sometimes...

Страница 29: ...0 video and uploaded it to YouTube but it cannot be played as a 360 video The videos recorded by CC 360 cameras contain 360 metadata and can be uploaded to YouTube Facebook directly After editing the metadata may be lost and you will need to inject it again You can find the injector on the website below https github com google spatial media releases tag v2 0 ...

Страница 30: ...30 11 Dimensions Top Bottom All measurements in millimetres mm ...

Страница 31: ...40 x 2160 10fps 3072 x 1536 24fps 1920 x 1080 30fps Image Adjustment AE AGC AWB Sharpness Stitching Focus Noise Reduction 2D 3D Wi Fi 802 11 b g n Storage Micro SD up to 128GB FAT32 Connector Micro USB Micro HDMI Software Android iOS Battery 1500 mAh 1 hour recording Sensitivity 0 1 LUX Auxiliary Power 5V DC USB Adaptor Operating Temperature 14 F 104 F 10 C 40 C Operating Humidity 0 90 Dimensions ...

Страница 32: ...s datavideo in Tel 91 0120 2427337 A 132 Sec 63 Noida 201307 India India Noida Datavideo India Kochi Tel 91 4844 025336 Fax 91 4844 047696 2nd Floor North Wing Govardhan Building Opp NCC Group Headquaters Chittoor Road Cochin 682035 India Kochi Datavideo Technologies Europe BV Floridadreef 106 3565 AM Utrecht The Netherlands Tel 31 30 261 96 56 Fax 31 30 261 96 57 E mail info datavideo nl Netherla...

Отзывы: