


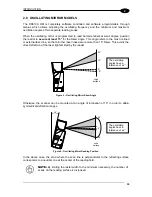


INTRODUCTION
29
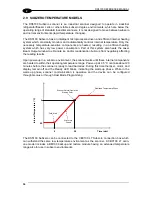
2
2.5 AUTOMATIC SCANNER REPLACEMENT
This parameter allows single scanner replacement to take place automatically (at power on
time only) whenever a scanner substitution is made. Data for the Automatic Scanner
Replacement are stored in the backup memory [BM100 Backup Module or QLMxxx
Gateway]. To correctly activate the Automatic Scanner Replacement feature follow these
steps:
Master/Slave Configuration:
1. Connect to the Master and properly configure all of the scanners in your system
according to your application needs.
2. Enable the Automatic Scanner Replacement parameter on the Master, then Send the
configuration to the Master.
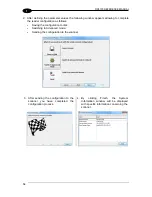
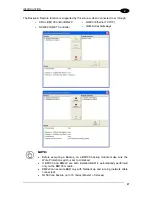
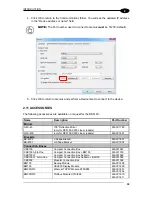
3. Backup the complete network configuration by selecting Backup & Restore in the
Device drop-down list from the Genius menu.
4. Get the Masters' configuration and verify that the Automatic Scanner Replacement
parameter is enabled.
The Automatic Scanner Replacement is now enabled. If any network scanner (Master
or Slave) is ever replaced by a new one (which must be set to the Default
Configuration or have the proper node address) the Automatic Scanner Replacement
feature will be performed.
Other Configuration:
1. Connect to the scanner and properly configure it according to your application needs.
2. Enable the Automatic Scanner Replacement parameter, then Send the configuration
to the scanner.
3. Backup the configuration by selecting Backup & Restore in the Device drop-down list
from the Genius menu.
4. Get the configuration and verify that the Automatic Scanner Replacement parameter
is enabled.
The Automatic Scanner Replacement is now enabled. If the scanner is ever replaced
by a new one (which must be set to the Default Configuration), the Automatic Scanner
Replacement feature will be performed.
NOTE 1: The Automatic Scanner Replacement feature can only be performed at power up (either
Master or Other: Stand Alone) and only one scanner at a time can be replaced.
NOTE 2: Once the Automatic Scanner Replacement has been activated, the Restore feature is also
available.
NOTE 3: Once the Automatic Scanner Replacement has been activated, it will be forced if a "Reset
Scanner to Factory Default" procedure is performed (by pressing and holding the X-PRESS
button at power-up).
NOTE 4: Once the Automatic Scanner Replacement has been activated, it can be disabled only by
Erasing the Backup content from the backup memory or by backing up a configuration once
the Automatic Scanner Replacement parameter has been disabled.
Содержание DS5100-X200
Страница 1: ......
Страница 29: ...RAPID CONFIGURATION 13 1 b Operating mode selection and definition a Digital Inputs configuration ...
Страница 30: ...DS5100 REFERENCE MANUAL 14 1 b Digital Outputs configuration c Hardware interface selection ...
Страница 62: ...DS5100 REFERENCE MANUAL 46 3 Figure 18 DS5100 OM Serial Model Overall Dimensions ...
Страница 78: ...DS5100 REFERENCE MANUAL 62 4 Figure 38 ID NET Network Connections with isolated power blocks ...
Страница 79: ...ELECTRICAL INSTALLATION 63 4 Figure 39 ID NET Network Connections with Common Power Branch Network ...
Страница 80: ...DS5100 REFERENCE MANUAL 64 4 Figure 40 ID NET Network Connections with Common Power Star Network ...
Страница 97: ...TYPICAL LAYOUTS 81 5 7 Double click on the DS5100 scanner to configure it ...
Страница 163: ...147 X X PRESS Human Machine Interface 23 ...
Страница 164: ......


