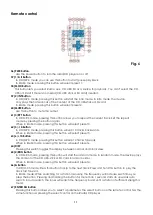
background image


12 

68) ◄ Button 

       In CD/MP-3 mode: Press this button to skip to the beginning of the track. Press and hold this button to  
       play the track fast backwards.  
       In Radio mode: While searching for a station manually. The frequency will decrease each time you  
       press the button. Pressing and holding the button for more than 1 second starts a downward auto  
       search. In auto search, the tuner will search the frequency band until a station with sufficient strength  
       is found.    

69) VOL+/Menu Button  

      This button allows you to increase parameter values (e.g. Volume, bass etc). It has the same effect as  
      turning the Select Control to the right. 

70) VOL-/Menu Button  

      This button allows you to decrease parameter values (e.g. Volume, bass etc). It has the same effect  
      as turning the Select Control to the left. 

71) ST/MO Button 


      Press this button to switch between Mono or Stereo mode. Functional only in radio mode. 

72) LOUD Button 


      Press this button and use the + and – buttons to switch the loudness function on or off. The loudness  
      increases the bass and treble frequencies and is very useful at low volume levels to give you a fatter    
      sound. 

73) LOC/DX Button 

      Press this button and use the + and – buttons to select Local mode. In Local mode, the tuner will only  
      store the strongest (local) stations in memory. Works only in radio mode. 

74) SCAN Button 
      

While in radio mode,


pressing this button will show all preset radio stations. 
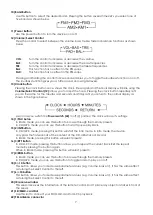
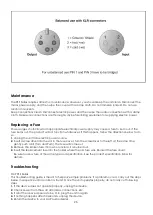
75) ID3/Band Button 
     

 Use this button to select the desired band. Pressing the button several times let’s you select one of  

      five bands as shown below.  


76) APS/SEARCH Button 
      

Pressing and holding this button for more than 3 seconds starts ASM. If ASM activated, the PSS will  

      scan the FM band for stations and automatically store them in memory. If you decide to exit ASM  
      before the search is finished, press the ASM button again. 
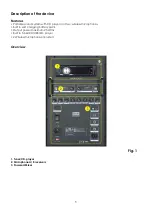


Installation 

Remove all packing materials from the CD Player. Check that all foam and plastic padding is removed. 
Connect all cables. 

Always disconnect from electric mains power supply before cleaning or servicing. 
Damages caused by non-observance are not subject to warranty.


Set Up and Operation


Before plugging the unit in, always make sure that the power supply matches the product specification 
voltage. The power supply is printed on the back of the device. 
Do not attempt to operate an 115V specification product on 230V power, or vice versa.


Connections 

1.

 Turn off the 

Power

 switch.  

2.

 Connect the PSS to your other devices you plan on using.  

 
CAUTION: Be sure that the power is off, when connecting the cables. 
 

Operating on AC power 

• Make sure the 

Power (43)

 switch is in Off (middle) position and connect the power cable. 

• Switch the 

Power (43)

 switch in position I to run the PSS. The 

Power (43)

 LED will light green. 


Содержание PSS-108 MKII

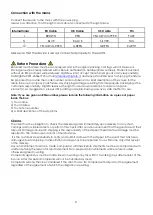
Страница 1: ...PSS 108 ORDERCODE D2603 v2 PSS 110 ORDERCODE D2604 PSS 112 ORDERCODE D2605 ...

Страница 2: ...dio for more excellent audio products We design and manufacture professional audio equipment for the entertainment industry New products are being launched regularly We work hard to keep you our customer satisfied For more information iwant dap audio info You can get some of the best quality best priced products on the market from DAP Audio So next time turn to DAP Audio for more great audio equip...

Страница 3: ...wer 13 Charging the built in batteries 13 Changing the built in batteries 13 CD MP3 Operations 13 Loading a CD 13 Unloading CD s 13 CD s MP3 discs USB sticks SD MMC cards 13 Selecting Tracks 13 Starting Playback 13 Stop Playback 14 Pausing 14 Operating of the wireless microphones 14 Inserting changing the battery 14 Tips for achieving maximum performance 14 Before switching off the power 14 Approv...

Страница 4: ...volved with the installation operation and maintenance of this system has to be qualified follow the instructions of this manual Before you initial start up please make sure that there is no damage caused by transportation Should there be any consult your dealer and do not use the system To maintain perfect condition and to ensure a safe operation it is absolutely necessary for the user to follow ...

Страница 5: ...r cord or signal cable or select the input mode switch Extreme frequency boosts in connection with a high input signal level may lead to overdriving your equipment Should this occur it is necessary to reduce the input signal level by using the input control Avoid ground loops Always be sure to connect the power amps and the mixing console to the same electrical circuit to ensure the same phase If ...

Страница 6: ...hod to use Note If you are given an RMA number please include the following information on a piece of paper inside the box 1 Your name 2 Your address 3 Your phone number 4 A brief description of the symptoms Claims The client has the obligation to check the delivered goods immediately upon delivery for any short comings and or visible defects or perform this check after our announcement that the g...

Страница 7: ...ystem with CD player and two wireless microphones Built in self charging battery pack Output power maximum 25 Wrms Built in Tuner CD USB SD player 2 Wireless microphones included Overview Fig 1 1 Tuner CD player 2 Microphone A B receivers 3 Powered Mixer ...

Страница 8: ...emory If you decide to exit APS before the search is finished press the APS button again 5 F Skip Button In CD MP 3 mode Press this button to skip to the next track In Radio mode While searching for a station manually The frequency will increase each time you press the button Pressing and holding the button for more than 1 second starts a forward auto search In auto search the tuner will search th...

Страница 9: ...er switch 42 in off 0 position the clock will lose it s settings 14 1 PAU buton In Radio mode you can use this button to browse through the memory presets In CD MP 3 mode you can use this button to start pause playback 15 2 INT Button In CD MP 3 mode pressing this button will start the intro mode In intro mode the device only plays the first seconds of the content of the CD USB stick or SD card In...

Страница 10: ...ncoming audio signal 28 Channel A RF indicator Lights if the carrierwave of the wireless microhone is received 29 Channel A Volume control Used to adjust the output level of channel A 30 Channel B Volume control Used to adjust the output level of channel B 31 Channel B RF indicator Lights if the carrierwave of the wireless microhone is received 32 Channel B Audio level indicator Indicates the leve...

Страница 11: ...nbalanced RCA Stereo Line level input 43 Power ON OFF CHARGE switch Position I is on position II is charge in between position is off 44 Power LED Lights green if the device is powered on Lights orange if the batteries run low in case of battery Power 45 Charge LED Blinks if the built in battery is being charged Light continuously if the battery is 100 charged 46 AC Inlet with integrated fuse hold...

Страница 12: ... level jack output 50 MIC 1 unbalanced microphone jack input 51 MIC 2 unbalanced microphone jack input 52 MIC 3 Combo balanced unbalanced microphone input Wireless Microphone Fig 6 53 Microphone On LED The red LED will light up shortly if the microphone is turned on 54 Power On switch Use this switch to turn the microphone On or Off 55 Battery compartment Access the battery compartment by removing...

Страница 13: ...skip 10 tracks backwards When in Radio mode pressing this button will select preset 5 63 6 10 Button In CD MP 3 mode pressing this button will skip 10 tracks forwards When in Radio mode pressing this button will select preset 6 64 DISP Pressing this switch toggles the display between normal and clock view 65 4 RDN Button In CD MP 3 mode pressing this button will start the random mode In random mod...

Страница 14: ...emory Works only in radio mode 74 SCAN Button While in radio mode pressing this button will show all preset radio stations 75 ID3 Band Button Use this button to select the desired band Pressing the button several times let s you select one of five bands as shown below 76 APS SEARCH Button Pressing and holding this button for more than 3 seconds starts ASM If ASM activated the PSS will scan the FM ...

Страница 15: ...front panel Hold the disc by the edges and push it gently in the Disc slot 22 The Disc will now be loaded automatically 2 Unloading CD s Press the Release 7 button to open the front panel Press the Eject 24 button The playback will stop and the disc will be ejected If the movement of the disc stops take the disc by the edges and remove it completely from the slot Caution Do not place any foreign o...

Страница 16: ...d adjust the location of the receiver If dead spots remain mark the dead spots and avoid them Before switching off the power When you have finished using the CD player Press the Eject 24 button When the disc is completely ejected take out the disc without using force Now you can safely switch off the power CAUTION Do not try to insert the disc when the power is off Do not switch off the power whil...

Страница 17: ...land Finnish Communications Regulatory Authority FICORA www ficora fi France Autorité de Régulation des Télécommunications ART www art telecom fr Germany Die Bundesnetzagenturie B www bundesnetzagentur de Greece National Telecommunications Commission EET www eett gr Hungary Communication Authority HIF www hif hu Iceland Post and Telecom Administration PTA www pta is Ireland Commission for Communic...

Страница 18: ...A11 2008 This certificate is issued by Highlite International B V Name Address Vestastraat 2 6468 EX Kerkrade The Netherlands This is the result of tests carried out on those 14 March 2011 samples of the product referred to above which were submitted for testing in accordance with Date the specification for the respective standards The certificate holder has the right to fix the mark which shows t...

Страница 19: ... 61000 3 2 EN 61000 3 3 This certificate is issued by Highlite International B V Name Address Vestastraat 2 6468 EX Kerkrade The Netherlands This is the result of tests carried out on those samples of the product referred to above which 19 March 2011 were submitted for testing in accordance with Date the specification for the respective standards The certificate holder has the right to fix the mar...

Страница 20: ...nal B V Name Address Vestastraat 2 6468 EX Kerkrade The Netherlands This is the result of tests carried out on those 01 March 2011 samples of the product referred to above which were submitted for testing in accordance with Date the specification for the respective standards The certificate holder has the right to fix the mark which shows the segment onto each individual product in the series to w...

Страница 21: ... A11 2008 This certificate is issued by Highlite International B V Name Address Vestastraat 2 6468 EX Kerkrade The Netherlands This is the result of tests carried out on those 14 March 2011 samples of the product referred to above which were submitted for testing in accordance with Date the specification for the respective standards The certificate holder has the right to fix the mark which shows ...

Страница 22: ...N 61000 3 2 EN 61000 3 3 This certificate is issued by Highlite International B V Name Address Vestastraat 2 6468 EX Kerkrade The Netherlands This is the result of tests carried out on those samples of the product referred to above which 19 March 2011 were submitted for testing in accordance with Date the specification for the respective standards The certificate holder has the right to fix the ma...

Страница 23: ...onal B V Name Address Vestastraat 2 6468 EX Kerkrade The Netherlands This is the result of tests carried out on those 01 March 2011 samples of the product referred to above which were submitted for testing in accordance with Date the specification for the respective standards The certificate holder has the right to fix the mark which shows the segment onto each individual product in the series to ...

Страница 24: ... A11 2008 This certificate is issued by Highlite International B V Name Address Vestastraat 2 6468 EX Kerkrade The Netherlands This is the result of tests carried out on those 14 March 2011 samples of the product referred to above which were submitted for testing in accordance with Date the specification for the respective standards The certificate holder has the right to fix the mark which shows ...

Страница 25: ...N 61000 3 2 EN 61000 3 3 This certificate is issued by Highlite International B V Name Address Vestastraat 2 6468 EX Kerkrade The Netherlands This is the result of tests carried out on those samples of the product referred to above which 19 March 2011 were submitted for testing in accordance with Date the specification for the respective standards The certificate holder has the right to fix the ma...

Страница 26: ...onal B V Name Address Vestastraat 2 6468 EX Kerkrade The Netherlands This is the result of tests carried out on those 01 March 2011 samples of the product referred to above which were submitted for testing in accordance with Date the specification for the respective standards The certificate holder has the right to fix the mark which shows the segment onto each individual product in the series to ...

Страница 27: ...hem This gives the advantage of increasing their life and reliability Periodically check your cables A great number of problems faulty contacts ground hum discharges etc are caused entirely by using unsuitable or faulty cables Headphones Unbalanced mono Balanced mono Insert Compensation of interference with balanced connections ...

Страница 28: ...ver into the slot in the fuse cover Turn the screwdriver to the left at the same time gently push a bit Turn and Push The fuse will come out 3 Remove the broken fuse If brown or unclear it is burned out 4 Insert the replacement fuse into the holder where the old fuse was Reinsert the fuse cover Be sure to use a fuse of the same type and specification See the product specification label for details...

Страница 29: ...puts 3x Mic 44dB 1x Stereo Aux 14dB Outputs 1x Tape Rec 8 5dB 1x Line Out 8 5dB EQ High 12 kHz 12dB EQ Low 80 Hz 12dB SNR 66dB Dimensions HxWxD 485 x 298 x 260 mm Wireless microphones Carrier frequency 195MHz 15kHz 202MHz 15kHz RF output 10dBm Frequency deviation 3kHz Spurious rejection 45dBc Modulation deviation 15kHz THD 1 Frequency response 50Hz 20kHz Low battery indication 6 5V 7V Red LED ligh...

Страница 30: ...nputs 3x Mic 44dB 1x Stereo Aux 14dB Outputs 1x Tape Rec 8 5dB 1x Line Out 8 5dB EQ High 12 kHz 12dB EQ Low 80 Hz 12dB SNR 66dB Dimensions HxWxD 605 x 350 x 305 mm Wireless microphones Carrier frequency 195MHz 15kHz 202MHz 15kHz RF output 10dBm Frequency deviation 3kHz Spurious rejection 45dBc Modulation deviation 15kHz THD 1 Frequency response 50Hz 20kHz Low battery indication 6 5V 7V Red LED lig...

Страница 31: ...gh 12 kHz 12dB EQ Low 80 Hz 12dB SNR 66dB Dimensions HxWxD 605 x 355 x 300 mm Wireless microphones Carrier frequency 195MHz 15kHz 202MHz 15kHz RF output 10dBm Frequency deviation 3kHz Spurious rejection 45dBc Modulation deviation 15kHz THD 1 Frequency response 50Hz 20kHz Low battery indication 6 5V 7V Red LED lights up Power consumption 45mA 9V Design and product specifications are subject to chan...

Страница 32: ...2011 Dap Audio ...

Отзывы: