background image


11 

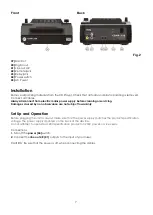
42. Remote jack 

      Use a 3,5mm mono jack cable to connect this input to a fader start output on a mixer for remote  
      control of the 

play/pause (13)

 button. 

43. Relay jack 

      Use a 3,5mm mono jack cable to connect the relay jacks of two CDMP-750’s to enable relay play. 

44. Power switch 


This is the main power


switch. Press to turn the device on.


45. 

Mains Cord 

      Connect the CDMP-750 to a 230Vac wall socket only. 


Operations 


Loading a CD 

Hold the disc by the edges and push it gently in the 

disc slot (39)

. The Disc will now be loaded 

automatically.        
 

Unloading CD’s 

1. The disc can't be ejected during playback. Stop the playback first. 
2. Press the 

eject (24)

 button. The disc will be ejected.  

3. If the movement of the disc stops, take the disc by the edges and remove it completely from the slot. 
 

CAUTION:  

• Do not place any foreign objects in the disc slot and do not try to place more than one disc in the disc   
   Slot at a time.  
• Do not push the disc in manually when the power is off, as this may result in malfunction and may  
   damage the player. 
 

Selecting tracks 

• Dial the 

edit (3)

 encoder clockwise to move to a higher track number. 

• Dial the 

edit (3)

 encoder counterclockwise to move to a lower track number.


• When a new track is selected during playback, playback begins as soon as the skip search operation is  
   completed. 
• If you dial the 

edit (3)

 encoder clockwise while at the last track, the first track will be selected. In the  

   same way, if you dial the 

edit (3)

 encoder counterclockwise while at the first track, the last track will  

   be selected. 


Starting playback  

• Push the 

play/pause (13) 

button during the pause or cue condition to start playback mode, the  


play/pause (13) 

button lights up green.


• The point at which playback starts is automatically stored in the memory as the cue point. The CD    
   Player returns to the cue point when the 

cue (11)

 button is pressed. 


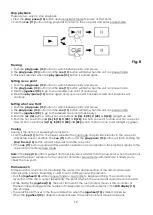
Fig. 7 


Содержание CORE CDMP-750

Страница 1: ...CDMP 750 ORDERCODE D1155 Highlite International B V Vestastraat 2 6468 EX Kerkrade The Netherlands...

Страница 2: ...P Audio for more excellent audio products We design and manufacture professional audio equipment for the entertainment industry New products are being launched regularly We work hard to keep you our c...

Страница 3: ...s 11 Unloading CD s 11 Selecting tracks 11 Starting playback 11 Stop playback 12 Pausing 12 Setting a cue point 12 Setting a hot cue Point 12 Cueing 12 Frame search 12 Scanning fast forward fast backw...

Страница 4: ...on and to ensure a safe operation it is absolutely necessary for the user to follow the safety instructions and warning notes written in this manual Please consider that damages caused by manual modif...

Страница 5: ...t use fuses of same type and rating only WARRANTY Till one year after date of purchase OPERATING DETERMINATIONS This system is not designed for permanent operation Consistent operation breaks will ens...

Страница 6: ...ged due to shipping Transportation damage has to be reported to us within one day after receipt of the delivery Any return shipment has to be made post paid at all times Return shipments must be accom...

Страница 7: ...8 16 100 Electronic anti shock buffer 15 seconds Seamless loop function Beat related auto loop function Scratch function Cue function 5 digital BPM related effects 4 memories for hotloops or cues Prog...

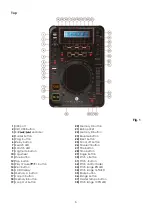
Страница 8: ...ct button 8 Scratch LED 27 Title button 9 Jogmode button 28 Time button 10 Jogwheel 29 Single button 11 Cue button 30 Pitch Button 12 Tap button 31 Pitch Button 13 Play Pause button 32 Pitch control f...

Страница 9: ...g or servicing Damages caused by non observance are not subject to warranty Set Up and Operation Before plugging the unit in always make sure that the power supply matches the product specification vo...

Страница 10: ...12 Frame search 8 Scratch LED Indicates the CDMP 750 is in scratch mode In scratch mode you can use the jogwheel for scratch effects 9 Jog mode button Pushing the jog mode button allows you to select...

Страница 11: ...list is running MT Lights up when performing master tempo function RELOOP Lights up when performing the loop function BPM Shows BPM value AUTO Indicates that the AUTO BPM function is activated 16 Memo...

Страница 12: ...ader upwards to decrease the pitch move the fader downwards to increase the pitch 33 Range 8 LED Indicates that the maximum range for the pitch control fader 32 is 8 34 Range 16 LED Indicates that the...

Страница 13: ...s in the disc slot and do not try to place more than one disc in the disc Slot at a time Do not push the disc in manually when the power is off as this may result in malfunction and may damage the pla...

Страница 14: ...2 which contain a cue point will light up green Cueing Cueing is the action of preparing for playback Push the Cue 11 button the player will enter the cue mode the playback returns to the cue point An...

Страница 15: ...espectively while the pushing the pitch bend 30 of pitch bend 31 button 2 The BPM increase depends on how long you hold the button If you hold the button for about 5 seconds the BPM will go either to...

Страница 16: ...the loop play function is canceled the LOOP indicator dims Creating a hot loop Creating a hot loop is the action of storing the current loop in one of the four hot loop memories 1 If you have already...

Страница 17: ...ways store the disc in the jewel case to protect from dirt or damage Do not place discs in the following areas 1 Areas exposed to face sunlight for a considerable time 2 Areas subject to accumulation...

Страница 18: ...C 230V 50Hz Power Consumption 20W Operating temperature 5 C 35 C Weight 2729g Dimensions 427 L 345 W 221 H mm MP3 Format DISC USB Devices Applicable file extensions MP3 mp3 Mp3 mP3 File Systems Compat...

Страница 19: ...2011 Dap Audio...

Отзывы: