8
Functions
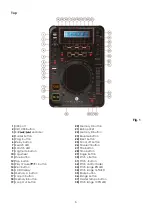
NAMES AND FUNCTIONS
Below is a description of the functions of the controls.
1.
USB port
Use this port to connect a USB stick or an external hard disk. The USB port is only active when you’re in
USB mode.
Note:
The CDMP-750 can handle a maximum of 2 Tbyte, 999 folders and 999 files.
2.
CD/ USB
button
Use this button to select CD mode or USB mode.
3.
Edit / encoder
This encoder has a dual function, in normal mode dialing the encoder clockwise, allows you to skip a
track forwards, dialing counterclockwise will skip a track backwards.
Depending on the mode you are in, the edit encoder can also be used for: adjusting the loop length,
selecting folders or selecting a playlist format.
Clicking the edit encoder allows you to enter certain parameters. For more info, see the chapter on
operations on page 11 – 14.
4. Folder button
Push this button to open the folder menu. While in the folder menu
Folder
will appear in the display.
Select a folder by rotating the
edit (3)
encoder and open the folder by pushing the
edit (3)
encoder.
5.
Prog button
This button allows you to toggle the program mode on or off. See page 13,
Program play
.
6. Relay button
Pushing this button allows you to toggle the relay mode on or off. If the FX section is switched in, this
button allows you to toggle between
gain
and
parameter
.
7. Search LED
Indicates the CDMP-750 is in search mode. See page 12,
Frame search
.
8. Scratch LED
Indicates the CDMP-750 is in scratch mode. In scratch mode, you can use the jogwheel for scratch
effects.
9.
Jog mode button
Pushing the jog mode button allows you to select search mode indicated by the
search (7)
LED,
scratch mode, indicated by the
scratch (8)
LED or normal
(no LED lit). If no mode is active,
the jogwheel is in pitch bend mode. If there is no
jogwheel (10)
action while in search mode or
scratch mode for 10 seconds, the unit will return to normal (pitch bend) mode.
10.
Jogwheel
The jogwheel is used for setting cues, scratch effects and performing a fast search depending on
the mode the unit is in.
11.
Cue
button
Push this button during playback to return to the position at which playback started.
12.
Tap button
Tap this button to determine the BPM of the music manually.
Push and hold this button to start auto BPM mode.
13.
Play/ Pause
button
This button allows you to toggle between pause mode and playback mode.
14. Memo Loop/Cue button
Pushing this button allows you to store a Hot Loop or a Hot Cue.
Pushing and holding the
memo loop/cue (14)
button and dialing the
jogwheel (10)
allows you to set
the length of the auto Loop.
After the auto loop length is set up, the
memo loop/cue (14)
button will light up, indicating the unit is
ready to execute the auto loop playback. Pushing the
loop in (17)
button will automatically start
and finish a loop with the length previously set up. The bar length of auto loop can be selected from
1/32 to 32/1. During loop playback, dialing the
edit (2)
encoder allows you to (re)adjust the loop
length.


