6
Commissioning (RF models only)
If the thermostat and the receiver have been supplied together in
a combined pack, the units have been paired in the factory and no
commissioning is required (RX1 only).
To tune the RX receiver to the frequency of the thermostat signal, follow
steps 1-5 below.
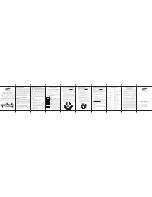
Step 1 TP5001-RF
Reset the unit by pressing the recessed
reset button.
Step 2
Press and hold
V and +
buttons for 3
seconds (TP5001-RF now transmits unique
signal continuously for 3 minutes).
Step 3 RX1
Press and hold buttons
PROG and CH1
for
3 seconds until green light fl ashes once.
Step 4 RX2 (if applicable)
Stat 1 - perform steps 1-3 and 5.
Stat 2 - perform steps 1-2 and then press
PROG and CH2 on RX2.
RX3 (if applicable)
Stat 1 - perform steps 1-3 and 5.
Stat 2 - perform steps 1-2 and then press
PROG and CH2 on RX3 then
step 5.
Stat 3 - perform steps 1-2 and then press
PROG and CH3 on RX3.
Step 5 TP5001-RF
Press
V or
Λ
to select temperature - the unit will revert back to operating
mode.
I M P O R T A N T
To ensure that the factory programmes are set and the micro-
computer is operating correctly it is essential that you press and
hold the RESET button before you begin any commissioning or
programming.
Installa
tion Instruc
tions
GB
Содержание TP5001 series
Страница 40: ...40 RF TP5001 TP5001 RF TP5001M 2 5 75 C 2 1 C 1 15 15 30 100 UA...
Страница 41: ...41 TP5001 1 2 3 L N D E S1 S2 A M 230 1 5 2 DIL 1 2 UA...
Страница 42: ...42 TP5001 TP5001 TP5001 TP5001A TP5001MA 1 2 3 TP5001 TP5001 RF RESET D E UA...
Страница 44: ...44 RF RX1 RX 1 5 1 TP5001 RF reset 2 V 3 TP5001 RF 3 3 RX1 PROG CH1 3 4 RX2 1 1 3 5 2 1 2 PROG CH2 RX2 RESET UA...
Страница 45: ...45 RX3 1 1 3 5 2 1 2 PROG CH2 RX2 5 3 1 2 PROG CH3 RX3 5 TP5001 RF V TP5001 TP5001 UA...
Страница 46: ...46 a V PROG 3 b V PROG 5 c V d RUN PROG UA...
Страница 47: ...47 30 30 V 40 5 C 30 C 31 31 V 5 40 C 5 C 32 32 V 0 1 33 33 V 0 1 UA...
Страница 48: ...48 34 34 V 0 3 3 6 6 9 9 12 12 35 34 3 6 9 12 PI 35 V 2 5 2 5 5 5 10 10 36 36 V 0 1 2 C 2 UA...
Страница 49: ...49 38 38 V 0 1 37 36 1 2 37 V 0 1 1 2 2 3 3 4 4 40 2 4 6 40 V 1 2 4 6 UA...
Страница 50: ...50 70 DIL 1 70 V 0 1 71 24 230 2 90 71 V 0 1 41 5 2 24 5 2 24 41 V 5 2 5 2 24 24 UA...
Страница 51: ...51 81 1 5 K 81 V 1 5 0 C 74 74 V 0 1 73 73 V 000 999 000 72 72 V 00 99 Factory setting is 00 UA...
Страница 52: ...52 90 A 90 V 0 1 2 93 3 94 93 A 90 2 93 V 2 C F10 20 50 C 27 C UA...
Страница 53: ...53 94 A 90 3 94 V 0 1 UA...