background image


 58


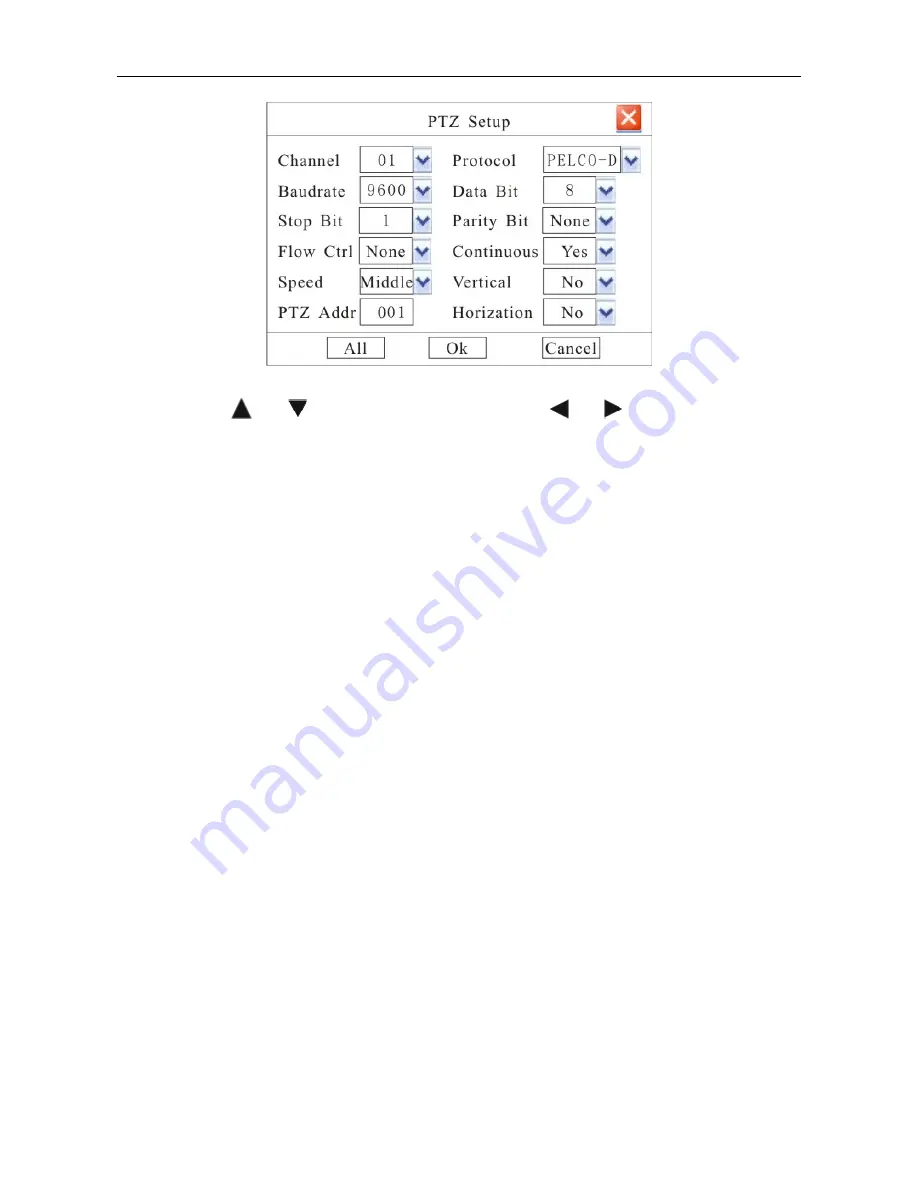
Fig. 53 

Move cursor with 

 and 

  on the front panel and select item with 

 and 

¾


Channel number:

 connect channel number of decipherer 

¾


RS-485 parameters:

 Including baudrate, data bit, stop bit, parity bit, flow control, etc. These parameters 

must be the same as those of PTZ Protocol. 

¾


PTZ Addr: 

Each PTZ has one different address. Default system configuration: 001. 

¾


Protocol: 

DVR had the following PTZ protocol: PELCO-D

PELCO-P2

PELCO-P1

W110

P3

PLD

ENKEL

YAAN

SONY

JC4116

PD-NW

PD-CONST

PIH-1016

KRE301

PELCO9760

LILIN

T3609HD

HD600

KTD

SAMSUNG

ELEC

PANASONIC

FASTRAX

DL-0001. 

¾


Speed: 

PTZ turning speed. 

¾


Vertical:

 Reverse PTZ’s vertical field. 

¾


Horization: 

Reverse PTZ’s horizontal field. 

In the course of setting up the parameters, if the parameters needed to be set the same in all channels, you can 

select ‘

ALL

’ after finishing the setup of parameters of one channel. The system will pop-up a dialog box. When 

pressing ‘

OK

’, parameters setup for all channels will be achieved. 

Serial Port


PTZ can be controlled by 485(1) or 485(2) port in   type 16 channel m

odel. 

Enter “Main Menu

Advanced

Serial ” as shown in Fig.54. 

Содержание dv-dvr404d

Страница 1: ...alone Multi channel Digital Video Recorder User Instruction Manual VERSION 1 0 Before attempting to connect or operate this product please read these instructions carefully and save this manual for future use ...

Страница 2: ...service personnel or system installers The connections should comply with local electrical code The lightning flash with arrowhead symbol within an equilateral triangle is intended to alert the user to the presence of uninsulated dangerous voltage within the product s enclosure that may be of sufficient magnitude to constitute a risk of electric shock to persons The exclamation point within an equ...

Страница 3: ...e maintenance of the product for the cases including but not limited to below 1 Any damage and loss including without limitation direct or indirect special consequential or exemplary arising out of or relating to the product 2 Personal injury or any damage caused by inappropriate use or negligent operation of the user 3 Unauthorized disassemble repair or modification of the product by the user 4 A...

Страница 4: ... drive is easily affected by heat used at high temperature characteristically It is recommended to use this unit at temperatures between 20 30 68 86 It is possible to damage it if it is moved while it motor is still running Do not move it just after turning it power on or off for around 30 seconds A lifetime of hard disk drive is limited by use It is recommended to replace it after around 18000 ho...

Страница 5: ... indicated on the manufacturer s label Special Note If you need to change the TIME DATE always clear the Hard Drive If you don t follow this step first it may cause erratic behaviour of the DVR and possible loss of recordings 1 It is recommended to use the same manufacturer when installing Hard Drives 2 When backing up data if there is any other data in USB disk please save it otherwise the origin...

Страница 6: ...e wide blade or the third prong are provided for your safety If the provided plug does not fit into your outlet consult an electrician for replacement of the obsolete outlet z Protect the power cord from being walked on or pinched particularly at plugs convenience receptacles and the point where they exit from the apparatus z Only use attachments accessories specified by the manufacturer z Use onl...

Страница 7: ...tion 22 Section 1 DVR Front Panel 22 Ⅰ type 4 channel model and Ⅱ type model 22 Ⅰ type 16 channel model 23 Ⅲ type model without LCD 25 Ⅲ type model with LCD 26 Section 2 IR remote device optional 28 Section 3 Mouse operation 29 Section 4 Input mode introduction 30 Chapter IV System operation 32 Section 1 Menu Navigation 32 Section 2 Surveillance View 33 Status Bar 33 Screen Switch 34 Screen Circul...

Страница 8: ...3 Display Setup 56 Section 14 PTZ Setup 57 Serial Port 58 PTZ Control 60 Section 15 Restore Defaults Setting 61 Section 16 Information Inquiry 62 Log Information 62 Version Information 62 User Information 63 Section 17 System Update 63 Section 18 Reset 64 ChapterⅤ IE Monitor 65 Section 1 Introduction 65 Section 2 Installation Requirements 65 Section 3 Network Connection Operation 65 Section 4 Basi...

Страница 9: ...8 Rec Alarm 71 Local Setup 72 Advance Setup 72 Remote control 74 Chapter Ⅵ Frequency Asked Questions 75 Appendix 1 HDD Capability Calculate 76 ...

Страница 10: ...he operation modes and performance criteria of our stand alone H264 DVR Please read the manual carefully before using the DVR and install the system according to the instructions Mainframe software is subject to renewal without prior notice Ⅰ type 4 16 channel model for synchronize video and audio Ⅱ type 4 8 video channel and 1 audio channel input model Ⅲ type ATM special model ...

Страница 11: ...8 channel model support 1CH playback for CIF resolution Support FAT32 files system Support backup the recorded files Support USB memory USB HDD Support cycle or none cycle record 3 Control Support exception alarm motion detection alarm external alarm etc Support user authority setting the authority distribute to each channel respectively 4 Network Support TCP IP protocol DHCP PPPoE DDNS Support E ...

Страница 12: ... 10 to 55 Humidity 10 to 95 Power Supply AC100 240V 50 60Hz Please pay particular attention to the following Keep away from heat sources and high temperatures and avoid direct sunlight Do not leave in humid places and never touch with wet hands Never spill liquids of any kind on the unit The unit is only to be opened by qualified persons Do not place other equipment on the DVR Section 2 HDD Instal...

Страница 13: ...et using supplied mounting screws 4 Replace HDD mounting bracket 5 Connect the ATX power cable to the power connection on the HDD Pay attention to the correct orientation 6 Plug HDD cable into SATA port on HDD 7 Plug HDD cable into SATA port on the main board After installed Ⅰ type 4 channel model and Ⅱ type model should be as fig 3 ...

Страница 14: ...13 Fig 3 After installed Ⅲ type model should be as fig 4 Fig 4 After installed Ⅰ type 16 channel model should be as fig 5 ...

Страница 15: ... 6 No Interface Connection Description 1 A IN Audio input connect simulate audio input device standard BNC interface 2 V IN Video input connect simulate video input device standard BNC interface 3 A OUT Audio output connect audio output device standard BNC interface Active device is requested while exporting audio 4 V OUT Video output connect monitor local video signal output 5 RS485 port connect ...

Страница 16: ...ternatively taken 11 power supply DC 12V 12V volts D C input Note 1 Active device is requested while using intercom function and output audio 2 For this model the audio output ports are the same ports for the intercom Back panel of Ⅱ type model Fig 7 No Interface Connection Description 1 2 V IN Video input connect simulate video input device standard BNC interface 3 A IN Audio input connect simula...

Страница 17: ...deo Input V IN BNC input 3 Normal editions are for audio input Loop editions are for video loop output AIN V OUT Normal edition DVR connect to audio input device standard BNC connector Loop out edition DVR connect to video matrix and monitor standard BNC connector 4 Matrix output MATRIX BNC for Matrix output RS485 port connect RS485 device details refer to Section 5 PTZ pan tilt and zoom control c...

Страница 18: ...RS485 2 is set as default If you want to use 485 1 port for PTZ control please setup as following Menu Network Serial Port Setup PTZ Port Port1 R R are receivers of RS485 connect to keyboard DK 204X keyboard for example This DVR can only use 485 1 port for DK 204X Remark 2 4 digit code switch definition When the pin 1 and 4 are put in OFF position display will be set as PAL format When the pin 1 a...

Страница 19: ...m control connection Alarm input ALARM IN connect alarm input device 8CH details refer to Section 4 External alarm in out connection 5 Alarm output ALARM OUT connect alarm output device 2CH details refer to Section 4 External alarm in out connection 6 VGA interface connect VGA display device such as PC VGA display 7 RS 232 connector Connect RS 232 device modem and PC for example 8 RJ45 connector U...

Страница 20: ...s 4 ports for alarm input 8 CH series DVR has 8 ports for alarm input 16 CH series DVR has 16 ports for alarm input Fig 11 Note external input voltage can not be higher than 5V Alarm out Alarm output is NO NC output Ⅰ type 4 channel model and Ⅱ type model has 1 CH alarm output Ⅲ type model provides 2 CH alarm output and Ⅰ type 16 channel model has 4 CH alarm output When NO1 and COM1 was off the al...

Страница 21: ...ith the Rx Rx on PTZ or High Speed Dome After all the above connection please enter the PTZ menu to setup camera and PTZ address baud rate PTZ protocol After the setup click icon on the status bar to enter the PTZ control interface Also you can run the DVR_WEB software or Netclient to control PTZ About the DVR_WEB setting please refer Chapter Ⅴ Note t Ⅰ ype 16 channel model support 485 1 and 485 2...

Страница 22: ...d on audio output of DVR About the DVR_WEB setting please refer ChapterⅤ NOTE 1 Ⅰ type 16 channel model and Ⅱ type model s intercom is independent 2 Ⅰ type 4 channel model and Ⅲ type model s intercom input will take up the channel 1 audio input intercom output is audio output port 3 Active device is requested while using intercom function for Ⅰ type 4 channel model and Ⅲ type model Other type mode...

Страница 23: ...eceive indicator flashing when control this DVR with IR controller ALARM Alarm indicator flashing when alarm is activated Record indicator Corresponding channel record indicator it lights when corresponding channel is recording Backup Backup indicator lighting constantly when backup is working 1 Direction key UP 2 Display the status bar in preview mode 1 Direction key DOWN 2 Hide the status bar in...

Страница 24: ...setting Entry the backup menu Pop up the dialogue box of manual recording 1 Entry search and playback interface 2 Pause Play recording file under playback mode Stop playback Jump backward under playback mode Jump forward under playback mode Entry input interface Ⅰ type 16 channel model Fig 19 Name specification Power switch POWER Power indicator lighting constantly when connected power RUN Working...

Страница 25: ... number 3 in input mode window 4 1 Number key 4 Corresponds relevant letter 2 Select pane 4 in cover area setting 3 input number 4 in input mode window 5 9 1 Number key 5 9 Corresponds relevant letter 2 input number 5 9 in input mode window 10 Plus 10 Channel auto switching sequencing 1 Entry Handle Record interface 2 Light control in PTZ mode 3 Switch the input method in input mode interface 1 Pl...

Страница 26: ...eiver POWER Power indicator lighting constantly when connected power HDD HDD indicator flashing when access HDD date ALARM Alarm indicator flashing when alarm is activated RUN Working indicator flashing after boot normally 1 4CH record indicator Corresponding channel record indicator it lights when corresponding channel is recording Entry search and playback interface Entry input interface Menu En...

Страница 27: ...ver area setting 4 input number 1 in input mode window 2 1 Number key 2 Corresponds relevant letter 2 Motion and Shelter area disable 3 Select pane 2 in cover area setting 4 input number 2 in input mode window 3 1 Number key 3 Corresponds relevant letter 2 Select pane 3 in cover area setting 3 input number 3 in input mode window 4 1 Number key 4 Corresponds relevant letter 2 Select pane 4 in cover...

Страница 28: ...n preview mode 1 Direction key DOWN 2 Hide the status bar in preview mode Direction key LEFT Direction key RIGHT 1 4 screen display or channel 1 full screen 2 Motion and Shelter area enable 3 Select pane 1 in cover area setting 1 4 screen display or channel 2 full screen 2 Motion and Shelter area disable 3 Select pane 2 in cover area setting 1 4 screen display or channel 3 full screen 2 Select pan...

Страница 29: ...ER button will realize the function NOTE Press ID in IR remote controller then input 000 in Remote Control Address Set will control all DVRs in the effective range The defaulted host address is 001 the value field among 001 255 It can be modified in the Main Menu Advanced General IR remote device for Ⅰ type 4 channel model Ⅱ type model and Ⅲ type model as follows Fig 22 Refer to the section of DVR...

Страница 30: ...mouse cursor will appear on the screen Note Ⅰ type 16 channel model and Ⅲ type model plug the USB mouse into either of the USB ports User Login Right click on screen and a pop up login box will appear Move cursor to the password input frame double click left key of mouse to enter the input box click relevant character to input the password then click ENTER or right click to reserve and exit Entry ...

Страница 31: ...ally then click icon to switch image Full Screen Image when multi screen display move mouse cursor to a channel double click mouse left key to view Full screen double click again will back full screen to multi screen Section 4 Input mode introduction Input mode interface of Ⅰ type 4 channel model Ⅱ type model and Ⅲ type model DVR support three input modes number capital and lowercase letter input ...

Страница 32: ...ouse to click 123 to change input modes click and to move cursor click Select to confirm selection click Clear to delete the character in front of cursor Right click to quit the input dialog In the input interface press key on the front panel to change input methods press number key to input numbers uppercase lowercase and Chinese press key to confirm selection press key to delete the character in...

Страница 33: ...e control number system time menu alpha VGA resolution auto logout circular monitor NTP time format setup and video format display User Add and delete user modify password set user rights Display Channel name modification and display system time display cover area setup video parameters setup PTZ Communication parameters PTZ address PTZ protocol setup Network IP address host port DHCP PPPoE and DD...

Страница 34: ...nformation Online Check online user information force kick online user Section 2 Surveillance View Status Bar Fig 26 Status bar button function definition Icon Function Entering main menu Split screen mode switch Entering Manual Record dialog Entering Playback dialog Mute mode and cancel mute mode ...

Страница 35: ... have the second split screen full screen press to have the third split screen full screen press to have the forth split screen full screen When the first split screen is the full screen press to return to 4 screen so do the other 3 buttons Ⅱ type 8 channel model Under the surveillance mode system defaults 9 screen press display the first channel in full screen mode press again display the second ...

Страница 36: ... system enters single screen mode Auto switch will be displayed on the status column Press again and the sequence mode will be canceled The Auto switch on the status column will disappear Section 3 Login and Logout System Login Press any key of front panel system will pop up the login interface as shown in Fig 27 Please select a user in User Login then move cursor to password input box and press o...

Страница 37: ...o logout the system Method 2 Set Auto Logout as ON in Main Menu Advanced General and input idle time then system will auto lock keyboard if no command input within the time set Section 4 System Reboot Shutdown Method 1 Press on front panel then the shutdown interface will pop up DVR will be Shutdown after inputting the username and the password correctly Method 2 Enter Main Menu Advanced Maintenan...

Страница 38: ...Main Menu Advanced General as shown in Fig 29 Fig 29 Move cursor with and on the front panel and select item with and System Time Press or to get into input interface for time inputting Time Format Setting the time format and DST Please refer Fig 30 ...

Страница 39: ...arate them automatically Note Time position of realtime monitoring screen is unalterable Channel Name Setup and Display Enter Main Menu Advanced Display In the interface channel name and display location can be modified Modify channel name move cursor to Name item box Press or on front panel to enter text input interface then channel name can be defined with uppercase or lowercase letter number an...

Страница 40: ...ame When you access DVR remotely you can find all the DVR intuitively by their names If you want to modify the DVR name please move cursor to DVR name edit box and press or key to enter into input mode Note Ⅰ type 16 channel model can get into input interface by while other model by Details refer to section 4 chapter Ⅲ NTP time Select NTP time as On you can entry NTP service setup to set service a...

Страница 41: ...re are following options 800 600 1024 768 and 1280 1024 Default 1024 768 Section 7 HDD Management HDD State Inquiry Enter Main Menu Rec Alarm HDD as shown in Fig 32 Fig 32 Move cursor with and on the front panel and select item with and Auto Overwrite Select it and it will overwrite the earliest recording when HDD is full HDD Alarm HDD alarm will activate once the capacity of HDD is lower than a v...

Страница 42: ...ter Main Menu Rec Alarm HDD to setup Auto Overwrite function whether activate overwrite function when HDD is full Select on then system will overwrite the earliest recording when HDD is full Section 8 Recording Record Parameter Setup Enter Main Menu Rec Alarm General as shown in Fig 34 Fig 34 Move cursor with and on the front panel and select item with and ...

Страница 43: ...ork bandwidth If you select CBR DVR will use the fixed bit rate to compress image Frame Rate Frame per second Default frame rate 25 Quality Define the image quality There are 5 options Basic Medium Good High and Best High image quality needs high bit rate size Default quality High In the course of setting up the parameters if the parameters needed to be set the same in all channels you can select ...

Страница 44: ... red circle of status bar as shown in the following Fig36 Fig 36 Please refer Status Bar section Schedule Recording Enter Main Menu Rec Alarm Schedule as shown in Fig 37 Fig 37 Move cursor with and on the front panel and select item with and Channel Number Select a channel for setup All After setup one channel Apply this strategy to all channels Calendar yy mm dd can be chose on the left of Calend...

Страница 45: ...d to holiday setting Apply Press Apply to save setting temporarily if need to set multiple recording periods For example set recording periods in 2008 10 20 and press Apply then other recording period could be set in the same menu without exit Press OK to save all setting permanently NOTE Only press OK to save all setting permanently without lost when power is blackout Press Apply to save temporar...

Страница 46: ...m as shown in Fig 39 Fig 39 Move cursor with and on the front panel and select item with and Record Duration Length of recording whenever alarm or motion detection is activated Default length 10 minutes Pre record Time Activate pre record function including OFF 5s 15s 25s 30s Default pre record time OFF Note The max pre record time of Ⅱ type 8 channel model is 5S External Alarm Input Setting Enter...

Страница 47: ...ted Default length 10 seconds Schedule Enter Alarm Schedule interface to setup alarm period in which system will activate relevant disposal mode such as buzzer alarm related channel full screen display alarm output relevant channel recording if alarm has triggered Alarm schedule setting is the same as schedule recording setting please refer Schedule Recording section Motion Detection Video Lost Vi...

Страница 48: ... can be selected to display as full screen Alarm Out Activate alarm out or not Schedule Enter Alarm Schedule interface to setup alarm period in which system will activate relevant disposal mode such as buzzer alarm related channel full screen display alarm output relevant channel recording if alarm has triggered Alarm schedule setting is the same as schedule recording setting please refer Schedule...

Страница 49: ...on Ⅰ type 16 channel model and Ⅱ type 8 channel model support 1CH playback for CIF resolution Card ID Ⅲ type model support card ID search and other model haven t this option Search Search the matched recorded files and display them in the list box If there is not matched file NO RECORD will be displayed in the list box Playback Playback the recorded stream directly based on the time section File L...

Страница 50: ...d files type to get expected record files Backup Plug the USB storage device into the USB port marked Press or on the front panel to enter search interface Note Ⅰ type 16 channel model and Ⅲ type model plug the USB mouse into either of the USB ports In searching box after moved cursor to a certain record section use left or right button to choose the section signal will show on select box right be...

Страница 51: ...cord can be played by Media player directly after backup and need not to install any other plug in software Note 1 USB device and DVR may be damaged if USB device falls off during backup 2 Do not connect more than 2 USB storage devices to one DVR Section 10 Network Setup Enter Main Menu Advanced Network as shown in Fig 42 Static DHCP Fig 42 Move cursor with and on the front panel and select item w...

Страница 52: ...ess must be identical Use the Gateway address first Server Port and Server IP If you set this IP and port when there is alarm and exception happened DVR will send information to that host IP DNS Please set DNS as local network supplier s IP when DVR is accessed from WAN PPPoE Set DNS as local network supplier s IP in Network Setup interface Then select PPPoE as shown in Fig 43 Fig 43 Please Enable...

Страница 53: ...lier is dyndns org and the registered domain name is user dyndns org you can input user in Host name option Username and Password user name and password registered in supplier s website Section 11 Net Transfer Parameter Setup Enter Main Menu Advanced Transfer as shown in Fig 45 Fig 45 Move cursor with and on the front panel and select item with and Channel number select relevant channel to setup ...

Страница 54: ... use high bit rate In this case DVR can save HDD usage and network bandwidth If you select CBR DVR will use the fixed bit rate to compress image Frame Rate Frame per second Default frame rate 25 Quality Define the image quality There are 5 options Basic Medium Good High and Best High image quality needs high bit rate size Default quality Good In the course of setting up the parameters if the param...

Страница 55: ... menu as shown in Fig 47 Fig 47 Press or key to enter into input mode then you can input the username The Viewer s default authority information view playback all channels and monitor all channels The operator s default authority PTZ control record management information view set parameter tools playback all channels and monitor all channels PS Detail refer to Authority Setup Setup the password fo...

Страница 56: ...ogin as Admin you can setup the rights for new users Use and key to move cursor to the corresponding right items press and key to enable or disable the item After you finish press Enter button the user s rights will be saved If you press Cancel button the user s rights will be aborted Fig 50 Authority PTZ Ctrl PTZ control Rec Manage General schedule and alarm recording parameter setting Start Stop...

Страница 57: ...sers password and Normal user only can modify himself password After input 3 times wrong password system will be locked by itself and warning do not allowed to login any more Only Administrator can add user in DVR Normal user do not allow add any user And can not add same name user in one DVR Only Administrator can delete user Normal user do not allow Administrator can not be deleted Only Administ...

Страница 58: ... pane is the shelter area After you finish setup press ESC key to exit Video Parameters You can adjust brightness contrast hue and saturation to get the best video image You can use and key to adjust and can find the video image will be changed at the same time Range from00 to 99 In the course of setting up the parameters if the parameters needed to be set the same in all channels you can select A...

Страница 59: ...N SONY JC4116 PD NW PD CONST PIH 1016 KRE301 PELCO9760 LILIN T3609HD HD600 KTD SAMSUNG ELEC PANASONIC FASTRAX DL 0001 Speed PTZ turning speed Vertical Reverse PTZ s vertical field Horization Reverse PTZ s horizontal field In the course of setting up the parameters if the parameters needed to be set the same in all channels you can select ALL after finishing the setup of parameters of one channel T...

Страница 60: ...4X can works only when it s connected to R R in 485 1 port PTZ can be controlled by RS485 or RS232 port in Ⅲ type model Fig 55 Fig 56 PTZ Port You should select the RS485 when the RS485 port is connected to PTZ And you should select the RS232 when the RS232 port is connected When temperature or humidity transducer is connected user can set the parameter in fig 56 If the display value is inconsiste...

Страница 61: ...he middle of direction button Set preset position In PTZ control mode select Setup to enter preset position setup dialog interface as shown in Fig 58 Fig 58 Choose Preset to setup or call the corresponding preset 001 is an order of preset positions and click Set to set a preset position click Call to move PTZ to a preset position Cruise Setup Choose Cruise and get into the interface as follows ...

Страница 62: ...lighting and screen wiper PTZ can be controlled on DVR_WEB or Netclient The detail refer to Chapter 5 For Ⅰ type 16 channel model PTZ control interface can be shown by press Fn on front panel Section 15 Restore Defaults Setting Enter Main Menu Advanced Maintenance Reset as shown in Fig 61 Fig 61 Move cursor with and on the front panel and select item with and Select a item to restore default setti...

Страница 63: ...tem with and Input start time and stop time and then move cursor to Search button and press ENTER key to start searching Type include Alarm A Operate O Abnormal E and All When searching is finished DVR will list all information You can press Previous or Next key to view more information Version Information Enter Main Menu Information Version as shown in Fig 63 ...

Страница 64: ...ting Previous and Next Section 17 System Update Method 1 You can update system through DVR_WEB Internet or Netclient About the DVR_WEB setting please refer ChapterⅤ Method 2 You can use this function to upgrade the firmware 1 Create a file with a name of update in the USB storage and copy the firmware file to this directory and rename it with special file name DVR Model Ⅰ type 4 channel model Ⅱ ty...

Страница 65: ...g the flash memory during the entire system updating process Section 18 Reset Under logout status press and simultaneously for 1 second then Reset menu will pop up Input correct password and press OK then system will pop up Reset Item box Select items in this menu and press OK to reset Fig 66 Fig 67 PS The function is not for type 16 channel model Ⅰ Note Please call your distributor for the passwo...

Страница 66: ... higher Install DirectX9 0 or higher version adjust hardware acceleration to highest Section 3 Network Connection Operation 1 Insure DVR connect the network correctly 2 Using ping DVR IP check if the network connect correctly 3 Make sure Web client net normally used the user has to insure http port communicate normally 4 Install the DVR_WEB_X XX XX msi in CD X XX XX is version number 5 Input http ...

Страница 67: ...age through click the Local Setup Language at the lower right corner on the main interface The main interface shown as Fig 69 Fig 69 The main interface includes the following module 1 Login logout 2 Switch the image view scale 3 Video display 4 Shortcut operation 5 Menu setup The user connect the Host have the limitation see the following a Login user number support max 16 users login together at ...

Страница 68: ...port is the host s port not the http 3 The user can operate the video connect display remote setup only after login the system 4 The subtitle auto change Login to Logout after login the operation authority auto cancel after logout Switch the image view scale Click the image view scale button on right top of the main interface fig 69 mark can switch the scale at 4 3 and 16 9 Video Display Area Oper...

Страница 69: ...the default button restore to the default 4 Local record local image snap every split screen has the hover shortcut status bar on the top Provide local record and local image snap function PTZ Control Open the surveillance channel control the PTZ by control the PTZ Control status bar on the main interface right Shown as Fig71 Fig 71 1 Preset point setting preset point available value 001 127 diffe...

Страница 70: ...area Full Split screen switch 1 Split screen 1 screen 4 screen 9 screen by click the screen split button 2 Screen split button will choose channel number by judging the equipment channel number As shown fig72 the 9 screen button unavailable when the equipment has 4 channels 8CH DVR can switch to 9 screen 16CH DVR can switch to 16 screen Fig 72 External alarm switch 1 Open close relevant alarm by c...

Страница 71: ...rmation Rec Alarm Local Setup Advance Setup and Remote Control modules Recording And Playback 1 Click entry Search Playback interface 2 Searching record select the start time channel number model click Search finds out the qualified record 3 Record playback select the record slice in the search result double click this slice or drag this slice to the selected area Or press Play play the record at ...

Страница 72: ...c Alarm interface setup the remote DVR recording configuration reference to Recording Section8 ChapterⅣ 1 Basic record setup setup the channel resolution rate rate type frame rate image quality and auto record cover 2 Schedule record setup setup the channel schedule record time user can choose today daily weekly monthly 3 Alarm record setup setup record time alarm time pre record alarm input relev...

Страница 73: ...ick entry Advance Setup interface These configurations are corresponding to the Advance Setup in the menu in DVRs 1 System configuration take reference at Basic Parameter Setup Section6 ChapterⅣ 2 Channel configuration take reference at Display Setup Section13 ChapterⅣ 3 Network Parameters including startup DHCP IP address Subnet mask Gateway Net card speed ports host MAC sits get PPPoE setup http...

Страница 74: ...oo email box SMTP is SMTP MAIL YAHOO COM support the IP input and DN domain name Input SMTP server ports Usually 25 e Authority select ON OFF Start SMTP email AMF Authentication Management Function avoid to abuse the email server f User name password sender address Email title etc user could write it as they like sender address could be virtual address When the alarm operation abnormal triggered i...

Страница 75: ...n provide DVR system image file update web software update remote DVR reboot restore default factory default export Remote system configuration import remote system configuration shutdown system and download Player plug ins Player plug in The plug in named H264ax exe can be downloaded from host end and installed on PC Then the record file can be played by Media Player immediately ...

Страница 76: ...ection If the HDD is not detected by DVR the recording will sure not working 2 Please check whether there is available space of HDD left If not Please replace the HDD or set Yes in Rec Alarm HDD Auto Overwrite 5 Cannot choose options in menu Please confirm that you possess the rights Please login as Admin to check the rights 6 Please DO NOT modify the system time or format HDD while recording 7 Ac...

Страница 77: ...egsvr32 scrrun dll Press the enter 12 Connect DVR through DVR_WEB if the icon or caption can not be displayed you should close the IE and then install the DVR_WEB_X XX XX msi which burned in CD X XX XX is version number Appendix 1 HDD Capability Calculate 1 Required HDD capacity for one channel one hour unit Mbyte HDD capacity bit rate 8 3600 1024 The unit of bit rate is Kbit s 2 Required one chan...

Страница 78: ...help to save valuable resources and prevent any potential negative effects on human health and the environment which could otherwise arise from inappropriate waste handling Please contact your local authority for further details of your nearest designated collection point Penalties may be applicable for incorrect disposal of this waste in accordance with national legislation For business users in ...

Отзывы: