background image

Uploading Bitmap Images to the All Sport CG

25

B  Uploading Bitmap Images to the All Sport CG

Requirements

•  All Sport CG and power adapter
•  Computer loaded with HyperTerminal, 

Tera Term, or similar application 

•  One open serial (COM) port (or USB-to-

Serial adaptor and one open USB port)

•  Serial cable with DB9 female to DB9 male 

(modem or straight-through cable)

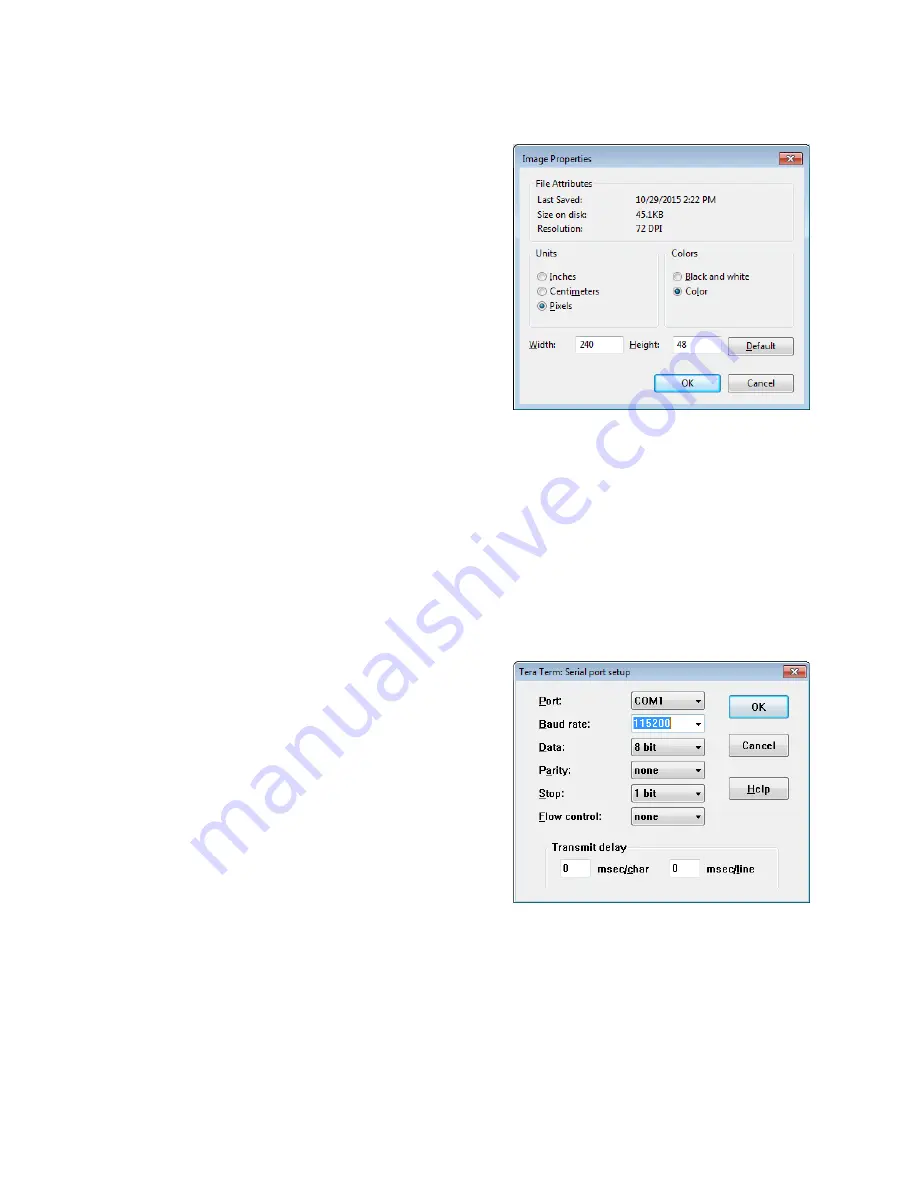
•  Bitmap File (.bmp) created using the 

parameters shown in 

Figure 6

•  Go to 

Start > All Programs > 

Accessories > Paint

•  Click the 

Paint

 button and select 

Properties

.

• 

Save the file as 

24-bit Bitmap

.

TeraTerm Procedure
1� 

Ensure the All Sport CG has been disconnected from the All Sport console. If there is 

a wireless radio connection, power off the All Sport console to ensure the devices do 

not automatically connect.

2� 

Connect the serial cable between a COM port on the computer (or USB-to-Serial 

adaptor) and the 

CONTROL

 port on the All Sport CG. 

3� 

Apply power to the All Sport CG using the supplied adapter and wait for “LOOKING 

FOR ALL SPORT” to appear on the LCD. 

4� 

Open Tera Term, and go to 

Setup > Serial 

Port Setup

.

5� 

Set up the port as described below and as 

shown in 

Figure 7

• 

Port:

 the serial (COM) port that the All 

Sport CG is connected to

• 

Baud rate:


115200

• 

Data:


8 bit

• 

Parity:


none

• 

Stop:


1 bit

• 

Flow control:


none

• 

Transmit delay:


0, 0

Click 

OK

 when finished.

6� 

Press 

[Enter]

 on the keyboard. “Unknown command” appears with “AllSportCG>” 

underneath to indicate proper connection of the computer and All Sport CG.

Figure 6: 

Bitmap Properties

Figure 7: 

Tera Term Serial Port Setup

Содержание P1314

Страница 1: ...201 Daktronics Drive Brookings SD 57006 5128 www daktronics com support 800 325 8766 ALL SPORT CG HD OPERATION MANUAL P1314 DD3199099 Rev 05 27 August 2021 ...

Страница 2: ...No part of this book covered by the copyrights hereon may be reproduced or copied in any form or by any means graphic electronic or mechanical including photocopying taping or information storage and retrieval systems without written permission of the publisher Daktronics trademarks are property of Daktronics Inc All other trademarks are property of their respective companies ...

Страница 3: ... Wire Connection 4 Wireless Radio Connection 4 Radio Connection Status 5 No All Sport Connection 5 Data Broadcast Unit 5 3 Operation 6 Menu Options 6 New Game 6 Home and Guest Team Names 6 Alpha Numeric Keypad Insert 6 Select Sport 7 Select Mode 7 Select Input 7 Overlay Location 7 Automatic Mode 8 Manual Mode 8 Scoring 8 Timing 8 Baseball 9 Ball 9 Strike 9 Out 9 Runs 9 Inning 9 At Bat 10 Batter Nu...

Страница 4: ... Deuce 14 Set 14 Select Court 14 Volleyball 14 Home Guest Serve 14 Sets Won 14 Set 14 Wrestling 15 Team Score 15 Match Score 15 Period 15 4 Troubleshooting 16 Troubleshooting Table 16 Replacement Parts 16 5 Daktronics Exchange and Repair Return Programs 17 Exchange Program 17 Repair Return Program 18 Daktronics Warranty Limitation of Liability 18 A Reference Drawings 19 B Uploading Bitmap Images t...

Страница 5: ...shipping damage such as rattles and dents and verify that all equipment is included as itemized on the packing slip Immediately report any problems to Daktronics save all packing materials if exchange is necessary Resources Figure 1 illustrates a Daktronics drawing label This manual refers to drawings by listing the last set of digits In the example the drawing would be referred to as DWG 1007804 ...

Страница 6: ...d live over the Internet The connection between the All Sport controller and the All Sport CG can be either wire or radio The radio option allows for more flexibility and fewer physical connections an All Sport CG with the radio option can still use a wire connection as a backup if desired System Requirements The All Sport CG system requires the following additional components sold separately High...

Страница 7: ... optional radio kits DATA DB9 M Receives the game in progress information from the All Sport controller via a direct wire connection CONTROL DB9 F Receives firmware upgrade information also used to output TV data feeds and upload custom graphics Refer to Appendix B POWER Receives power via power adapter Figure 3 All Sport CG Top View Power Connection The All Sport CG receives power from a standard...

Страница 8: ...l between the All Sport CG and the All Sport controller All Sport CG used manually no All Sport controller required Wire Connection For a wire connection game in progress data is sent through a cable from the 1 4 phone jack J1 J2 or J3 on the back of the All Sport 5000 or 5500 controller to the 9 pin DATA port on top of the All Sport CG Wireless Radio Connection When the wireless radio option is u...

Страница 9: ... may be used This 2RU rack mount unit Figure 4 provides up to 8 serial data outputs to third party character generators The All Sport CG slides out of the front for easy access to the keypad Wired current loop signal from the All Sport terminates at the TB31 terminal block Alternately fiber optic signal from a current loop to fiber converter not provided by Daktronics may be terminated at the fibe...

Страница 10: ...the team up to 10 characters After entering a team name press ENTER EDIT to save HOME TEAM NAME ENTER TO MODIFY HOME TEAM NAME _OME These menu items can be set in both Automatic and Manual modes Note Team names must be configured on the All Sport CG when it is used in Manual mode The All Sport 5000 and 5500 controllers can output team names as part of the data transferred to the All Sport CG Alpha...

Страница 11: ... order to receive game data from the control console When the All Sport CG is set to Automatic the output data cannot be changed by using the keypad The mode needs to be set to Manual in order to operate the All Sport CG when a control console is not available Also the mode can be switched to Manual at any time to override and ignore the data from a connected controller Select Input Press ENTER ED...

Страница 12: ...to all sports include MENU and and navigation Each sport also has buttons with specific functions as described in the following sections Scoring Each sport has two to six buttons on the keypad insert used for keeping score Press these buttons to increment or add to the score by the value printed on the insert To decrement or subtract points from the home team press CLEAR ALT then HOME SCORE 1 1 To...

Страница 13: ...ll information Out Press OUT 1 1 to increment the out number Press CLEAR ALT followed by OUT 1 1 to decrement the out number Press ENTER EDIT followed by OUT 1 1 to edit the number of outs Use the keypad to type in the value and then press ENTER EDIT again to save Runs Press GUEST RUNS 1 1 or HOME RUNS 1 1 to increment the number of runs for the respective team Press CLEAR ALT followed by GUEST RU...

Страница 14: ...LEAR HIT ERROR to remove all error and hit information Basketball The following buttons and functions are unique to the basketball sport mode Basketball Scoring Output Team Fouls Press HOME FOULS 1 1 or GUEST FOULS 1 1 to increment the number of team fouls for the respective team Press CLEAR ALT followed by HOME FOULS 1 1 or GUEST FOULS 1 1 to decrement the number of team fouls for the respective ...

Страница 15: ...o decrement the down number Press ENTER EDIT followed by DOWN 1 1 to edit the down number Use the keypad to type in the value and then press ENTER EDIT again to save Yards To Go Press YARDS TO GO to edit the number of yards for a first down Use the keypad to type in the value and then press ENTER EDIT to save Possession Press CLEAR ALT followed by HOME SCORE 6 POSS or GUEST SCORE 6 POSS to set the...

Страница 16: ...od number Use the keypad to type in the value and then press ENTER EDIT again to save Note The shot clock only appears in AUTOMATIC MODE for lacrosse when using sport codes 4602 4603 4702 or 4703 Soccer The following buttons and functions are unique to the soccer sport mode Soccer Scoring Output Shots On Goal Press either home or guest SHOTS ON GOAL 1 1 to increment the number of shots on goal for...

Страница 17: ...er of games won for the top or bottom Press CLEAR ALT followed by GAMES WON 1 1 in the appropriate TOP or BOTTOM key group to decrement the number of games won for the top or bottom Press ENTER EDIT followed by GAMES WON 1 1 in the appropriate TOP or BOTTOM key group to edit the number of games won for the top or bottom Use the keypad to type in the value and then press ENTER EDIT again to save Re...

Страница 18: ...splayed in the lower right corner of the LCD Volleyball The following buttons and functions are unique to the volleyball sport mode Volleyball Scoring Output Home Guest Serve Press SERVE under the appropriate team to turn the serve on or off Sets Won Press SETS WON 1 1 under the appropriate team to increment the number of sets won Press CLEAR ALT followed by SETS WON 1 1 under the appropriate team...

Страница 19: ... respective team by 1 Press HOME MATCH 2 3 or GUEST MATCH 2 3 to increment the match score for the respective team by 2 Press CLEAR ALT followed by HOME MATCH 2 3 or GUEST MATCH 2 3 to increment the match score for the respective team by 3 Press CLEAR ALT followed by HOME MATCH 1 1 or GUEST MATCH 1 1 to decrement the match score for the respective team Press ENTER EDIT followed by any MATCH key to...

Страница 20: ...rt CG Check the connection between the All Sport CG and the recording device Ensure the video input supports 720p HDMI to DVI converters are not supported Ensure the video equipment is ON and working Refer to the video equipment user s manual for further troubleshooting Video does not record Ensure the recording device is ON and working Refer to the recording device user s manual for further troub...

Страница 21: ...___________________________ Daktronics Customer ID Number ______________________________________________________ To participate in the Exchange Program follow these steps 1 Call Daktronics Customer Service United States Canada 1 800 DAK TRON 325 8766 Outside the U S Canada 1 605 275 1040 2 When the new exchange part is received mail the old part to Daktronics If the replacement part fixes the prob...

Страница 22: ...ent damage during shipment Electronic components such as printed circuit boards should be placed in an antistatic bag before boxing Daktronics does not recommend using packing peanuts when shipping 4 Enclose name address phone number the case number a clear description of symptoms 5 Ship to Daktronics Customer Service Case 201 Daktronics Drive Dock E Brookings SD 57006 Daktronics Warranty Limitati...

Страница 23: ...garding how to read the drawing number Any contract specific drawings take precedence over the general drawings Reference Drawings Quick Install Guide All Sport CG HD DWG 3192029 Truck Dock Data Broadcast Schematic DWG 3642883 Schematic Truck Dock Data Broadcast 1 RU Shelf DWG 4252992 ...

Страница 24: ...This page intentionally left blank ...

Страница 25: ...BLE COMPUTER TV BY OTHER W 2316 2 METER HDMI CABLE W 2316 2 METER HDMI CABLE COMPUTER TV SDI HDMI HDMI SDI CONVERTER KIT 0A 1314 0012 OPTIONAL VIDEO CONVERSION SETUP CONTROL 0A 1314 0009 ALL SPORT CG HD WITH RADIO RECEIVER 720P VIDEO ONLY 720P VIDEO ONLY 720P VIDEO ONLY A 3430138 18VDC WALL PACK 120VAC REQUIRED A 3430138 18VDC WALL PACK 120VAC REQUIRED A 3430138 18VDC WALL PACK 120VAC REQUIRED 8 P...

Страница 26: ...TA PIN 5 GROUND W 3644184 W 3644182 1 RED BLK 2 SIGNAL IN CUR LOOP SIGNAL TB 31 T 1034 WALL PACK TRANSFORMER WITH HARNESS D 120VAC RECEPTACLE REQUIRED SIGNAL OUT RED 3 BLK 4 J9 J10 J2 J3 J4 J5 J6 J7 J8 J1 W 3644182 W 3644182 W 3644182 W 3644182 W 3644182 W 3644182 W 3644182 HARNESS B HARNESS E HARNESS A HARNESS D TB31 DESCRIPTION HARN 0A 1196 0282 DATA BROADCAST SHELF HARNESS SHELF HARNESS 1 1 2 2...

Страница 27: ...SHELF MRUFER 29 JUN 19 P1196 E 10 B NONE HBONER 4252992 02 VDC VDC BLACK WITH LIGHT BLACK DASHES BLACK WITH RIDGES FRONT VIEW REAR VIEW POWER 120VAC 240VAC ES 249 RS 232 BROADCAST DATA CONVERTER FIELD INSTALLED ES 249 RS 232 BROADCAST DATA CONVERTER FIELD INSTALLED REAR VIEW OF ES 249 NOT ACTUAL BUT FOR ILLUSTRATION PURPOSES ONLY INPUT 1 2 3 4 8 7 6 5 OUTPUTS NOTES 1 HAVE ALL9 PIN CABLES CONNECTED...

Страница 28: ...This page intentionally left blank ...

Страница 29: ...eless radio connection power off the All Sport console to ensure the devices do not automatically connect 2 Connect the serial cable between a COM port on the computer or USB to Serial adaptor and the CONTROL port on the All Sport CG 3 Apply power to the All Sport CG using the supplied adapter and wait for LOOKING FOR ALL SPORT to appear on the LCD 4 Open Tera Term and go to Setup Serial Port Setu...

Страница 30: ...ces are communicating on 57600 baud rate 10 Type in BD and press Enter on the keyboard The message Transfer file now will appear 11 Go to File Transfer XModem Send 12 Navigate to the bitmap image file created with the parameters shown in Figure 7 and click Open 13 Once the progress bar is complete press Enter on the keyboard AllSportCG appears again to indicate the file transfer is complete 14 Dis...

Страница 31: ...Daktronics Warranty Limitation of Liability 27 C Daktronics Warranty Limitation of Liability This section includes the Daktronics Warranty Limitation of Liability statement SL 02374 ...

Страница 32: ...This page intentionally left blank ...

Страница 33: ...ty per Incoterms 2020 otherwise End User shall pay transportation charges to return the Equipment back to the End User and such Equipment shall be shipped Ex Works Daktronics designated facility per Incoterms 2020 All returns must be pre approved by Daktronics before shipment Daktronics shall not be obligated to pay freight for any unapproved return End User shall pay any upgraded or expedited tra...

Страница 34: ... Daktronics or M paint or refinishing the Equipment or furnishing material for this purpose 3 Limitation of Liability A Daktronics shall be under no obligation to furnish continued service under this Warranty if alterations are made to the Equipment without the prior written approval of Daktronics B It is specifically agreed that the price of the Equipment is based upon the following limitation of...

Страница 35: ...ration of this warranty Alternatively an Extended Service Agreement may be purchased in conjunction with this Warranty for extended additional services For further information contact Daktronics Customer Service at 1 800 DAKTRONics 1 800 325 8766 Additional Terms applicable to sales outside of the United States The following additional terms apply only where the installation site of the Equipment ...

Страница 36: ...This page intentionally left blank ...

Отзывы: