background image

46 

MAN# 650814 


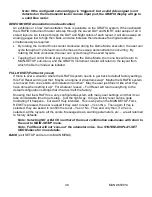
HOLD: CLEAR - This will clear the warning box, stops the LED flash and ALSO 

– clears 

the warning in the Message Area. 


If the WARN LED condition is NOT 

acknowledged with a ‘tap’ or cleared with a ‘hold’, the 

LED will flash 3 times as mentioned, and the box will clear automatically in 10 seconds.  In 
approximately 45 seconds the Warn LED sequence above will repeat 

– until the driver 

acknowledges the 

warning with a ‘tap’, clears the warning by ‘holding’ the Control Knob, or 

the fault condition goes away. 


Note:  

A single ‘tap’ will NOT clear the warning in the Message Area, but if the user 

holds the Control Knob, the message area will be cleared….and a warning box or 
Warn LED will not reoccur unless the condition goes away and another subsequent 
fault is detected.  

This ‘hold’ to clear is the same operation used for clearing any 

warning, trip mileage, performance info, etc. in the Message Area. 


Note:  Even if the WARN LED is cleared above but the root cause is not addressed 
on the system, the ‘warning indication’ will remain on the respective reading as a 
warning indicator 

‘dot’ on an analog gauge or as a ‘red background’ of a digital 

reading.  Of course for these to be viewable, the reading has to be displayed in the  
current layout. 


BACK:  Will exit the WARN sub-menu 


GFORCE (GFORCE meter setup) 

The GRAFIX system comes standard with a built-in accelerometer.  This allows the measuring 
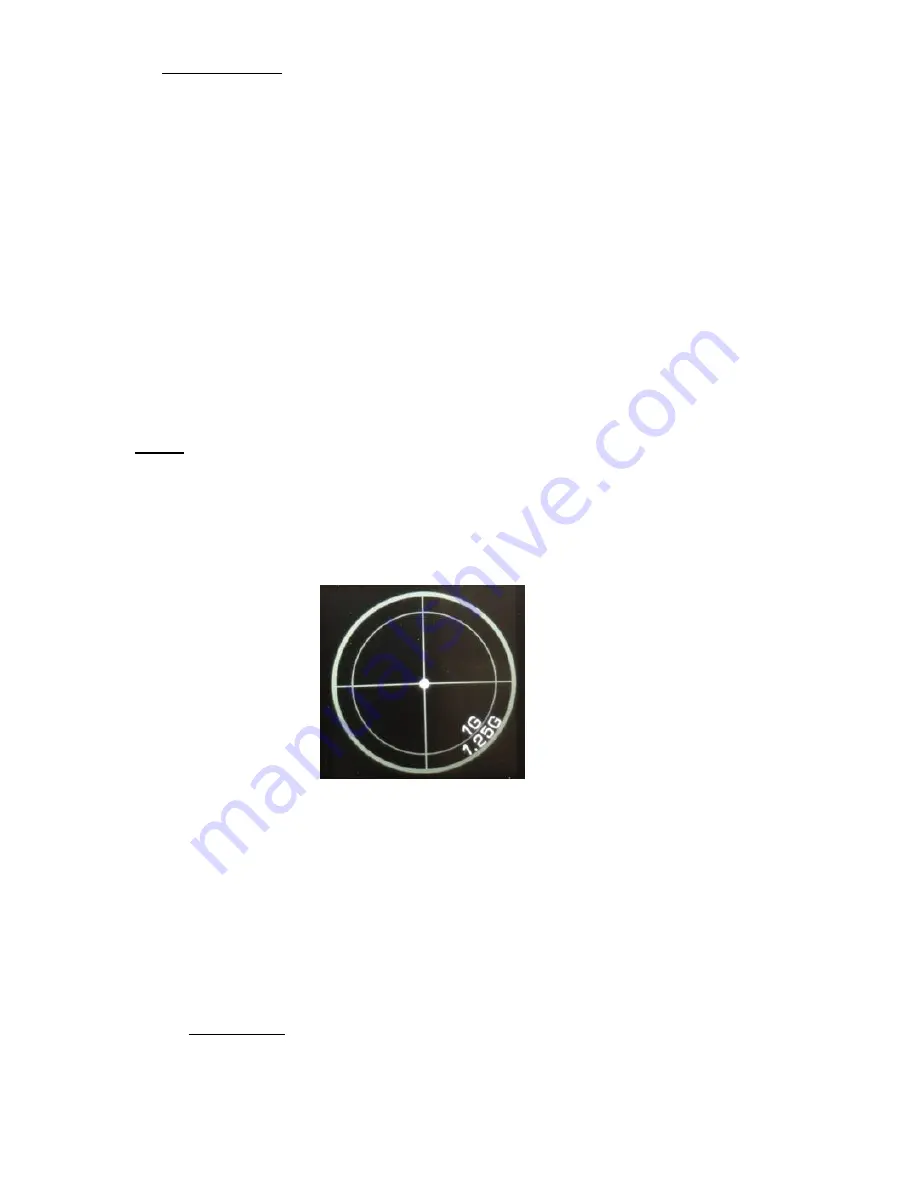
and graphical display of g-forces exerted on the vehicle.  Below is a picture of the G-FORCE 
gauge.  The ‘force’ indicator is represented by the ‘dot’ in the center of the crosshairs.  This 
measurement shown is of ‘zero force’, and was taken with the vehicle parked on a level surface. 


Note:  Having the GFORCE gauge displayed on the Instrument Cluster while performing the 
GFORCE setup will aide in understanding its operation.  See MAIN-SYSTEM-LAYOUTS-
<LAYOUT x>-GAUGES above if the G-FORCE gauge is not currently displayed. 

  Turn on ignition 

  Tap Control Knob to enter MAIN MENU 

  Rotate knob to highlight 

SETUP

, tap to select 

  Rotate knob to 

GFORCE

, tap to select 

  A sub-menu list will appear in the menu box: LEVEL, FORWARD, and BACK 

  Rotate the knob to highlight the desired item, tap to select 

  LEVEL:  Pressing 

LEVEL

 will bring up menu:  SET LEVEL and BACK 

SET LEVEL:  When the GRAFIX system is firmly installed in the vehicle, and the 
vehicle is in a level location, pressing this 

SET LEVEL

 will give the GRAFIX an 

orientation calibration value for this known X, Y and Z reference in this stopped 
position.  Any reading observed will be referenced to this point. 

Содержание GRAFIX

Страница 1: ...N AND OPERATION MANUAL Please read this before beginning installation or wiring IMPORTANT NOTE This system has an odometer preset option that is only available for the first 100 miles of operation See odometer preset section p 31 for instructions and setup information ...

Страница 2: ...ensity Turn remind Gear Set ODO Extra Label Start Image 31 INFO Sensor GPS Version Display 34 SWITCH Control Knob settings 34 UPDATE Themes Operational SW Start Image 35 SETUP 36 BLUETOOTH setting up Bluetooth 37 CLOCK setting clock 37 SPEED Speedometer setup and calibration 37 TACH Tachometer setup 40 VOLT Voltmeter warning setup 41 WATER Water temperature setup 41 OIL Oil pressure setup 42 FUEL ...

Страница 3: ...rumentation are now standard on the GRAFIX system This digital accuracy and solid state reliability will give you quality service for miles down the road and also includes a limited lifetime warranty on a product engineered and manufactured in the USA GRAFIX Series System Features Full Color TFT s Four 4 factory preset user configurable layouts User configurable layout parameters including Theme s...

Страница 4: ...rning notification and User Interface feedback Fully configurable on off volume tone notification style No additional wiring or mounting requirements Special outputs RPM shift output to activate external light Selectable 2000ppm or 4000ppm speed output for cruise or ECM Buffered tachometer output for cruise control User configurable Control Box warning output Demonstration mode Automatically cycle...

Страница 5: ...associated GRAFIX features will be used If the GPS receiver in the Control Box will be required and use of the internal satellite antenna is desired a location that allows adequate reception should be identified See the SYSTEM INFO GPS section in this manual for more specific GPS use and Control Box mounting guidelines Also be sure to choose a mounting location that will allow you proper access in...

Страница 6: ... the user wants displayed not every terminal will be used in most applications On the pages that follow we describe the function of each terminal what they do and how to wire them To get up and running quickly see the supplied GRAFIX QUICK START GUIDE Below is a simplified block diagram showing Control Box connections in a typical application ...

Страница 7: ...t on to the formatted flash thumb drive o Turn the ignition switch to the OFF position i e no power on the IGNITION PWR terminal 12V ACCESSORY POWER o Disconnect the 12 VOLT CONSTANT POWER INPUT to the Control Box either by removing the wire to the Control Box terminal or disconnecting the battery terminal on the vehicle disconnecting the battery may be preferred o Insert the thumb drive with the ...

Страница 8: ...in ground for the GRAFIX system A wire should be run from this terminal to the vehicle s main chassis ground Use 18 AWG or larger wire to ensure sufficient grounding Proper vehicle grounding is extremely important for any gauge or electronics to operate correctly The engine block should have heavy ground cables to the battery frame firewall and body Failure to properly ground the engine block or t...

Страница 9: ...board functions do not run the tachometer wire alongside any other sensor or input wires DO NOT USE SOLID CORE SPARK PLUG WIRES WITH THIS DASHBOARD SYSTEM Solid core ignition wires cause a large amount of electromagnetic and radio frequency interference which can disrupt the system operation Do not connect the TACH terminal to the secondary or high voltage side of the ignition coil The tachometer ...

Страница 10: ...hen using a GSS 3000 or BIM 01 when in the REVERSE gear position The output is ground activated when any of the activated gauge warnings are exceeded This output can turn on a 4 Watt or smaller 12V bulb or can activate a relay to turn on a larger bulb or buzzer To wire a warning light to this output connect one wire from the bulb to 12 volt accessory power and connect the other wire to the WARN OU...

Страница 11: ...obtain the speedometer reading then this terminal will not be connected Dakota Digital supplies a 3 wire sensor for most of its kits SEN 01 5 If you are using this sensor the white wire is the speed signal connect to SPD SIG The red and black wires in the cable are power and ground 5V DC and their connection is discussed in the SPEED INPUT PWR and GND sections For two wire speed sensors such as a ...

Страница 12: ...ground reference used for two wire water temp sensors This will connect to one of the wires from the Dakota Digital SEN 04 5 The other wire will connect to the SIG terminal and it doesn t matter which wire goes into either location PRESSURE INPUT PWR This terminal is used to supply power to Dakota Digital pressure sensor SEN 03 10 This supplies 5V DC to the sensor and should not be connected to an...

Страница 13: ...hen it may be used If using a wire from an existing harness make sure that the wire does not have power Fuel sensors reference their ground from the sensor mounting plate Make sure that a ground wire is connected from one of the sensor s mounting bolts to the vehicle frame The fuel sensor type is selected using the fuel setup menu under INPUT The settings are discussed later in the setup section A...

Страница 14: ...IX Instrument Cluster The label can appear temporarily when the state changes or remain displayed while active The label and operation can be changed in the MAIN SYSTEM DISPLAY EXTRA LABEL setup menu This input can also be set up to connect to a powered dome light switch to activate the system entry screen when the door is opened This input can also be connected and configured as a camera input tr...

Страница 15: ...activated by a 12 volt signal from the headlight high beam wire When the terminal has 12 volts a blue high beam indicator will light up on the Instrument Cluster An existing wire from the vehicle for the high beam indicator can be used or a new wire can be connected from the high beam side of the high low beam switch BRAKE The BRAKE terminal can be used as a brake system warning indicator The BRAK...

Страница 16: ... also possible to override the night dimming If you need the headlights on during the day for a parade or other event but still want the gauges in daytime mode toggle the headlight switch off and on three times DIM DISABLED will briefly be displayed in the Message Area and the gauges will remain in daytime mode with the headlights on To disable the night dimming override simply turn the headlights...

Страница 17: ...l of the user accessible features of the GRAFIX system The main user actions performed on the Control Knob and referenced in the following sections are Rotate or Scroll Turning the Control Knob clockwise CW or counter clock wise CCW to go through the listed available menu items The cursor is indicated on the menu by the highlighted item as the user maneuvers through the menu list Tap Press and imm...

Страница 18: ...ping the tap on a particular highlighted Message Group MSG GROUP this group will be selected to remain in the Message Area during normal operation Turn the Control Knob until all highlighted boxes around all Message Areas are gone If the Control Knob is not turned the highlight boxes will clear automatically in approximately 4 seconds and the displayed selected Message Group will remain Clearing M...

Страница 19: ... gauge face that will illuminate Digital readouts will be displayed in a red box with white text Configurable output terminals on the Control Box TACH and WARN o See MAIN SETUP for details Configurable audible tone Configurable red LED indicator on the Instrument Cluster and associated popup message MAIN MENU The following section will go through the MAIN MENU line items At the end of this section...

Страница 20: ...ill be explained in more detail in SYSTEM sub menu operation section below To exit the layout selection function simply rotate the Control Knob in either direction or wait approximately 3 seconds to return to the Main Menu list SYSTEM Access to sub menus for layout and display customization such as theme and gauge assignments color selection display brightness and intensity Message Center notifica...

Страница 21: ...y selected displayed layout THEME Allows selection from 1 of 4 installed themes COLORS Allows custom selection of colors for day and or night DAY NIGHT Color setup for both day and night operation SCHEME List of 12 predefined color combinations available for layouts CUSTOMISE List of 7 Instrument Cluster parameters ACCENT LABEL READING SCALE POINTER BAR WARN IND SWITCH BACK Exit CUSTOMISE RESET CO...

Страница 22: ...12DO BACK Exit GEAR setup SET ODOM Preset odometer reading with current vehicle miles see page 31 EXTRA LABEL EX EX WAIT 4x4 List of available items to change labels on LABEL Change the 8 letter label for this input DISPLAY Select always active or only momentarily when it changes TYPE WARN Select label as a warning INFO Select label as an information message type BACK Exit TYPE sub menu BACK Exit ...

Страница 23: ...RD PERF etc List of themes to load to ALL display modules BACK Exit THEME LOAD sub menu START IMAGE DEFAULT Use the factory default start image CUSTOM Use a loaded custom start image LOAD Select a display to load custom start image to from the thumb drive BACK Exit START IMAGE sub menu MANUAL UPD Select a display to update software from the thumb drive BOOT TEST Run a display boot test diagnostic ...

Страница 24: ...rument Cluster SETUP Sub Menu Description____________________ BLUETOOTH DEVICE Displays the system s device name in place of DEVICE OFF Disable Bluetooth connections SETUP ONLY Allow Bluetooth connections only while in setup ALWAYS ON Allow Bluetooth connections when key is on BACK Exit BLUETOOTH setup menu CLOCK MANUAL Manually enter time GPS Clock will be set to the time received from satellite ...

Страница 25: ...OW 5 36 Set low pressure warning point BACK Exit OIL setup menu FUEL INPUT Select sensor type MANUAL ADJ GM 0 30 GM 0 90 63 VETTE GM 40 250 GM 250 40 FORD 73 10 FORD 20 150 VDO 10 180 SW 240 33 IMPRT 112 4 BIM MANUAL ADJ PROGRAM Calibrate manual adjust fuel sensor Back Exit MANUAL ADJ RANGE LEARN RESET Clear and restart learning range to empty BACK Exit FUEL setup menu BIM Menu options depend on B...

Страница 26: ...cted by the Control Box the gear position must be in either the park or the neutral position Any other position will also result in the SYSTEM menu item to be grayed out and non selectable LAYOUTS Theme selection Color Gauge customization Message Group setup Directly from the factory the GRAFIX Series is a very unique and appealing dash platform for any classic car or hot rod enthusiast just as it...

Страница 27: ...t the currently displayed layout the GRAFIX Instrument Cluster will update to the settings of the saved LAYOUT 3 selection In this situation when editing of the layout is completed the GRAFIX will continue to display the LAYOUT 3 Note If BLANK appears in the upper left and right corners of larger TFTs where there was not a gauge seen previously these are available regions that will be selectable i...

Страница 28: ...o the parameter list ACCENT Graphical details on the some of the GRAFIX themes LABEL MPH RPM x1000 VOLT etc READING Measured values i e 55 MPH 15 5 VOLTS etc SCALE Scale ticks and numerical scale values on analog gauges POINTER BAR Pointer Bar gauge Needle and bar gauge WARN IND Warning Indicator Analog gauge warning indicator SWITCH Illuminated center of rotary Control Knob BACK Notice that as th...

Страница 29: ...ep occurs only if Reading has multiple scales to select from Rotate to select the Scale o While rotating notice that the available scales for the selected reading will be displayed o When the desired SCALE is on the display tap to select Note Depending on the selected Arrangement and Gauge the Scale may be available as either an analog or a digital readout If an Arrangement has more than one avail...

Страница 30: ...e groups chosen above will be displayed o Rotate to the group to be edited and tap o A pop up will be displayed and the MESSAGE AREA will be highlighted on the TFT o Rotate the knob to the desired MESSAGE AREA and tap to edit o Rotate to cycle through all of the available settings for the MESSAGE AREA and tap to select the desired reading o Continue to follow the onscreen directions for each of th...

Страница 31: ... grayed out in this menu and not available to edit Instead when the DIM terminal on the Control Box has power applied to it i e headlight switch is pulled on the DIM 1 the nighttime brightness level is controlled with the twist of the DIM 1 knob Note If the HI VIZ high visibility mode is ON in the Main Menu the intensity will go to maximum level in DAYTIME operation regardless of the MANUAL INTENS...

Страница 32: ...d remain until the input is released The user can also select whether the message is for information purposes only or as a system warning As a warning the message will be highlighted in red in the Message Area For added flexibility and if more inputs are needed the WAIT input and 4x4 input can also be configured to be extra universal inputs instead of being used for their default operation Also an...

Страница 33: ...sage is shown can be changed The ALWAYS setting will keep the message displayed as long as the terminal is active The ON CHANGE setting will show the message briefly for a few seconds when it is activated and the message along with the word OFF for a few seconds when it is released The DISPLAY option is not available for the WAIT or 4x4 inputs unless their respective label has first been changed T...

Страница 34: ... be selectable o The associated software for the selected display will be listed Operational code version DISP hardware Configuration version specific system setup o Theme 1 4 version version for each of the stored themes 1 4 o Tap BACK to exit Display version Rotate the Control Knob to CONTROL BOX tap to select o The version of currently installed software will be displayed o Tap the highlighted ...

Страница 35: ...is not grayed out and is user selectable Rotate the Control Knob to UPDATE tap to select The sub menu list will be displayed AUTO UPD THEME LOAD START IMAGE MANUAL UPD BOOT TEST and BACK Rotate the knob to the desired operation tap to select Note If a thumb drive is detected but no GRAFIX update files are found the NO UPDATE FILES FOUND message will be displayed AUTO UPD Auto Update This selection...

Страница 36: ...ioned above BOOT TEST This is a diagnostic selection that contains information that may be requested if factory support is needed Note Pressing BOOT TEST will require cycling power off and then back on to return to Normal Operation BACK Exit UPDATE and return to MAIN SYSTEM menu BACK exit SYSTEM and return to MAIN MENU SETUP Note In order to reduce the risk of accidents or injury with the exceptio...

Страница 37: ...pends on GRAFIX system configuration and layout Tap Control Knob to enter MAIN MENU rotate knob to highlight SETUP tap to select Rotate Control Knob to CLOCK tap to display current time and the clock sub menu list MANUAL GPS and BACK With MANUAL highlighted tap knob to enter CLOCK setup o The HOUR will be flashing and a 1 12 list will be displayed with current hour highlighted and an Scroll to the...

Страница 38: ...number will count pulses from the speed sensor as you drive This number should stay at 0 until you start driving If this is number is increasing while stopped you may have something wired wrong or are picking up interference and need to check connections and wire routing before continuing or you will have incorrect readings later If the number stays at zero while you are driving then the speed sen...

Страница 39: ...ter reading is calculated from the speedometer cal value if it is not calibrated properly the odometer reading could be higher lower than actual The following MAIN SETUP SPEED menu items SERVICE UNIT INPUT and OUTPUT will be grayed out and non selectable if the vehicle is not stopped and the gear indication if equipped is not in the park or neutral position SERVICE Service countdown meter The serv...

Страница 40: ...d returns to the SPEED menu OUTPUT Speed Output This option will be grayed out if SPEED INPUT is set to BIM or GPS If a speed signal is needed for an ECM or cruise control the SPD out terminal on the Control Box can be used This terminal can supply a 2 000 ppm 2K PPM or 4 000 ppm 4K PPM signal that is created from the SIG terminal speed input signal BACK exit SPEED setup sub menu TACH Tachometer s...

Страница 41: ...ut terminal on the Control Box as well as the trigger for the configured GRAFIX Warning Systems When the RPM reading is above this setting the TACH output terminal on the Control Box will activate providing a ground signal This low level signal can be used to turn on a shift light or other RPM based devices The value is adjustable from 2 000 RPM 15 000 RPM in 250 RPM increments Other configured GR...

Страница 42: ...g point When the temperature reading s value is higher than this point this will trigger the configured GRAFIX Warning Systems The warning value is adjustable from 150 300 F 65 148 C BACK Exit water setup and return to MAIN SETUP sub menu OIL Oil pressure setup The standard Dakota Digital oil pressure sensor for this system is the SEN 03 10 0 150 psi solid state sensor with 1 8 NPT threads A 0 300...

Страница 43: ...hms GM 0 90 ohm mid 60 s late 90 s GM 0 90 0 ohms 90 ohms GM 90 0 ohm 63 67 Corvette 63 VETTE 90 ohms 0 ohms GM 40 250 ohm late 90 s later GM 40 250 40 ohms 249 ohms GM 250 40 ohm GM 250 40 249 ohms 40 ohms FORD 73 10 ohm earlier late 80 s FORD 73 10 73 ohms 10 ohms FORD 20 150 ohm late 80 s later FORD 20 150 20 ohms 150 ohms VDO 10 180 ohm VDO 10 180 10 ohms 180 ohms SW SUN 33 240 SW 240 33 240 o...

Страница 44: ...t Cluster layouts through the MAIN SYSTEM LATOUTS GAUGES menu and setting up the reading in the desired region The Message Area groups for the BIM can also be setup from the MAIN SYSTEM LAYOUTS MSG GROUPS menu The setup and warning options for the BIM s are set from this menu Turn on ignition Tap Control Knob to enter MAIN MENU Rotate knob to highlight SETUP tap to select Rotate knob to BIM tap to...

Страница 45: ...r their installation With the BUZZER VOL set to something other than 0 i e volume not off cycle through the settings tap to select o BUZZER VOL Sets the volume in range of 0 off to 10 max tap to select o BUZZER TONE Is a list of 3 differing tones TONE 1 3 With the BUZZER VOL set to something other than 0 i e volume not off cycle through the settings tap to select o SPD CNT VOL The buzzer volume ca...

Страница 46: ... to be viewable the reading has to be displayed in the current layout BACK Will exit the WARN sub menu GFORCE GFORCE meter setup The GRAFIX system comes standard with a built in accelerometer This allows the measuring and graphical display of g forces exerted on the vehicle Below is a picture of the G FORCE gauge The force indicator is represented by the dot in the center of the crosshairs This me...

Страница 47: ...enter MAIN MENU Rotate knob to highlight SETUP tap to select Rotate knob to CAMERA tap to select A sub menu list will appear in the menu box TRIGGER and BACK Rotate the knob to highlight the desired item tap to select TRIGGER GEAR REVERSE EX WAIT DISABLE and BACK Rotate the knob to the desired item tap to select GEAR REVERSE If the vehicle is configured with a Dakota Digital GSS gear position sens...

Страница 48: ...ed FULL RESET Full factory reset If there is ever a situation where the GRAFIX system needs to get back to default factory settings this Full Reset will do just that Maybe an engine or drivetrain swap Maybe the GRAFIX system is removed from one vehicle and installed in another May the user just doesn t like what they have done when setting it up For whatever reason Full Reset will return everythin...

Страница 49: ...e feedback groups By selecting a layout that layout can be edited to the user s preference and is then saved for future recall and use Note RESET ALL in the edit MAIN SYSTEM LAYOUT menu will reset the current layout to the factory defaults for that layout Normal Operation Is defined as the GRAFIX system not displaying any menu or warning boxes on the Instrument Cluster and with the Message Center ...

Страница 50: ...n Connector type Type A USB versions supported 1 x and 2 0 Format FAT FAT16 or FAT32 only Thumb drive size Minimum 1GB Note Using FAT16 limits the size of the volume to 4GB If the device is larger than 8GB the drive must be resized to 4GB to use FAT16 Warning When reformatting a thumb drive to support either FAT FAT16 or FAT32 format all data on the drive will be erased Be sure to save any existin...

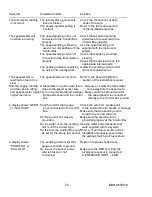
Страница 51: ... and 12v to IGNITION PWR terminal when the key is on Do not use a battery charger to power the system Control Box may not be getting Check if the Control Box has a ground a proper ground connection The Control Box may have Contact Dakota Digital s service an internal problem department with a description of the problem System does not turn on Constant power connected but Check connection at IGNITI...

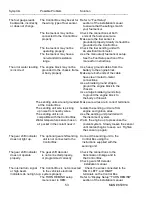
Страница 52: ...ter or ignition wire is too Reroute or isolate the tachometer and the vehicle sitting close to the speed sensor wire wire away from the speed wire still speedometer reads There is a ground problem between Make certain the ground wire for higher than zero the speed sensor and the control the speed sensor is connected box directly to the Control Box ground A display shows OPEN Sending unit for that ...

Страница 53: ...dy or firewall The sending units are not grounded Make sure wires are in correct terminals at the Control Box The sending unit wire is picking Isolate the sending unit wire from up noise from nearby wires engine and ignition wires The sending unit is not Use the sending unit provided with compatible with the Control Box the instrument system Water temperature sensor has an Warm the engine up to pr...

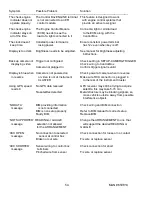
Страница 54: ...isplay is blue when Camera is not powered on Check power at camera when in reverse in reverse or video is not at Instrument Make sure RCA connector is plugged in CLUSTER to the rear of the Instrument Cluster Using GPS speed No GPS data received GPS receiver may still be trying to acquire reads 0 satellite this may take 5 15 min No satellites detected Metal structure may be blocking signals so move...

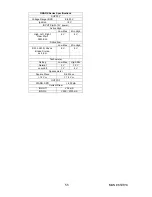
Страница 55: ...gh Low Max Min High High Left Right Gear Wait DIM EX 4 V 8 V Active Low Low Max Min High SW L SW R Check Brake Cruise 4x4 EX 8 V 9 V Tachometer Setting Low Max High Min Normal 3 V 7 5 V Low Volt 1 V 4 V Speedometer Square Wave Sin Wave 1 2 VP P 1 4 VP P OUTPUT WARN SPD 600 mA Current Draw IGN Off 0 3 mA IGN On 500 2000 mA ...

Страница 56: ...s product that should it under normal use and condition be proven defective in material or workmanship for the lifetime of the original vehicle it was installed in such defect s will be repaired or replaced at Dakota Digital s option This warranty does not cover nor extend to damage to the vehicle s systems and does not cover diagnosis removal or reinstallation of the product This Warranty does no...

Отзывы: