


• Outdoor Units • HEAT PUMP • RWEYQ-MY1
1
10
• VRV Systems • Outdoor Units
88
10
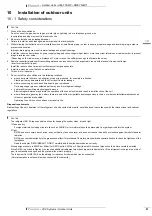
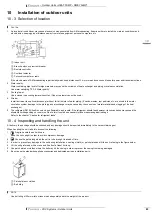
Installation of outdoor units
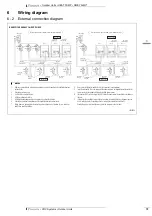
10 - 7 Handling of the plate type heat exchanger
C
AUTION
The brazing plate type heat exchanger (the plate type heat exchanger) is used for this outside unit. Because its structure is different from a
conventional type heat exchanger, it must be handled in a different manner.
10 - 7 - 1
When designing the equipment
1
Install a strainer (an optional accessory) at the water inlet side adjacent to the outside unit in order to prevent any foreign materials such as dust,
sand, etc. from entering.
2
Depending on the water quality, scale may stick to the plate type heat exchanger. In order to remove this scale, it is necessary to clean it at a
regular interval using chemicals. To this end, install a gate valve in the water piping. Set up a piping connection port on the piping between this
gate valve and the outside unit for cleaning by chemicals.
3
For the purpose of cleaning and water drain off from the outside unit (water draining during a long period of nonuse in winter, draining upon starting
of season-off), install an “air discharge plug” and a “water draining plug” at the inlet/outlet ports of water piping. In addition, install an “automatic
air discharging valve” at the top of riser piping or at the top of a portion where air tends to stay.
4
Independent of the piping inlet of the outside unit, install a cleanable strainer at a portion close to the pump piping inlet.
5
Carry out complete cooling/thermal insulation of water piping and outdoor dehumidification. If complete cooling or thermal insulation has not been
carried out, any damage may be caused during severe winter due to freezing, in addition to thermal loss.
6
When you stop operation during night or winter, it is necessary to take measures to prevent water related circuits from natural freezing in the area
the ambient temperature drops below 0°C (by water drain off, keeping the circulation pump running, warming up by a heater, etc.) Freezing of
water related circuits may result in any damage to the plate type heat exchanger. Therefore, please take appropriate measures depending on the
circumstances of use.
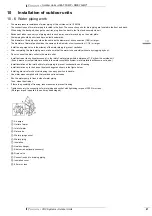
햲
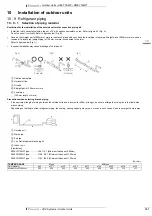
Example of piping
햳
Water inlet piping
햴
Strainer (sold separately as an accessory)
햵
Air discharge plug (for joint use with cleaning port)
햶
Cleaning device
햷
Strainer for pump
햸
Automatic air discharge valve
햹
Water outlet piping
햺
Joint use with water draining plug
햻
Plate type heat exchanger
햽
Outside unit
10 - 7 - 2
Before starting a test run
1
Before starting a test run, please make sure that the piping work has been carried out in a proper manner.
Especially, make sure that the strainer, air discharge valve, automatic water supply valve, expansion tank and cistern are positioned at their places correctly.
2
After water has been completely filled in, first run the pump only, and then make sure that no air has been caught in the water circulation system
and the water flow rate is correct. If any air has been caught or the flow rate is not enough, the plate type heat exchanger may freeze. Measure
any water pressure loss before and after the outside unit and make sure that the flow rate is as designed. In case of any abnormal, stop the test
run immediately and carry out trouble shooting to resolve the trouble.
3
Following the installation manual, carry out a test run of the outside unit.
4
After the test run has been completed, inspect the strainer at the inlet piping of the outside unit. Clean it if it is dirty.


