D-EIMWC00208-16EN - 31/48
Startup procedure
Turning on the machine
1.
With the general disconnecting switch Q10 closed, check that switc hes Q0, Q1, Q2 and Q12 are in the Off (or 0)
position.
2.
Close the thermalmagnetic switch Q12 and wait for the microprocessor and the control to start. Check that the oil
temperature is warm enough. The oil temperature must be at least 5°C above the satur ation temperature of the
refrigerant in the compressor.
If the oil is not warm enough, it will not be possible to start
the compressors and the phrase “Oil Heating” will appear
on the microprocessor display.
3.
Start the water pump.
4.
Turn the Q0 switch to On and wait for
“UnitOn/Compressor StandBy” to appear on the display.
5.
Check that the evaporator pressure drop is the same as the design pressure drop and correct if necessary. The
pressure drop must be measured at the factorysupplied charge connections placed on the evaporator piping. Do
not measure the pressure drops at points where any valves and/or filters are interposed.
6.
When starting up for the first time, turn the Q0 switch to Off to check that the water pump stays on for three minutes
before it stops.
7.
Turn the Q0 switch to On again.
8.
Check that the local temperature setpoint is set to the required value by pressing the Set key.
9.
Turn the Q1 switch to On (or 1) to start compressor #1.
10. Once the compressor has started, wait for at least 1 minute for the system to stabilise. During this time the
controller will perform a series of operations to empty the evaporator (prepurge) to ensure a safe start up.
11. At the end of the prepurge, the microprocessor will start loading the compressor, now running, in order to reduce
the outlet water temperature. Check the proper functioning of the capacity control by measuring the compressor
’s
electrical current consumption.
12. Check refrigerant evaporation and condensation pressure.
13. Once the system has stabilized, check that the liquid sight glass located on the expansion valve inlet pipe is
completely fully (without bubbles) and that the humidity indicator shows “Dry”. Any bubbles inside the liquid sight
glass might indicate a low refrigerant level or an excessive pressure drop through the filter dryer or an expansion
valve that is blocked at the full open position.
14. In addition to checking the liquid sight glass, check circuit operating parameters by verifying:
a) Superheating of refrigerant at compressor suction
b) Superheating of refrigerant at compressor discharge
c) Subcooling of liquid coming out of the condenser banks
d) Evaporation pressure
e) Condensation pressure
Except for liquid temperature and suction temperature for machines with a thermostatic valve, which require the use
of an external thermometer, all other measurements can be carried out by reading the relevant values directly on
the onboard microprocessor display.
15. Turn the Q2 switch to On (or 1) to start compressor #2.
16. Repeat steps 10 through 15 for the second circuit.
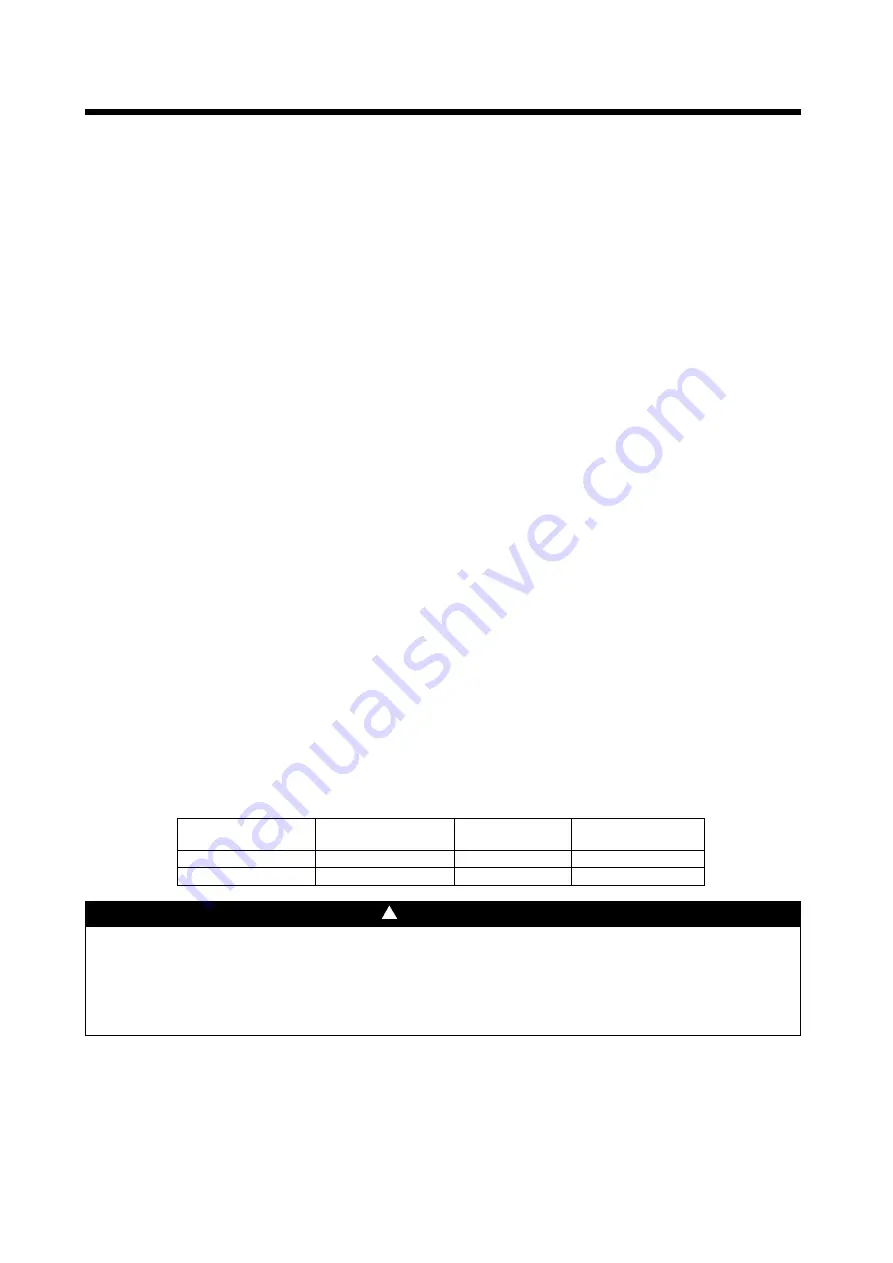
Table 5 - Typical operating conditions with compressors at 100%
Economised cycle?
Suction superheating Delivery
superheating
Liquid subcooling
NO
4
6 °C
20
25 °C
5
6 °C
YES
4
6 °C
18
23 °C
10
15 °C
IMPORTANT
The symptoms of a low refrigerant charge are: low evaporation pressure, high suction and exhaust superheating
(beyond the above limits) and a low subcooling level. In this case, add R134A refrigerant to the relevant circuit. The
system has been provided with a charge connection between the expansion valve and the evaporator. Charge
refrigerant until working conditions return to normal.
Remember to reposition the valve cover when finished.
To turn off the machine temporarily (daily or weekend shutdown) turn the Q0 switch to Off (or 0) or open the remote
contact between terminals 58 and 59 on terminal board M3 (Installation of remote switch to be carried out by the
customer). The microprocessor will activate the shutdown procedure, which requires several seconds. Three
minutes after the compressors have been shut down, the microprocessor will shut down the pump. Do not switch
off the main power supply so as not to deactivate the electrical resistances of the compressors and the evaporator.
Содержание EWLD160~550G-SS
Страница 14: ...D EIMWC00208 16EN 14 48 Fig 7 Condenser Located above Chiller Unit Fig 8 Condenser Located below Chiller Unit...
Страница 21: ...D EIMWC00208 16EN 21 48 Fig 10 Refrigeration cycle EWWD G SS EWWD G XS 23 5 bar...
Страница 22: ...D EIMWC00208 16EN 22 48 Fig 11 Refrigeration cycle EWWD G SS EWWD G XS Partial Heat recovery 23 5 bar...
Страница 23: ...D EIMWC00208 16EN 23 48 Fig 12 Refrigeration cycle EWLD G SS OPTIONAL 23 5 bar...
Страница 45: ...D EIMWC00208 16EN 45 48...
Страница 46: ...D EIMWC00208 16EN 46 48...
Страница 47: ...D EIMWC00208 16EN 47 48...


