


3
x
Installation
EKSV21P/EKSV26P/EKSH26P
Solar panels on-roof installation
008.1618444_00 – 12/2012
Installation instructions
25
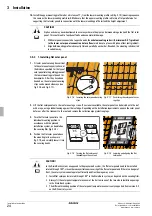
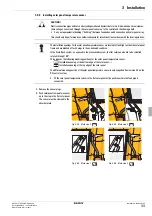
The flat solar panel must be lifted onto the roof in the correct orientation for mounting (prevents faults during
connection or difficult manoeuvring operations). The top side of the solar panel is marked on the protective
cover of the solar panel glazing. The plugs for the solar panel temperature sensor and the round solar panel
connection seals must at the top when aligning the flat solar panel.
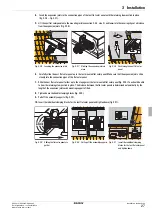
5.
Move the flat solar panel sideways until the left-hand outer ends of the two
mounting rails project approx. 25 mm
beyond the solar panel's edge (fig. 3-20).
Slide the individual clamping block sideways into the mounting profile rail (flush
to the end) and screw down tightly using an Allen key (fig. 3-20).
6.
Slide the individual clamping block onto the mounting rail and tighten using an
Allen key.
Fig. 3-20 Check correct mounting position,
slide the individual clamping block
into the mounting profile and
screw down tightly
CAUTION!
In order to prevent torsional stresses and fixing difficulties when mounting the solar panels;
• Lightly tighten the self-locking nuts of the slide blocks,
• align both mounting profile rails exactly flat against the marking line and parallel to each other. If needed,
the mounting rails inserted in suitable way.
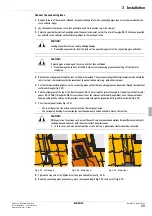
7.
Slide the single mounting block with
equipotential bonding terminal at the
position;
a)
of the return flow
connection into the mounting
profile and secure with the hex
socket wrench (fig. 3-21).
b)
of the inflow connection
into the mounting profile and
secure with the hex socket
wrench (fig. 3-22).
Fig. 3-21 Work step 6a -
Fig. 3-22 Work step 6b -


