


3
x
Installation
EKSV21P/EKSV26P/EKSH26P
Solar panels on-roof installation
008.1618444_00 – 12/2012
Installation instructions
21
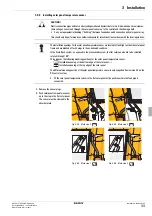
3.4.2 Mounting the support structure
DANGER!
Non-intended use and prohibited modifications to the structure reduce safety. Any changes to the structure
of components is not permitted.
WARNING!
Insufficiently dimensioned supporting structures can endanger persons, the building and the solar installation.
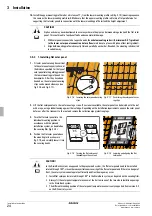
•
Check carrying capacity of the supporting structure
(Note wind and snow loads, see chapter 5
"Technical data"). Do not use roofing battens.
• On-roof hooks only with correspondingly appropriately dimensioned screw connections and always screw
on the rafters.
• Also
note the dimensions
X
0
, X
1
, and X
2
given in tab. 3-2 for the rafter spacing – if necessary, a suitable
supporting structure will have to be provided.
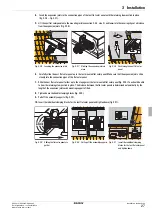
We offer the on-roof mounting packs for roof tiles, the roof fixing FIX-ADP, for slate roofs, the roof fixing
FIX-ADS, for corrugated roof covering, the roof fixing FIX-WD and for folded roof covering, the roof fixing
FIX-BD.
A defined roof area is required per flat solar panel.
– for the EKSV21P: 2.0 x 1.04 m
2
,
– for the EKSV26P: 2.0 x 1.33 m
2
,
– and for the EKSH26P: 1.30 x 2.03 m
2
,
The main dimensions of the Solar system solar panel (in accordance with fig. 3-3 and fig. 3-4) are summarized
in tab. 3-2.
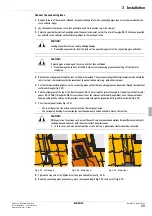
A
Hex socket and socket wrench
SW 13
B
Open-ended spanner
SW 13
C
Hammer
D
Cut-off grinder with diamond cutting wheel
E
Spirit level
F
Yard stick
G
Cordless drill with Ø
7 mm
M
Hex socket- (Allen Key-) socket wrench SW 5
Fig. 3-5
Required tools
The short names are explained in the following figures for:
– the mounting parts provided by DAIKIN in the chapter 2 "Product description".
– the dimension details in tab. 3-2.
– the auxiliary equipment in fig. 3-5.


