


3
x
Installation
Installation instructions
22
EKSV21P/EKSV26P/EKSH26P
Solar panels on-roof installation
008.1618444_00 – 12/2012
1.
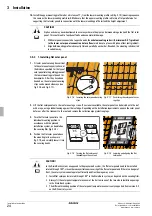
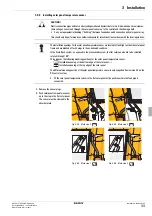
Measure the collector array and mark the installation location.
2.
Remove the row of tiles above the intended lower edge of the flat solar panels.
3.
Position the mounting rail horizontally centred on the rafters (for the entire width of the solar panel). If several mounting rails
are required for an array, they must first be joined by means of the assembly profile connector and the pre-mounted studs
from the FIX-VBP mounting kit.
4.
Determine the installation points for the on-roof mounting ties. The on-roof mounting ties should be distributed evenly under
the mounting profile rail (fig. 3-6 and
5.
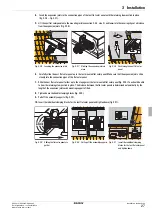
Position the perforated plate of the roof mounting bracket so that at least two screw holes are located over the rafter.
6.
Place the mounting rail on the perforated plates, and align the mounting brackets parallel to the roof tiles or roof slates.
7.
Roof tile:
– Fix each on-roof hook (FIX-AD, FIX-ADP) to the rafters with at least two of the woodscrews provided (fig. 3-8), using a
Ø 6 mm drill to produce a pilot hole.
Roof slate:
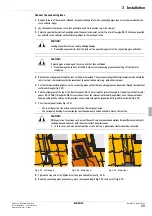
– Prepare a covering plate fig. 3-4 (taking care with adequate dimensioning).
– Fix the covering plate and on-roof ties (FIX-ADS) to the rafters with screws.
– The heads of the screws should be sealed off with a suitable silicon compound to prevent the ingress of water.
8.
If several mounting rails are being used:
• Release a stud on the assembly profile connector (do not remove) and separate the assembly profile rails again.
9.
Push the individual mounting rails into the pre-assembled slide blocks of the roof mounting bracket from the side.
10.
If several mounting profile rails are used on the roof, these should be connected together and fixed in place using the studs.
11.
Tighten the self-locking nuts with which the slide blocks have been attached to the roof mounting brackets. Take care to
align the mounting rails parallel to the edges of the roof tiles (fig. 3-9 / fig. 3-10).
Fig. 3-6
Aligning the on-roof ties from the
planned lower edge of the solar
panels at distance Y
2
Fig. 3-7
Determining the mounting posi-
tions of the roof brackets
Fig. 3-8
Attach the roof brackets to the
rafters with at least two screws
The mounting brackets may neither press on the roof tiles below, nor raise the roof tiles above.


