background image

4 Installation

Installation manual

25

D035A1/4AB + D035A4AB
Wall-mounted condensing boiler
3P469346-5N – 2019.11

1

Connect  the  appliance  to  the  main  power  supply.  Due  to  low
pressure,  error  code  "Err  HJ-09"  will  appear  on  the  user
interface and the status indicator light will be red.

2

Open 

all radiator valves

.

3

Set 

all isolating valves

 to closed position.

4

Connect fresh water supply pipe to 

valve 5

.

5

Open 

valves 1, 2, 3, 4, 5, 6

.

6

Slowly turn the 

valve 7

 to open position until pressure reaches

a  value  around  0.8  bar  for  system  heights  up  to  6  metres.  For
longer  system  heights,  see 

"4.5  Central  heating  system

requirements"

  [

4

  11]  to  determine  filling  pressure.  Filling

operation  should  be  done  slowly.  When  pressure  exceeds
0.8  bar,  error  code  will  disappear  and  the  status  indicator  light
will turn to blue. Turn the 

valve 7

 off.

7

Turn the 

valve

 5 off. Remove the filling loop if it is required by

local regulations.

8

Check  the  central  heating  circuit  -  especially  the  couplings  of
the circuit - for leakage.

9

Make  sure  the  automatic  air  vent  valves  located  on  the  pump
and  heat  exchanger  are  opened.  Vent  the  air  from  the
installation  with  the  manual  air  vent  screws  on  the  radiators.
Make sure screws are tightened after venting.

10

If  after  the  venting  the  pressure  decreases  below  0.8  bar,  refill
with water until the pressure reaches 0.8 bar again.

11

Isolate the appliance from power mains.

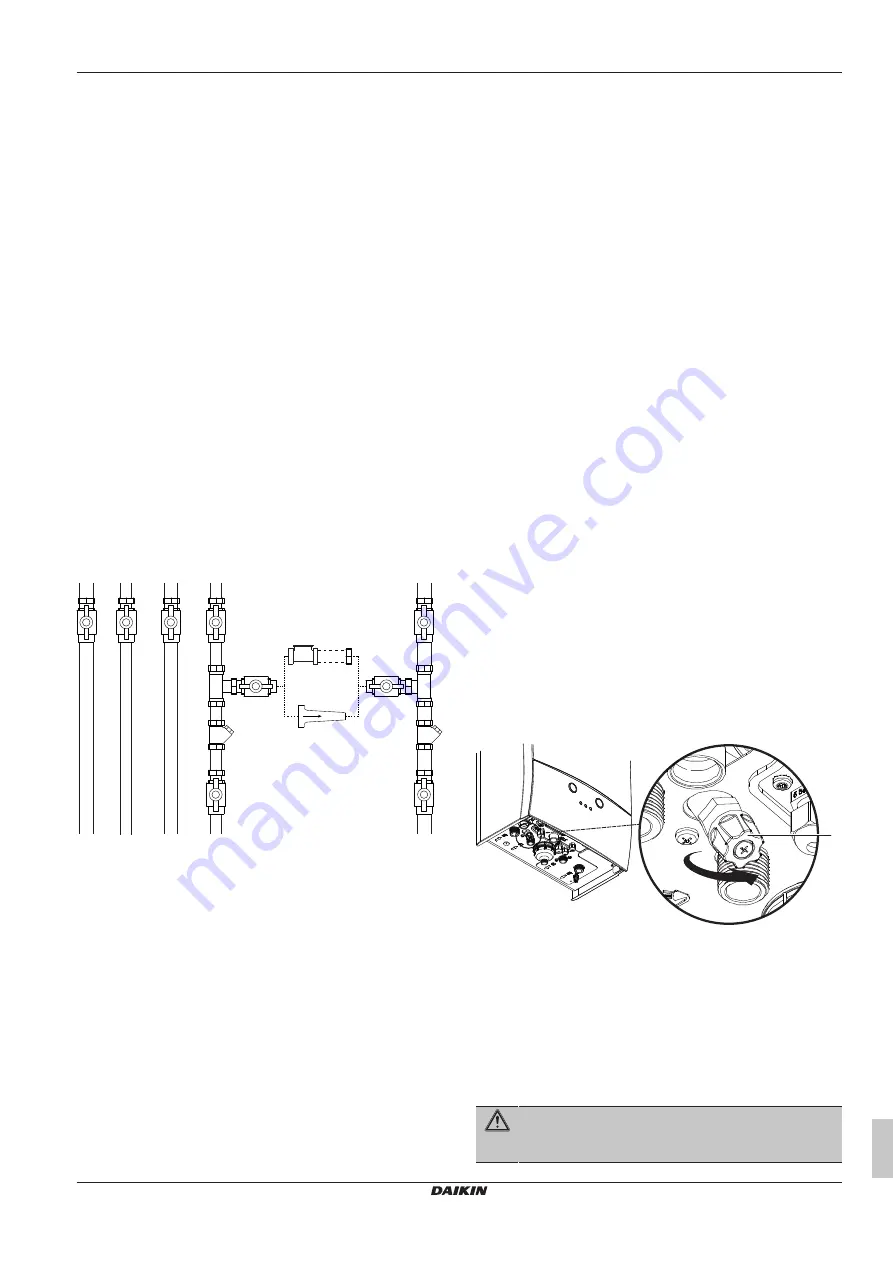
Method 2

(For model D2CND028A4AB and D2CND035A4AB)

E

1

2

4

3

6

5

D

F

B

7

a

8

A

a

Use a disconnector or a double check valve according to
local regulations.

After  all  system  connections  are  performed  with  care,  perform  the
following steps:

1

Connect  the  appliance  to  the  main  power  supply.  Due  to  low
pressure,  error  code  "Err  HJ-09"  will  appear  on  the  user
interface and the status indicator light will be red.

2

Open all 

radiator valves

.

3

Set all 

isolating valves

 to closed position.

4

Connect the filling loop to the 

valve 7 and valve 8

.

5

Set 

valves 1, 3, 5, 6 and 8

 to open position.

6

Slowly open the 

valve 7

 until pressure reaches a value around

0.8  bar  for  system  heights  up  to  6  metres.  For  longer  system
heights, see 

"4.5 Central heating system requirements"

 [

4

 11] to

determine  filling  pressure.  Filling  operation  should  be  done
slowly.  When  pressure  exceeds  0.8  bar,  error  code  will
disappear  and  the  status  indicator  light  will  turn  to  blue.  Turn
the 

valve 7

 off.

7

You  can  monitor  the  system  pressure  value  from  the  user
interface.

8

Make  sure  the  automatic  air  vent  valves  located  on  the  pump
and  heat  exchanger  are  opened.  Vent  the  air  from  the
installation  with  the  manual  air  vent  screws  on  the  radiators.
Make sure screws are tightened after venting.

9

If  after  the  venting  the  pressure  decreases  below  0.8  bar,  refill
with water until the pressure reaches 0.8 bar again.

10

Set 

valve  8

  to  off  position.  Remove  the  filling  loop  if  it  is

required by local regulations.

11

Check  the  central  heating  circuit  -  especially  the  couplings  of
the circuit - for leakage.

12

Isolate the boiler from power mains.

Method 3

(For model D2CND028A1AB and D2CND035A1AB)

After  all  system  connections  are  performed  with  care,  perform  the
following steps:

1

Connect  the  unit  to  the  main  power  supply.  Due  to  low
pressure,  error  code  "Err  HJ-09"  will  appear  on  the  user
interface and the status indicator light will be red.

2

Open all radiator valves.

3

Set all isolating valves to vertical (open) position.

4

Measure system water height (see 

"4.5 Central heating system

requirements"

 [

4

 11]).

5

Slowly  turn  the  filling  valve  until  pressure  reaches  a  value
around  0.8  bar  for  system  heights  up  to  6  metre.  For  longer
system 

heights, 

see 

"4.5 

Central 

heating 

system

requirements"

  [

4

  11]  to  determine  filling  pressure.  Filling

operation  should  be  done  slowly.  When  pressure  exceeds
0.8  bar,  error  code  will  disappear  and  the  status  indicator  light
will turn to blue. Turn off the filling valve.

6

System  pressure  value  can  be  monitored  from  the  user
interface.

7

Make  sure  the  automatic  air  vent  valves  located  on  the  pump
and  heat  exchanger  are  opened.  Vent  the  air  from  the
installation  with  the  manual  air  vent  screws  on  the  radiators.
Make sure screws are tightened after venting.

a

a

Filling valve

8

If  after  the  venting  the  pressure  decreases  below  0.8  bar,  refill
the system with water until the pressure reaches 0.8 bar again.

9

Check  the  central  heating  circuit  -  especially  the  couplings  of
the circuit - for leakage.

10

Isolate the unit from power mains.

4.10

Converting for use with a different
type of gas

WARNING

Gas  conversion  operation  can  only  be  carried  out  by
qualified competent persons.

Содержание D2CND028A1AB

Страница 1: ...Installation manual Wall mounted condensing boiler English Installation manual Wall mounted condensing boiler D2CND028A1AB D2CND028A4AB D2CND035A1AB D2CND035A4AB D2TND028A4AB D2TND035A4AB...

Страница 2: ...tiivsete dokumentidega kui neid kasutatakse vastavalt meie juhenditele atitinka emiau nurodytus standartus ir arba kitus norminius dokumentus su s lyga kad yra naudojami pagal m s nurodymus tad ja lie...

Страница 3: ...pressure 29 Disposal Old units must be appropriately disposed of in accordance with local and national regulations The components are easy to separate and the plastics are marked This allows the vario...

Страница 4: ...r 2 Safety instructions These instructions are exclusively designed for qualified competent persons Work on gas units must only be carried out by a qualified gas fitter Work on electrical equipment mu...

Страница 5: ...s preventing the pressure from rising Safety valve When the water pressure of the heating circuit exceeds 3 bar some water is automatically drained from the safety valve to keep the pressure below 3 b...

Страница 6: ...5A1 4AB D2TND028 035A4AB Wall mounted condensing boiler 3P469346 5N 2019 11 Bottom view of model D2CND028A4AB and D2CND035A4AB 90 65 65 68 65 37 5 125 132 180 Bottom view of models D2TND028A4AB and D2...

Страница 7: ...s Silencer t Automatic air vent pump u Water pressure sensor v By pass w Boiler pump x Domestic hot water flow sensor y Domestic hot water flow limiter z Internal filling valve included in model D2CN...

Страница 8: ...31 Consumption min max m h 0 2 1 09 0 2 1 38 0 2 1 09 0 2 1 38 Combustion products mass flow rate min max G20 g s 2 2 12 35 2 2 15 47 2 2 12 35 2 2 15 47 Combustion products mass flow rate min max G31...

Страница 9: ...heaters 50 C return temperature at heater inlet 4 Installation 4 1 To open the unit WARNING Only qualified competent persons are allowed to open the unit Certain actions explained in this document suc...

Страница 10: ...urrent I E E Wiring Regulations local Building Regulations or any other local regulations currently in service The intake air must not include chemicals that may cause corrosion toxic gas formation an...

Страница 11: ...pressure bar In case system charge pressure needs to be more than 1 bar gas side initial charge pressure must be increased to the pressure value that is equal to system charge pressure Make sure that...

Страница 12: ...g circuit 0 0 100 200 300 400 500 600 700 800 200 400 600 800 1000 1200 1400 1600 1800 A mbar B l h A Residual pump lift mbar B Flow l h 4 8 Connections NOTICE During installation do not loosen or rem...

Страница 13: ...he following instructions WARNING Ignoring the rules explained below may result in serious damages in installation or boiler or cause discomfort of the user The manufacturer is not responsible for any...

Страница 14: ...pacity or incomplete electrical work may cause electrical shock or fire A main switch or other means for disconnection having a contact separation in all poles providing full disconnection under overv...

Страница 15: ...able glands that are sent with the unit must be assembled to the bottom sheet of the boiler in case connection of these options Below you can see the cable glands placement PG9 PG7 PG7 PG9 Holes on th...

Страница 16: ...Wall mounted condensing boiler 3P469346 5N 2019 11 4 8 6 Wiring diagram DANGER RISK OF ELECTROCUTION Disconnect the power supply for more than 10 minutes before servicing Models D2CND028A1AB D2CND028A...

Страница 17: ...Card Ext2 X10 Personal computer production interface Ext3 X1M Daikin room thermostat Ext4 X2M External power output 230 V AC Ext5 X2M Reserved not in use X1M X4 X11 X12 Low voltage terminal strip X2M...

Страница 18: ...vent backflow from common chimney Approved ue systems Choose a flue type according to the installation site Approved flue types are written on the identification label Flue termination The positions o...

Страница 19: ...nsible for atmospheric conditions when siting flue terminals CAUTION Once the flue system has been installed and the appliance commissioned the installer should observe the plume direction Particular...

Страница 20: ...rom the outside and expels flue gas to the outside through a concentric coaxial pipe via the roof The terminal outlets from separate combustion and air supply circuits shall fit inside a square of 50...

Страница 21: ...lowable length of the ue duct up to common chimney is 2 metres 1 60 100 90 elbow In C43x type units condensate flow into the unit is not allowed Type C63x concentric flue system INFORMATION C63 flue t...

Страница 22: ...mm 1 0 m Equivalent length of options 90 elbow 80 mm 2 0 m Subtract equivalent length value of bends from the allowable flue length value Note The air intake length is 3 metres In case of longer air...

Страница 23: ...circular and rough 130 11 6 34 1 Allowable flue length for C93x DN 80 Flex circular and rough 120 4 4 13 0 DN 80 Flex square and rough 140 23 8 69 9 DN 80 Flex square and rough 130 20 6 60 6 DN 80 Fle...

Страница 24: ...909 43 47 EKFGT6305 48 52 EKFGT6306 53 57 EKFGT6307 Flat roof outlet kit 60 100 EKFGP6940 80 125 EKFGW5333 Flue part Order code Wall bracket DN 100 EKFGP4631 DN 125 EKFGP4481 60 100 to 80 125 adapter...

Страница 25: ...filling pressure Filling operation should be done slowly When pressure exceeds 0 8 bar error code will disappear and the status indicator light will turn to blue Turn the valve 7 off 7 You can monito...

Страница 26: ...5 Commissioning WARNING Only qualified persons should conduct commissioning CAUTION Preliminary electrical system checks such as earth continuity polarity resistance to earth and short circuit must b...

Страница 27: ...the sweeper mode gas analyzer device should be mounted to its place on the flue 3 To activate the sweeper mode press Cancel and Menu buttons together 5 seconds With sweeper mode boiler can be operated...

Страница 28: ...s under the relevant national regulations Explain and demonstrate the lighting and shutting down procedures Explain the function and the use of the boiler heating and domestic hot water controls Expla...

Страница 29: ...person who commissioned the boiler as a means of demonstrating compliance with the appropriate Building Regulations and then handed to the customer to keep for future reference GAS BOILER SYSTEM COMMI...

Страница 30: ...g co uk It is recommended that your heating system is serviced regularly and that the appropriate Service Interval Record is completed Service Provider SERVICE RECORD SERVICE 01 AND Where Possible AND...

Страница 31: ......

Страница 32: ...ANBUL T RK YE Tel 0216 453 27 00 Faks 0216 671 06 00 a r Merkezi 444 999 0 Web www daikin com tr G lsuyu Mahallesi Fevzi akmak Caddesi Bur ak Sokak No 20 34848 Maltepe 3P469346 5N 2019 11 Copyright 20...

Отзывы: