background image

3

 | 

Third party components

Service manual

127

FTXF20~71A + FTXF20~25B + FTXF20~42C + ATXF20~71A + ATXF20~42C
+ RXF20~71A + RXF20~60B + RXF20~42C + ARXF20~71A + ARXF20~42C
Split Sensira R32
ESIE18-12E – 2021.02

3 Third party components

3.1 Electrical circuit

3.1.1 Checking procedures

To check the power supply of the unit

Prerequisite: 

Stop the unit operation via the user interface.

Prerequisite: 

Turn OFF the respective circuit breaker.

Prerequisite: 

Remove the required plate work, see 

"2.10 Plate work"

 [

4

 101].

1

Check that the power supply cables and earth connection are firmly fixed to
the power supply terminal X1M.

2

Measure  the  insulation  resistance  between  each  power  supply  terminal  and
the  ground  using  a  megger  device  of  500  V  DC.  All  measurements  MUST  be
>1MΩ. If insulation resistance is <1MΩ, earth leakage is present.

3

Turn ON the power using the respective circuit breaker.

4

Measure the voltage between L and N on the power supply terminal X1M.

Result: 

The voltage MUST be 230 V AC ± 10%.

5

Unbalance between the phases MUST NOT exceed 2%.

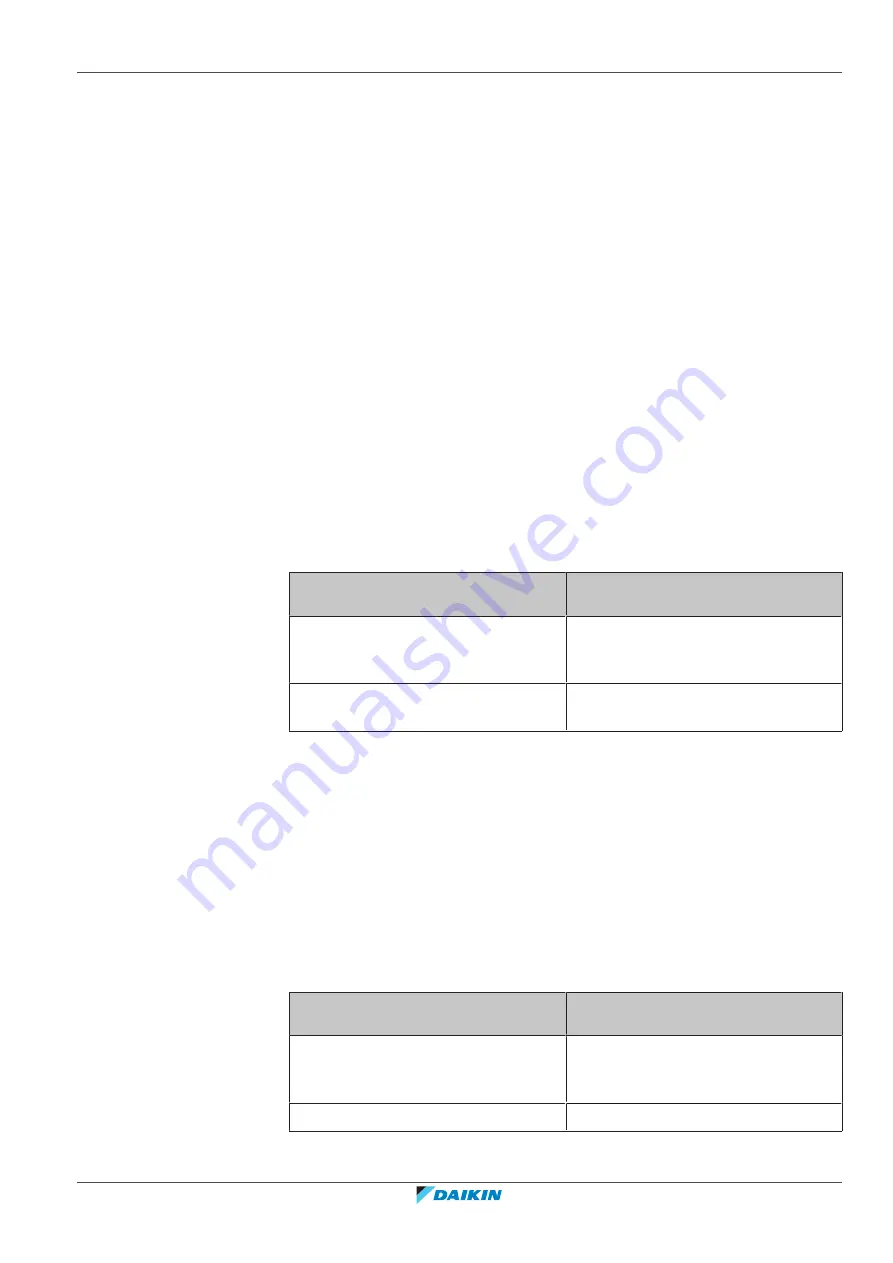
Is the measured voltage (power supply)
correct?

Action

Yes

Return to the troubleshooting of the
specific error and continue with the
next procedure.

No

Adjust the power supply, see

"3.1.2 Repair procedures"

 [

4

 128].

To check the power supply to the indoor unit

Prerequisite: 

Stop the unit operation via the user interface.

Prerequisite: 

Turn OFF the respective circuit breaker.

1

Remove the required plate work, see 

"2.10 Plate work"

 [

4

 101].

2

Check that the power supply cables and earth connection are firmly fixed to
the indoor unit power supply terminal X1M.

3

Turn ON the power using the respective circuit breaker.

4

Measure  the  voltage  between  L  and  N  on  the  indoor  unit  power  supply
terminal X1M.

Result: 

The voltage MUST be 230 V AC ± 10%.

Is the measured voltage (power supply)
correct?

Action

Yes

Return to the troubleshooting of the
specific error and continue with the
next procedure.

No

Continue with the next step.

5

Check the power supply to the unit, see 

"3.1.1 Checking procedures"

 [

4

 127].

Содержание ARXF A Series

Страница 1: ...Service manual Split Sensira R32 FTXF20 71A FTXF20 25B FTXF20 42C ATXF20 71A ATXF20 42C RXF20 71A RXF20 60B RXF20 42C ARXF20 71A ARXF20 42C ...

Страница 2: ...mpiled the content of this publication to the best of its knowledge No express or implied warranty is given for the completeness accuracy reliability or fitness for particular purpose of its content and the products and services presented therein Specifications are subject to change without prior notice Daikin Europe N V explicitly rejects any liability for any direct or indirect damage in the bro...

Страница 3: ...20 71A added Indoor unit models ATXF20A and ATXF50 71A added Technical data Wiring diagram Wiring diagrams for new models added Technical data Piping diagram Piping diagrams for new models added Technical data Piping diagram Piping diagram for models RXF20 25B updated Version code Description Date ESIE18 12E See below February 2021 The following updates have been applied to the Service Manual Outd...

Страница 4: ...ction sensor 20 1 5 19 H8 00 Outdoor unit Malfunction of compressor input system 21 1 5 20 H9 00 Outdoor unit Malfunction of outdoor air thermistor 21 1 5 21 J3 00 Outdoor unit Malfunction of discharge pipe thermistor 22 1 5 22 J6 00 Outdoor unit Malfunction of heat exchanger thermistor 22 1 5 23 L3 00 Outdoor unit Electrical box temperature rise problem 22 1 5 24 L4 00 Outdoor unit Malfunction of...

Страница 5: ...hecking procedures 127 3 1 2 Repair procedures 128 3 2 Refrigerant circuit 129 3 2 1 Checking procedures 129 3 2 2 Repair procedures 133 3 3 External factors 136 3 3 1 Checking procedures 136 4 Maintenance 138 4 1 To clean the outdoor unit heat exchanger 138 4 2 To clean the indoor unit heat exchanger 138 4 3 To clean the indoor unit heat exchanger in extreme condition 138 4 4 To clean the air fil...

Страница 6: ...troller to reset the error 1 3 To reset the error code via outdoor unit Prerequisite Problem is solved 1 Perform a power reset to reset the error code 1 4 To perform a test run Prerequisite Power supply MUST be in the specified range Prerequisite Test run may be performed in cooling or heating mode Prerequisite Test run should be performed in accordance with the operation manual of the indoor unit...

Страница 7: ...ts immediately after power is restored 1 5 Error based troubleshooting 1 5 1 A1 00 PCB abnormality Trigger Effect Reset The system CANNOT set the internal settings Unit will stop operating Power reset via outdoor unit To solve the error code INFORMATION It is recommended to perform the checks in the listed order 1 Check for improper combination of the indoor unit and the outdoor unit See the combi...

Страница 8: ...ntrol To solve the error code INFORMATION It is recommended to perform the checks in the listed order 1 Check for objects near the indoor unit that may block the airflow See 3 3 External factors 4136 Possible cause Airflow of the indoor unit is blocked 2 Clean the air filter of the indoor unit s See 4 Maintenance 4138 Possible cause Faulty or dirty air filter 3 Clean the indoor unit heat exchanger...

Страница 9: ...e 2 5 Indoor unit fan motor 464 Possible cause Faulty indoor unit fan motor INFORMATION If all procedures listed above have been performed and the problem is still present contact the helpdesk 1 5 4 C4 00 Heat exchanger temperature sensor problem Trigger Effect Reset Refrigerant liquid thermistor detects an open or short circuit during compressor operation Unit will stop operating Power reset To s...

Страница 10: ...PCB 467 Possible cause Faulty indoor unit main PCB INFORMATION If all procedures listed above have been performed and the problem is still present contact the helpdesk 1 5 6 E1 00 Outdoor unit PCB defect Trigger Effect Reset Main PCB detects that EEPROM is abnormal Unit will stop operating Manual reset via user interface Power reset To solve the error code INFORMATION It is recommended to perform ...

Страница 11: ...een performed and the problem is still present contact the helpdesk 1 5 7 E3 00 Outdoor unit Actuation of high pressure switch Trigger Effect Reset High pressure switch opens due to measured pressure above high pressure switch operating point Unit will stop operating Manual reset via user interface High pressure control measured pressure just below high pressure switch operating point occurs 16 ti...

Страница 12: ... runs without warning for 60 seconds To solve the error code INFORMATION It is recommended to perform the checks in the listed order 1 Check that all stop valves of the refrigerant circuit are open See 3 2 Refrigerant circuit 4129 Possible cause Closed stop valve in the refrigerant circuit 2 Perform a check of the discharge pipe thermistor See 2 13 Thermistors 4117 Possible cause Faulty discharge ...

Страница 13: ...in the listed order 1 Perform a check of the discharge pipe thermistor See 2 13 Thermistors 4117 Possible cause Faulty discharge pipe thermistor or connector fault 2 Check that all stop valves of the refrigerant circuit are open See 3 2 Refrigerant circuit 4129 Possible cause Closed stop valve in the refrigerant circuit 3 Check if the refrigerant circuit is clogged See 3 2 Refrigerant circuit 4129...

Страница 14: ...FORMATION It is recommended to perform the checks in the listed order 1 Perform a check of the outdoor unit fan motor See 2 9 Outdoor unit fan motor 492 Possible cause Faulty outdoor unit fan motor 2 Perform a check of the main PCB See 2 8 Main PCB 474 Possible cause Faulty main PCB INFORMATION If all procedures listed above have been performed and the problem is still present contact the helpdesk...

Страница 15: ...after a continuous operation for some time If the error occurs too soon unit will stop operating Manual reset via user interface To solve the error code INFORMATION It is recommended to perform the checks in the listed order 1 Perform a check of the 4 way valve See 2 1 4 way valve 437 Possible cause Faulty 4 way valve 2 Perform a check of the main PCB See 2 8 Main PCB 474 Possible cause Faulty mai...

Страница 16: ... It is recommended to perform the checks in the listed order 1 Check that all stop valves of the refrigerant circuit are open See 3 2 Refrigerant circuit 4129 Possible cause Closed stop valve in the refrigerant circuit 2 Check if the refrigerant circuit is correctly charged See 3 2 Refrigerant circuit 4129 Possible cause Refrigerant overcharge or shortage 3 Check for the presence of non condensabl...

Страница 17: ...lve in the refrigerant circuit 3 Perform a check of the heat exchanger thermistor See 2 13 Thermistors 4117 Possible cause Faulty heat exchanger thermistor 4 Perform a check of the expansion valve See 2 3 Expansion valve 453 Possible cause Faulty expansion valve 5 Perform a check of the main PCB See 2 8 Main PCB 474 Possible cause Faulty main PCB 6 Check if the refrigerant circuit is correctly cha...

Страница 18: ... non condensables and or humidity in the refrigerant circuit See 3 2 Refrigerant circuit 4129 Possible cause Non condensables and or humidity in the refrigerant circuit 4 Check if the refrigerant circuit is clogged See 3 2 Refrigerant circuit 4129 Possible cause Clogged refrigerant circuit 5 Perform a check of the discharge pipe thermistor See 2 13 Thermistors 4117 Possible cause Faulty discharge ...

Страница 19: ...properly on the heat sink INFORMATION If all procedures listed above have been performed and the problem is still present contact the helpdesk 1 5 17 H3 00 Outdoor unit Malfunction of high pressure switch Trigger Effect Reset High pressure switch is activated when compressor is off Unit will stop operating Manual reset via user interface To solve the error code INFORMATION It is recommended to per...

Страница 20: ... a check of the main PCB See 2 8 Main PCB 474 Possible cause Faulty main PCB 3 Check that all stop valves of the refrigerant circuit are open See 3 2 Refrigerant circuit 4129 Possible cause Closed stop valve in the refrigerant circuit 4 Check if the refrigerant circuit is clogged See 3 2 Refrigerant circuit 4129 Possible cause Clogged refrigerant circuit 5 Check if the refrigerant circuit is corre...

Страница 21: ...rm a check of the compressor See 2 2 Compressor 444 Possible cause Faulty compressor or miswiring of the compressor power supply cable 3 Perform a check of the reactor See 2 11 Reactor 4111 Possible cause Faulty reactor INFORMATION If all procedures listed above have been performed and the problem is still present contact the helpdesk 1 5 20 H9 00 Outdoor unit Malfunction of outdoor air thermistor...

Страница 22: ... If all procedures listed above have been performed and the problem is still present contact the helpdesk 1 5 22 J6 00 Outdoor unit Malfunction of heat exchanger thermistor Trigger Effect Reset Outdoor heat exchanger thermistor input is out of range Unit will stop operating Manual reset via user interface To solve the error code INFORMATION It is recommended to perform the checks in the listed ord...

Страница 23: ...y outdoor heat exchanger INFORMATION If all procedures listed above have been performed and the problem is still present contact the helpdesk 1 5 24 L4 00 Outdoor unit Malfunction of inverter radiating fin temperature rise Trigger Effect Reset Radiating fin thermistor measures a too high temperature Unit will stop operating Manual reset via user interface To solve the error code INFORMATION It is ...

Страница 24: ...e To solve the error code INFORMATION It is recommended to perform the checks in the listed order 1 Check that all stop valves of the refrigerant circuit are open See 3 2 Refrigerant circuit 4129 Possible cause Closed stop valve in the refrigerant circuit 2 Check if the refrigerant circuit is clogged See 3 2 Refrigerant circuit 4129 Possible cause Clogged refrigerant circuit 3 Check if the refrige...

Страница 25: ...the problem is still present contact the helpdesk 1 5 26 P4 00 Outdoor unit Malfunction of radiating fin temperature sensor Trigger Effect Reset Radiating fin thermistor input is out of range Unit will stop operating Manual reset via user interface To solve the error code INFORMATION It is recommended to perform the checks in the listed order 1 Perform a check of the main PCB See 2 8 Main PCB 474 ...

Страница 26: ...mpressor power supply cable 7 Perform a check of the expansion valve See 2 3 Expansion valve 453 Possible cause Faulty expansion valve 8 Check for leaks in the refrigerant circuit Look for oil traces on the unit s Check the brazing points on the field piping Perform a pressure test see 3 2 Refrigerant circuit 4129 Possible cause Leak in the refrigerant circuit INFORMATION If all procedures listed ...

Страница 27: ...rating Power reset via outdoor unit To solve the error code INFORMATION It is recommended to perform the checks in the listed order 1 Check if the power supply is conform with the regulations See 3 1 Electrical circuit 4127 Possible cause Faulty or disturbance of the power supply imbalance 4 Power drop Short circuit 2 Perform a check of the power supply connections wiring between the outdoor unit ...

Страница 28: ...Trigger Effect Reset Signal transmission between outdoor and indoor unit abnormality Improper combination of outdoor and indoor unit Unit will stop operating Power reset via outdoor unit To solve the error code INFORMATION It is recommended to perform the checks in the listed order 1 Check for improper combination of the indoor unit and the outdoor unit See the combination table in the Databook fo...

Страница 29: ... C WB or higher Cooling operation cannot be used when the outdoor temperature is below 10 C DB When the operation lamp blinks there may be an error code activating the protection device Diagnose with remote controller indication See 1 5 Error based troubleshooting 47 Check the remote controller addresses Are the address settings for the remote controller and indoor unit correct Check the operation...

Страница 30: ...hin specified range Field piping is defective is there a refrigerant leakage Is there capacity loss over the condensor saturation pressure or sound because of air mixed in to the circuit Incorrect size of connection wiring When the operation lamp blinks there may be a thermistor detection error code activating the protection device Check the resistance of all thermistors Check the connection of al...

Страница 31: ...vibration prevention where needed If the mounting wall is too thin you must use cushion material or rubber or change the installation place Refrigerant piping is too short is the length within specified range Due to bad installation or general conditions there may be deformation of the unit Are all the screws installed and tightened properly Is all piping secured fixed and supported by inserting a...

Страница 32: ...ual inspection Does air enter the refrigerant system Conduct refrigerant collection and vacuum drying and then add proper amount refrigerant Is the refrigerant overcharged Conduct refrigerant collection and vacuum drying and then add proper amount refrigerant In heating mode Check item Detail Does the indoor unit fan run normally Visual inspection Is the indoor unit heat exchanger clogged Visual i...

Страница 33: ...there clogging before or after the expansion valve capillary Check if there is a temperature difference before and after expansion valve capillary Check if the main valve unit of expansion valve operates by noise vibration Is the check valve if applicable clogged Check if there is a temperature difference before and after check valve If YES the check valve is clogged Is there a shortage of refrige...

Страница 34: ...10 supplied Check the insulation of the electric system Check the thermistor Connection witch PCB Output Check PCB s HAP LED s if applicable if green led on the control PCB is not blinking then the microprocessor is not working if the green led on the main PCB is not blinking then the microprocessor is not working if first green LED on the service monitor PCB is not blinking then the microprocesso...

Страница 35: ...Air in the system Water in the system Check the fan motor Check the magnetic switch Check the overcurrent relay Check the four way valve coil Is there a short circuit Is the four way valve coil broken Check the outdoor PCB Is there a short circuit Is the outdoor PCB broken Check the heat exchanger Soiled heat exchanger obstruction Check the airflow Soiled air filter obstruction installation space ...

Страница 36: ...y site Oil mist Check installation conditions Dirty heat exchanger Air filter Dirty air filter Fan motor Defective fan motor 1 6 11 Swing flap does not operate Symptom Check Detail Swing flap does not operate Check swing flap motor Some functions can force the swing flap into a fixed position although swing mode is selected on the remote controller This is not a unit error but a control function t...

Страница 37: ...he coil gets hot while energized Wait for it to cool down 2 Verify that the screw is firmly fixing the coil to the valve body 3 Check if any damage or burst is present Is the 4 way valve coil firmly fixed and not visually damaged Action Yes Perform an electrical check of the 4 way valve see 2 1 1 Checking procedures 437 No Fix or replace the 4 way valve coil see 2 1 2 Repair procedures 441 To perf...

Страница 38: ... Class 20 42 12 V DC Class 50 71 220 240 V AC 7 De activate Heating and activate Cooling operation via the user interface 8 Measure the voltage on the 4 way valve connection on the PCB Result The measured voltage MUST be Class Voltage Class 20 42 0 V DC Class 50 71 0 V AC Are the measured voltages correct Action Yes Perform a position check of the 4 way valve see 2 1 1 Checking procedures 437 No P...

Страница 39: ...4 way valve see 2 1 1 Checking procedures 437 When outdoor temperature is mild and unit can switch between heating and cooling INFORMATION This procedure is ONLY possible when the outdoor temperature is within the temperature range for both Heating and Cooling operation mode See the databook on Business Portal for the temperature range of the operation modes 2 Activate Heating operation via the us...

Страница 40: ...rature is outside the temperature range for one of the operation modes Heating or Cooling The unit CANNOT operate in the mode for which the outdoor temperature is outside its temperature range See the databook on Business Portal for the temperature range of the operation modes 7 With the unit operating connect the service monitoring tool to the unit and check whether the unit is operating in Heati...

Страница 41: ... 4 way valve coil c 4 way valve body 2 Cut all tie straps that fix the 4 way valve coil harness 3 Disconnect the 4 way valve coil connector from the appropriate PCB 4 To install the 4 way valve coil see 2 1 2 Repair procedures 441 To remove the 4 way valve body Prerequisite Recuperate the refrigerant from the refrigerant circuit see 3 2 2 Repair procedures 4133 1 Remove the 4 way valve coil from t...

Страница 42: ... the 4 way valve pipe ends 7 Stop the nitrogen supply when the piping has cooled down 8 To install the 4 way valve body see 2 1 2 Repair procedures 441 To install the 4 way valve body 1 Remove the coil from the valve body 2 Install the 4 way valve in the correct location INFORMATION If any refrigerant pipes were cut during removal of the 4 way valve body ALWAYS install new pipes 3 Supply nitrogen ...

Страница 43: ... circuit see 3 2 2 Repair procedures 4133 To install the 4 way valve coil 1 Install the 4 way valve coil on the 4 way valve body c a b a Screw b 4 way valve coil c 4 way valve body 2 Install and tighten the screw to fix the 4 way valve coil 3 Route the 4 way valve coil harness towards the appropriate PCB 4 Connect the 4 way valve coil connector to the PCB WARNING When reconnecting a connector to t...

Страница 44: ...to the compressor when it tries to operate Judge if a mechanical lock is present INFORMATION If you have a multimeter with data logging functionality record the current in 1 of the U V W wires at compressor start up If mechanical lock is present logged current will drastically increase to a peak value and the unit will trigger an error INFORMATION If a mechanical lock is present also check and eli...

Страница 45: ... the compressor dampers for any damage a a 1 Damper INFORMATION The compressor dampers may look different Compressor dampers are in a good condition Action Yes Perform an electrical check of the compressor see 2 2 1 Checking procedures 444 No Replace the compressor and or damaged dampers see 2 2 2 Repair procedures 449 To perform an electrical check of the compressor 1 First perform a mechanical c...

Страница 46: ...ctors on the compressor wire terminals to allow correct connection during installation V U W U Wire terminal U V Wire terminal V W Wire terminal W CAUTION Before measuring the compressor motor windings resistance measure the resistance of the multimeter probes by holding the probes against each other If the measured resistance is NOT 0 Ώ this value MUST be substracted from the measured winding res...

Страница 47: ...re terminal W 7 Install the compressor insulation 8 Turn ON the power using the respective circuit breaker 9 Start the unit operation via the user interface 10 Wait for or create condition to operate the compressor 11 Once the compressor operates measure the U V W inverter voltages All measurements MUST be the same Inverter voltage measurements are correct Action Yes Continue with the next step No...

Страница 48: ...ace 1 Turn OFF the respective circuit breaker DANGER RISK OF ELECTROCUTION Wait for at least 10 minutes after the circuit breaker has been turned OFF to be sure the rectifier voltage is below 10 V DC before proceeding 2 Remove the cover of the compressor wire terminals a a Compressor wire terminals cover 3 Disconnect the Faston connectors from the compressor wire terminals U V and W INFORMATION No...

Страница 49: ...epair procedures To remove the compressor Prerequisite Stop the unit operation via the user interface Prerequisite Turn OFF the respective circuit breaker Prerequisite Remove the required plate work see 2 10 Plate work 4101 Prerequisite Remove the compressor insulation Prerequisite Recuperate the refrigerant from the refrigerant circuit see 3 2 2 Repair procedures 4133 1 If needed remove any parts...

Страница 50: ...ing installation V U W U Wire terminal U V Wire terminal V W Wire terminal W 4 Cut the compressor pipes below the soldered joint using a pipe cutter a a a Compressor pipe 5 Supply nitrogen to the refrigerant circuit The nitrogen pressure MUST NOT exceed 0 02 MPa 6 Heat the ends of the compressor pipes using an oxygen acetylene torch and remove the compressor pipe ends 7 Stop the nitrogen supply wh...

Страница 51: ...Remove the bushings and keep them for re use 11 To install the compressor see 2 2 2 Repair procedures 449 To install the compressor 1 Check the state of the dampers Replace if worn 2 Install the 3 dampers in the correct location on the unit a a b c c c a a Nut b Compressor c Damper INFORMATION The compressor dampers may look different 3 Remove the caps from the compression pipe and suction pipe CA...

Страница 52: ...d any other components near the compressor and solder the compressor pipes to the refrigerant pipes a a a Compressor pipe CAUTION Overheating the compressor pipes and the oil inside the compressor pipes will damage or destroy the compressor 6 After soldering is done stop the nitrogen supply after the component has cooled down 7 Connect the Faston connectors to the compressor wire terminals U V and...

Страница 53: ...nical check of the expansion valve Prerequisite Power OFF the unit for 3 minutes Then turn ON the unit and listen to the expansion valve assembly If the expansion valve does NOT make a latching sound continue with the electrical check of the expansion valve see 2 3 1 Checking procedures 453 Prerequisite Stop the unit operation via the user interface Prerequisite Turn OFF the respective circuit bre...

Страница 54: ...ctrical check of the expansion valve see 2 3 1 Checking procedures 453 No Replace the expansion valve body see 2 3 2 Repair procedures 456 To perform an electrical check of the expansion valve 1 First perform a mechanical check of the expansion valve see 2 3 1 Checking procedures 453 2 Disconnect the electrical connector of the expansion valve coil from the appropriate PCB and measure the resistan...

Страница 55: ...nterface 3 With the unit operating connect the service monitoring tool to the unit 4 When the expansion valve is closed according to the service monitoring tool check the inlet and outlet of the valve with a contact thermometer or use an expansion valve stethoscope to see if refrigerant flows through the expansion valve Check that the valve is NOT bleeding Result There MUST be NO flow through the ...

Страница 56: ...let and outlet of the valve with a contact thermometer or use an expansion valve stethoscope to see if refrigerant flows through the expansion valve Result Refrigerant MUST flow through the expansion valve Is the flow through the expansion valve correct Action Yes Component is OK Return to the troubleshooting of the specific error and continue with the next step No Replace the expansion valve see ...

Страница 57: ...n position of the expansion valve coil before removal a b a Expansion valve motor b Expansion valve motor harness INFORMATION The expansion valve and motor can have a different configuration layout 4 Cut all tie straps that fix the expansion valve motor harness 5 Disconnect the expansion valve motor connector from the main PCB 6 To install the expansion valve motor see 2 3 2 Repair procedures 456 ...

Страница 58: ...nfiguration layout 3 Cut the expansion valve pipes using a pipe cutter 4 Remove the expansion valve body 5 Supply nitrogen to the refrigerant circuit The nitrogen pressure MUST NOT exceed 0 02 MPa 6 Heat the ends of the expansion valve pipes using an oxygen acetylene torch and remove the expansion valve pipe ends 7 Stop the nitrogen supply when the piping has cooled down 8 To install the expansion...

Страница 59: ...y it 4 After soldering is done stop the nitrogen supply after the component has cooled down a b c a Putty b Expansion valve pipe c Expansion valve body a b a Expansion valve pipe b Expansion valve body INFORMATION The expansion valve and motor can have a different configuration layout 5 Reinstall the putty 6 To install the expansion valve motor see 2 3 2 Repair procedures 456 7 Add refrigerant to ...

Страница 60: ...CB WARNING When reconnecting a connector to the PCB make sure to connect it on the correct location and do NOT apply force as this may damage the connector or connector pins of the PCB 4 Fix the expansion valve motor harness using new tie straps 5 Install the insulation cap on the expansion valve motor if applicable Is the problem solved Action Yes No further actions required No Return to 2 3 1 Ch...

Страница 61: ...the expansion valve motor harness using new tie straps 5 Install the insulation cap on the expansion valve motor if applicable Is the problem solved Action Yes No further actions required No Return to 2 3 1 Checking procedures 453 of the expansion valve and continue with the next procedure 2 4 High pressure switch 2 4 1 Checking procedures To perform an electrical check of the high pressure switch...

Страница 62: ...ing between the high pressure switch and the appropriate PCB If NO continuity is measured repair as needed see 5 2 Wiring diagram 4142 4 Measure the resistance between the Faston connections of the high pressure switch Result The switch MUST be closed 5 Fill the refrigerant circuit with nitrogen until pressurized just above operating pressure of the high pressure switch 6 Measure the resistance be...

Страница 63: ...ures To remove the high pressure switch Prerequisite Stop the unit operation via the user interface Prerequisite Turn OFF the respective circuit breaker Prerequisite Remove the required plate work see 2 10 Plate work 4101 Prerequisite Recuperate the refrigerant from the refrigerant circuit see 3 2 2 Repair procedures 4133 1 If needed remove any parts to create more space for the removal of the hig...

Страница 64: ...pressure switch and solder the high pressure switch pipe to the refrigerant pipe a c b b a High pressure switch b Faston connector c High pressure switch pipe CAUTION Overheating the pressure switch will damage or destroy it 4 After soldering is done stop the nitrogen supply after the component has cooled down 5 Connect the Faston connectors to the high pressure switch 6 Add refrigerant to the ref...

Страница 65: ...ures 464 No Replace the DC fan motor assembly see 2 5 2 Repair procedures 465 To perform an electrical check of the DC fan motor assembly Prerequisite First perform a mechanical check of the DC fan motor assembly see 2 5 1 Checking procedures 464 1 Remove the cover from the switch box see 2 10 Plate work 4101 2 Disconnect the DC fan motor connector from the appropriate PCB 3 Measure the resistance...

Страница 66: ... fan motor cover for easier removal a a Indoor unit fan motor cover 3 Remove the rubber from the indoor unit 4 Remove the indoor unit fan motor from the indoor unit 5 To install the indoor unit fan motor see 2 5 2 Repair procedures 465 To install the DC fan motor assembly 1 Install the indoor unit fan motor in its correct location on the fan 2 Install the rubber in front of the fan motor 3 Click t...

Страница 67: ...the indoor unit main PCB Prerequisite Stop the unit operation via the user interface Prerequisite Turn OFF the respective circuit breaker Prerequisite Remove the required plate work see 2 10 Plate work 4101 1 Turn ON the power of the unit 2 Measure the voltage between the black and white wires on the PCB The measured voltage MUST be 230 V AC a b a Black wire b White wire Is the measured voltage on...

Страница 68: ...art number corresponds with the spare part number indicated in the webbank Is the correct spare part for the indoor unit PCB installed Action Yes Return to 2 6 1 Checking procedures 467 of the indoor unit PCB and continue with the next procedure No Replace the indoor unit PCB see 2 6 2 Repair procedures 469 To check the wiring of the indoor unit main PCB Prerequisite First perform all earlier chec...

Страница 69: ...es 467 of the indoor unit main PCB and continue with the next procedure Problem solved After all checking procedures listed above have been performed Is the problem solved Action Yes No further actions required No Return to the troubleshooting of the specific error and continue with the next procedure 2 6 2 Repair procedures To correct the wiring from the indoor unit power supply terminal to the i...

Страница 70: ...equisite Turn OFF the respective circuit breaker Prerequisite Remove the required plate work see 2 10 Plate work 4101 1 Disconnect all connectors from the indoor unit main PCB 2 Carefully pull the indoor unit main PCB from the PCB supports b b a b a Indoor unit PCB b PCB support 3 Remove the indoor unit main PCB from the indoor unit 4 To install the indoor unit main PCB see 2 6 2 Repair procedures...

Страница 71: ...s the problem solved Action Yes No further actions required No Return to 2 6 1 Checking procedures 467 of the indoor unit main PCB and continue with the next procedure To remove a fuse of the indoor unit main PCB Prerequisite Stop the unit operation via the user interface Prerequisite Turn OFF the respective circuit breaker Prerequisite Remove the required plate work see 2 10 Plate work 4101 1 Rem...

Страница 72: ...ck of the inverter PCB Prerequisite Stop the unit operation via the user interface Prerequisite Turn OFF the respective circuit breaker Prerequisite Remove the required plate work see 2 10 Plate work 4101 1 Open the compressor insulation DANGER RISK OF ELECTROCUTION Wait for at least 10 minutes after the circuit breaker has been turned OFF to be sure the rectifier voltage is below 10 V DC before p...

Страница 73: ...ransistor check operation may damage the compressor INFORMATION Wait for 3 minutes for the power transistor check operation to start 6 All LED s on the Inverter Analyzer must lit 7 Turn off the respective circuit breaker 8 Wait a few minutes and confirm that the LED s of the Inverter Analyzer are off 9 Disconnect the Inverter Analyzer from the Faston connectors 10 Connect the Faston connectors to ...

Страница 74: ...res As the inverter PCB is integrated in the main PCB of the unit see 2 8 Main PCB 474 for the repair procedures 2 8 Main PCB 2 8 1 Class 20 42 units Checking procedures INFORMATION It is recommended to perform the checks in the listed order To perform a power check of the main PCB Prerequisite Stop the unit operation via the user interface Prerequisite Turn OFF the respective circuit breaker Prer...

Страница 75: ...wer supply to the unit see 3 1 2 Repair procedures 4128 To check the HAP LED of the main PCB Prerequisite First check the power supply to the main PCB see Checking procedures 474 1 Locate the HAP LED on the main PCB a a HAP LED INFORMATION Make sure the correct software is available on the PCB If NOT update using the updater tool Does the HAP LED blink in regular intervals 1 second ON 1 second OFF...

Страница 76: ...ng of the main PCB Prerequisite First perform all earlier main PCB checks see Checking procedures 474 Prerequisite Stop the unit operation via the user interface 1 Turn OFF the respective circuit breaker 2 Check that all wires are properly connected and that all connectors are fully plugged in 3 Check that no connectors or wires are damaged 4 Check that the wiring corresponds with the wiring diagr...

Страница 77: ...in PCB and continue with the next procedure To check the rectifier voltage of the main PCB Prerequisite First perform all earlier main PCB checks see Checking procedures 474 1 Turn ON the power of the unit 2 Measure the voltage on the rectifier voltage check terminals and on the main PCB Result The measured voltage MUST be approximately 324 V DC b a a terminal b terminal INFORMATION When measuring...

Страница 78: ...rectifier voltage is NOT OK replace the main PCB Below procedure describes how to check the diode module itself Prerequisite Stop the unit operation via the user interface 2 Turn OFF the respective circuit breaker DANGER RISK OF ELECTROCUTION Wait for at least 10 minutes after the circuit breaker has been turned OFF to be sure the rectifier voltage is below 10 V DC before proceeding 3 Check the di...

Страница 79: ...eration via the user interface 1 Turn OFF the respective circuit breaker DANGER RISK OF ELECTROCUTION Wait for at least 10 minutes after the circuit breaker has been turned OFF to be sure the rectifier voltage is below 10 V DC before proceeding Power module IPM1 for compressor 1 Disconnect the compressor connector from the main PCB 2 Check the power module IPM1 in reference with the image and the ...

Страница 80: ...2 Check the power module IPM2 in reference with the image and the table below e d a b c a U b V c W d DC e DC INFORMATION When measuring on the front of the main PCB make sure to locally remove the protective varnish with the test leads of the multi meter VDC Com Ref VDC Com Ref U DC 0 475 V DC U O L V DC 0 475 V DC V O L W DC 0 475 V DC W O L DC U 0 475 V U DC O L DC V 0 475 V V DC O L DC W 0 475...

Страница 81: ...Turn OFF the respective circuit breaker Prerequisite Remove the required plate work see 2 10 Plate work 4101 1 Disconnect all connectors from the main PCB 2 Disconnect the power supply wires from the main power supply terminal X1M and route the wires out of the ferrite core s d d e e d a a b c a Power supply wiring b Red wire c Ground wire d Screw e PCB support 3 Disconnect the red wire from the t...

Страница 82: ...round wires through the ferrite core s Install the ground wiring on the switch box and fix using the screw 5 Route the reactor wires towards the reactor and connect the Faston connectors to the reactor 6 Route the power supply wiring through the ferrite core s and connect it to the main power supply terminal X1M 7 Route the red wire through the ferrite core s and connect it to the main power suppl...

Страница 83: ...fuse from the PCB a a Fuse 2 To install a fuse on the main PCB see Repair procedures 481 To install a fuse on the main PCB WARNING For continued protection against risk of fire replace only with same type and rating of fuse 1 Install the fuse on the correct location on the PCB CAUTION Make sure the fuse is plugged in correctly contact with the fuse holder a a Fuse Is the problem solved Action Yes ...

Страница 84: ...Turn ON the power of the unit 2 Measure the voltage between the black and white wires Result The measured voltage MUST be 230 V AC a b a Black wire b White wire Is the measured voltage on the PCB correct Action Yes Return to Checking procedures 484 of the PCB and continue with the next procedure No Continue with the next step 3 Check the power supply to the unit see 3 1 1 Checking procedures 4127 ...

Страница 85: ...quisite First perform all earlier main PCB checks see Checking procedures 484 1 Visit your local spare parts webbank 2 Enter the model name of your unit and check if the installed spare part number corresponds with the spare part number indicated in the webbank NOTICE Also check that the correct spare part is installed for the capacity adapter Is the correct spare part for the PCB installed Action...

Страница 86: ...ther actions required No Return to Checking procedures 484 of the PCB and continue with the next procedure To check the fuse of the main PCB Prerequisite First perform all earlier main PCB checks see Checking procedures 484 1 Measure the continuity of the fuse If no continuity is measured the fuse has blown c a b a Fuse F1U b Fuse F2U c Fuse F3U Blown fuse on the main PCB Action Yes Replace the ma...

Страница 87: ...form a check of the power module see Checking procedures 484 No Replace the main PCB see Repair procedures 489 To perform a diode module check 1 First check the rectifier voltage of the main PCB see Checking procedures 484 INFORMATION If the rectifier voltage is OK the diode module is OK If rectifier voltage is NOT OK replace the main PCB Below procedure describes how to check the diode module its...

Страница 88: ...V c d O L c a 0 51 0 52 V a c O L 4 If the diode module is NOT OK replace the main PCB see Repair procedures 489 To perform a power module check Prerequisite First check the rectifier voltage of the main PCB see Checking procedures 484 Prerequisite Stop the unit operation via the user interface 1 Turn OFF the respective circuit breaker DANGER RISK OF ELECTROCUTION Wait for at least 10 minutes afte...

Страница 89: ...V O L W DC 0 501 V DC W O L DC U 0 501 V U DC O L DC V 0 501 V V DC O L DC W 0 501 V W DC O L Are the test results OK Action Yes Power module is OK Return to Checking procedures 484 of the main PCB and continue with the next procedure No Replace the main PCB see Repair procedures 489 Problem solved After all checking procedures listed above have been performed Is the problem solved Action Yes No f...

Страница 90: ...nector h Tie strap compressor harness i Ferrite core compressor harness j Screw k Main PCB 3 Remove the screw and remove the ground wiring from the switch box Route the ground wire out of the ferrite core 4 If applicable Disconnect the connector X12A 5 Disconnect the compressor connector 6 Cut the tie straps that fix the compressor harness to the switch box 7 Route the compressor harness out of th...

Страница 91: ...and connect the compressor connector 5 Install new tie straps to fix the compressor harness to the switch box 6 Route the ground wire through the ferrite core Install the ground wiring on the switch box and fix using the screw 7 If applicable Connect the connector X12A 8 Route the power supply wiring through the ferrite core and connect it to the main power supply terminal X1M 9 Fix the power supp...

Страница 92: ...assembly damaged Action Yes Replace the propeller fan blade assembly see Repair procedures 494 No Perform a mechanical check of the DC fan motor assembly see Checking procedures 492 To perform a mechanical check of the DC fan motor assembly Prerequisite First perform a mechanical check of the propeller fan blade assembly see Checking procedures 492 1 Visually check For any burnt out part or wire I...

Страница 93: ... next step 5 Turn OFF the unit via the user interface 6 Turn OFF the respective circuit breaker DANGER RISK OF ELECTROCUTION Wait for at least 10 minutes after the circuit breaker has been turned OFF to be sure the rectifier voltage is below 10 V DC before proceeding 7 Check that the DC fan motor connector is properly connected to the PCB 8 Unplug the DC fan motor connector and measure the resista...

Страница 94: ...owly rotate the fan blade propeller 1 turn and measure the voltage on the DC fan motor connector pins 10 12 Result 4 pulses MUST be measured 13 Repeat the previous step and measure the voltage on the DC fan motor connector pins 10 13 Result 4 pulses MUST be measured Pulses are measured during fan blade propeller rotation Action Yes Perform a check of the main PCB see Checking procedures 474 No Rep...

Страница 95: ...Slightly bend the harness retainers to detach the DC fan motor harness 7 Remove the 4 screws that fix the DC fan motor assembly 8 Remove the DC fan motor assembly from the unit 9 To install the DC fan motor assembly see Repair procedures 494 To install the DC fan motor assembly 1 Install the DC fan motor assembly in the correct location 2 Fix the DC fan motor assembly to the unit by tightening the...

Страница 96: ...dure 2 9 2 Class 50 71 units Checking procedures INFORMATION It is recommended to perform the checks in the listed order To perform a mechanical check of the propeller fan blade assembly Prerequisite Stop the unit operation via the user interface Prerequisite Turn OFF the respective circuit breaker Prerequisite Remove the required plate work see 2 10 Plate work 4101 1 If propeller fan blade touche...

Страница 97: ...ion Yes Perform an electrical check of the DC fan motor assembly see Checking procedures 496 No Replace the DC fan motor assembly see Repair procedures 499 To perform an electrical check of the DC fan motor assembly 1 First perform a mechanical check of the DC fan motor assembly see Checking procedures 496 INFORMATION Check the DC fan motor power supply voltage circuit on the PCB 2 Turn ON the pow...

Страница 98: ...DC fan motor see Repair procedures 499 9 Turn ON the power of the unit 10 With the DC fan motor connector S70 disconnected from the inverter PCB measure the voltage on the connector pins 4 7 fan motor power supply on the inverter PCB Result The voltage MUST be 200 390 V DC 11 Measure the voltage on the connector pins 4 3 fan motor control on the inverter PCB Result The voltage MUST be 15 10 V DC A...

Страница 99: ...k of the main PCB see Checking procedures 474 No Replace the DC fan motor see Repair procedures 499 Problem solved After all checking procedures listed above have been performed Is the problem solved Action Yes No further actions required No Return to the troubleshooting of the specific error and continue with the next procedure Repair procedures To remove the propeller fan blade assembly Prerequi...

Страница 100: ...tach the DC fan motor harness 7 Remove the 4 screws that fix the DC fan motor assembly 8 Remove the DC fan motor assembly from the unit 9 To install the DC fan motor assembly see Repair procedures 499 To install the DC fan motor assembly 1 Install the DC fan motor assembly in the correct location 2 Fix the DC fan motor assembly to the unit by tightening the screws 3 Route the DC fan motor harness ...

Страница 101: ...12E 2021 02 a b a Nut b Propeller fan blade assembly Is the problem solved Action Yes No further actions required No Return to Checking procedures 496 of the outdoor unit fan motor and continue with the next procedure 2 10 Plate work 2 10 1 Outdoor unit To remove the refrigerant connection cover DANGER RISK OF ELECTROCUTION DANGER RISK OF BURNING SCALDING 1 1 2 2 ...

Страница 102: ...just an example and may differ on some details for your actual unit Prerequisite Stop the unit operation via the user interface 1 Turn OFF the respective circuit breaker DANGER RISK OF ELECTROCUTION Wait for at least 10 minutes after the circuit breaker has been turned OFF to be sure the rectifier voltage is below 10 V DC before proceeding 2 Loosen and remove the screws that fix the top plate a b ...

Страница 103: ...t plate To remove the compressor sound insulation INFORMATION This procedure is just an example and may differ on some details for your actual unit Prerequisite Remove the front plate see 2 10 Plate work 4101 1 Untwist the cord and remove the compressor sound insulation a a Compressor sound insulation To remove the switch box INFORMATION This procedure is just an example and may differ on some det...

Страница 104: ...it Sensira R32 ESIE18 12E 2021 02 a b a Insulation b Main PCB 2 Disconnect all connectors from the main PCB 3 Disconnect the electrical power supply wiring from the wire terminals f a d c b e a Electrical power supply wiring b Wire terminals c Screws d Wire clamp e Screws f Right side plate assembly 4 Remove the screws that fix the wire clamp ...

Страница 105: ...te assembly 7 Cut the cable tie a b a Cable tie b Switch box 8 Lift and remove the switch box from the outdoor unit 9 To install the switch box see 2 10 Plate work 4101 To install the switch box INFORMATION This procedure is just an example and may differ on some details for your actual unit 1 Install the switch box on the correct location in the outdoor unit 2 Install the right side plate assembl...

Страница 106: ...lectrical power supply wiring to the wire terminals 4 Install the wire clamp and fix it using the screws 5 Connect all connectors to the main PCB INFORMATION Use the wiring diagram and connection diagram for correct installation of the connectors see 5 2 Wiring diagram 4142 WARNING When reconnecting a connector to the PCB make sure to connect it on the correct location and do NOT apply force as th...

Страница 107: ...R32 ESIE18 12E 2021 02 a b a Cable tie b Switch box 7 Install the insulation on the upper side of the switch box a b a Insulation b Main PCB 2 10 2 Indoor unit To open the front panel 1 Hold the front panel by the panel tabs on both sides and open it To close the front panel 1 Gently press the front panel at both sides and at the center until it clicks ...

Страница 108: ...anel shaft on 1 side will be disconnected 3 Disconnect the front panel shaft on the other side in the same manner a a Front panel shaft To open the service cover 1 Remove 1 screw from the service cover 2 Pull out the service cover horizontally away from the unit a b a Service cover screw b Service cover To remove the front grille CAUTION Wear adequate personal protective equipment protective glove...

Страница 109: ...lle push it up and then toward you 1 2 To remove the electrical wiring box cover 1 Remove the front grille 2 Remove 1 screw from the electrical wiring box 3 Open the electrical wiring box cover by pulling the protruding part on the top of the cover 4 Unhook the tab on the bottom and remove the electrical wiring box cover a a c b a 1 3 2 a Tab b Protruding part on the top of the cover c Screw 5 To ...

Страница 110: ... 3 Remove the screws to disconnect the grounding wires from the heat exchanger a a b c d e a Grouding wire screw b Heat exchanger thermistor c Indoor unit PCB d Switch box screw e Switch box 4 Disconnect the connectors of the indoor unit fan motor the swing flap motor and the swing raster motor if equipped from the indoor unit PCB 5 Remove the screw and remove the switch box from the indoor unit 6...

Страница 111: ...back on the front grille 3 Install the air filter and then mount the front panel 2 11 Reactor 2 11 1 Checking procedures To perform an electrical check of the reactor Prerequisite Stop the unit operation via the user interface Prerequisite Turn OFF the respective circuit breaker 1 Remove the required plate work see 2 10 Plate work 4101 DANGER RISK OF ELECTROCUTION Wait for at least 10 minutes afte...

Страница 112: ...128 7 mΩ Is the resistance measurement correct Action Yes Return to the troubleshooting of the specific error and continue with the next step No Replace the reactor see 2 11 2 Repair procedures 4114 Class 50 71 units 1 Check that the reactors are firmly installed on the main PCB a b a Reactor L803 b Reactor L804 2 Remove the main PCB see Repair procedures 489 The reactor measuring points are ONLY ...

Страница 113: ...rrect Action Yes Proceed with the next step No Replace the reactor see 2 11 2 Repair procedures 4114 4 Measure the inductance of the reactor using an LCR meter Result The inductance MUST be as follows Measuring points Resistance c d 88 5 101 5 µH d d c c a b c d c d a L803 b L804 c Measuring point d Measuring point Is the inductance measurement correct Action Yes Return to the troubleshooting of t...

Страница 114: ...nterface Prerequisite Turn OFF the respective circuit breaker 1 Remove the required plate work see 2 10 Plate work 4101 2 Remove the Faston connectors to disconnect the wires from the reactor 3 Remove the 2 screws that fix the reactor to the switch box 4 Remove the reactor a b b a Reactor b Screw 5 To install the reactor see 2 11 2 Repair procedures 4114 To install the reactor 1 Install the reacto...

Страница 115: ...k 4101 1 Disconnect the swing flap motor connector from the indoor unit main PCB 2 Measure the resistance between the following pins of the motor connector Result The measurements MUST be as shown in the table below Pins Measured resistance Ω 1 2 232 5 267 5 1 3 1 4 1 5 2 3 465 535 2 4 2 5 3 4 3 5 4 5 Swing flap motor resistance measurements are correct Action Yes Return to the troubleshooting of ...

Страница 116: ...wing flap motor from the swing flap 5 To install the swing flap motor see 2 12 2 Repair procedures 4115 To install the swing flap motor 1 Install the swing flap motor in the correct location on the swing flap a b c a Cover b Screw c Swing flap motor 2 Install and tighten the screw to fix the swing flap motor 3 Connect the connector to the swing flap motor 4 Install the cover Is the problem solved ...

Страница 117: ...ng or ambient for air thermistor Is the thermistor correctly installed thermal contact between the thermistor and the piping Action Yes Perform an electrical check of the specific thermistor see Checking procedures 4117 No Correctly install the thermistor see Repair procedures 4121 To perform an electrical check of the specific thermistor 1 First perform a mechanical check of the thermistor see Ch...

Страница 118: ... S27 1 2 on display PCB B Heat exchanger thermistor R2T Main I U S32 1 2 A 4 Determine the thermistor resistance that matches the measured temperature Thermistor Table A T C kΩ T C kΩ T C kΩ T C kΩ 20 197 81 10 39 96 40 10 63 70 3 44 19 18 17 16 15 14 13 12 11 186 53 175 97 166 07 156 80 148 10 139 94 132 28 125 09 118 34 11 12 13 14 15 16 17 18 19 38 08 36 30 34 62 33 02 31 50 30 06 28 70 27 41 2...

Страница 119: ...8 61 46 26 44 05 41 95 31 32 33 34 35 36 37 38 39 15 43 14 79 14 18 13 59 13 04 12 51 12 01 11 52 11 06 61 62 63 64 65 66 67 68 69 4 70 4 54 4 38 4 23 4 08 3 94 3 81 3 68 3 56 Thermistor Table B T C kΩ T C kΩ T C kΩ T C kΩ 30 25 20 15 10 5 0 200 20 144 32 105 38 77 90 58 25 44 0 33 6 5 10 15 20 25 30 35 25 9 20 2 15 8 12 5 10 0 8 0 6 5 40 45 50 55 60 65 70 5 3 4 3 3 6 3 0 2 5 2 1 1 8 75 80 85 90 9...

Страница 120: ...interface display replace the applicable PCB INFORMATION See the overview of the thermistors at the start of the procedure and the 5 2 Wiring diagram 4142 to determine if the specific thermistor is either Directly connected to the PCB Connected to an intermediate connector which is connected to the PCB For thermistors directly connected to the PCB Does the measured resistance of the thermistor mat...

Страница 121: ...he respective circuit breaker Prerequisite Remove the required plate work see 2 10 Plate work 4101 1 Disconnect the connector from the display PCB 2 Press the latches to unlock and remove the display PCB from the unit 3 To install the indoor unit air room thermistor see Repair procedures 4121 Other refrigerant side thermistors Prerequisite Stop the unit operation via the user interface Prerequisit...

Страница 122: ...e the thermistor INFORMATION Some of the thermistors are wired to the same connector See connector and pin information of the thermistors at the start of the electrical check procedure and 5 2 Wiring diagram 4142 ALWAYS replace the complete set of thermistors wired to the same connector 8 When removing the complete set of thermistors wired to the same connector Remove all other thermistors wired t...

Страница 123: ...lay PCB in the correct location on the unit 2 Connect the connector to the display PCB Other refrigerant side thermistors 3 Install the thermistor in the thermistor holder as follows For outdoor unit air ambient thermistor Correctly install the thermistor in the holder and close the thermistor holder For refrigerant piping thermistors Pull the clip and install the thermistor in the specific thermi...

Страница 124: ... a connector to the PCB make sure to connect it on the correct location and do NOT apply force as this may damage the connector or connector pins of the PCB 7 Fix the thermistor harness using new tie straps 8 Install the insulation around the thermistor 9 Fix the insulation and the thermistor wire using new tie straps Is the problem solved Action Yes No further actions required No Return to the tr...

Страница 125: ...4 18 32 17 54 16 80 51 52 53 54 55 56 57 58 59 6 91 6 65 6 41 6 65 6 41 6 18 5 95 5 74 5 14 0 65 84 30 16 10 60 4 87 1 2 3 4 5 6 7 8 9 62 54 59 43 56 49 53 71 51 09 48 61 46 26 44 05 41 95 31 32 33 34 35 36 37 38 39 15 43 14 79 14 18 13 59 13 04 12 51 12 01 11 52 11 06 61 62 63 64 65 66 67 68 69 4 70 4 54 4 38 4 23 4 08 3 94 3 81 3 68 3 56 4 Measure the resistance between the appropriate connectio...

Страница 126: ...sira R32 ESIE18 12E 2021 02 INFORMATION All thermistors have a resistance tolerance of 3 Does the measured resistance of the thermistor match with the temperature determined resistance Action Yes Thermistor is OK Return to the troubleshooting of the specific error and continue with the next procedure No Replace the specific PCB see 2 Components 437 ...

Страница 127: ...N on the power supply terminal X1M Result The voltage MUST be 230 V AC 10 5 Unbalance between the phases MUST NOT exceed 2 Is the measured voltage power supply correct Action Yes Return to the troubleshooting of the specific error and continue with the next procedure No Adjust the power supply see 3 1 2 Repair procedures 4128 To check the power supply to the indoor unit Prerequisite Stop the unit ...

Страница 128: ...ing as needed Is the problem solved Action Yes No further actions required No Return to the troubleshooting of the specific error and continue with the next procedure 3 1 2 Repair procedures To adjust the power supply 1 Make sure that the power source is in line with the requirements described in the databook 2 Adjust the power supply within 50 Hz 3 Is the problem solved Action Yes No further acti...

Страница 129: ...n to the troubleshooting of the specific error and continue with the next procedure 3 2 Refrigerant circuit 3 2 1 Checking procedures INFORMATION It is recommended to perform the checks in the listed order To check if the stop valves are open Prerequisite Remove the required plate work see 2 10 Plate work 4101 1 Remove the caps a b a Liquid stop valve b Gas stop valve 2 Check if the stop valves ar...

Страница 130: ...d 2 5 4K an internal pipe obstruction may be present at this location INFORMATION Focus on positions with a potential risk for clogging such as Filters Valves Brazing points INFORMATION A bigger temperature drop before and after the expansion valve can be normal however excessive ice is indicating a malfunction of the expansion valve or internal obstruction of the valve dirt or ice build up in cas...

Страница 131: ... amount Higher degree of overcharge Degree of overcharge To maintain high pressure frequency decreases under the capacity control Low pressure drops due to closed outdoor unit electronic expansion valve High pressure drops or rises immediately after the overload control is complete Low pressure rises due to decreased frequency Frequency comes to the minimum level The electronic expansion valve is ...

Страница 132: ...to compressor capacity decreasing Operating frequency comes to the lowest level Heating Frequency Low pressure High pressure Proper amount Higher degree of shortage Degree of refrigerant shortage To maintain low pressure frequency initially increases due to the capacity control Frequency drops due to the low pressure drooping control High pressure is maintained at a constant level Frequency comes ...

Страница 133: ...ce the refrigerant see 3 2 2 Repair procedures 4133 No Return to the troubleshooting of the specific error and continue with the next procedure To perform a pressure test of the refrigerant circuit 1 Perform a pressure test in line with local legislation Is the pressure in the refrigerant circuit correct Action Yes Return to the troubleshooting of the specific error and continue with the next proc...

Страница 134: ... repaired See also Repair information 4135 for more details Is the problem solved Action Yes No further actions required No Return to the troubleshooting of the specific error and continue with the next procedure To recuperate the refrigerant Prerequisite Stop the unit operation via the user interface 1 Manually open all expansion valves 2 Connect the vacuum pump manifold recovery unit and refrige...

Страница 135: ...riate equipment and tools according to the refrigerant and unit type R32 can be charged in gas phase Make sure to use a digital scale no charging cylinder Execute correct vacuum drying procedure after repair 0 1 MPa 760 mm Hg 750 Torr 1 bar for at least 1 hour Connect the unit according to the available service ports Use related field setting where necessary to open expansion valve solenoid valve ...

Страница 136: ...e apply insulation removed during repair Pipe expansion flare making Remove any burrs on the cut surface using the correct tool such as reamer or scraper note that excessive deburring can thin the pipe walls and cause cracking of the pipe Make sure the flare has the correct size use a flare gauge Make sure no particles remain in the piping Apply just a drop of refrigerant oil on the inner surface ...

Страница 137: ...he troubleshooting of the specific error and continue with the next procedure No Wait for the outdoor temperature to return within the operating range To check for objects that may block the airflow 1 Check for the presence of object s near the indoor unit that may block the airflow Remove the object s as needed Is the problem solved Action Yes No further actions required No Return to the troubles...

Страница 138: ...e indoor unit heat exchanger 1 Straighten the hair fins 2 Clear the indoor unit heat exchanger from dust using a fin comb or compressed air N2 CAUTION Avoid bending or damaging the hair fins of the indoor unit heat exchanger during the cleaning process Is the problem solved Action Yes No further actions required No Return to the troubleshooting of the specific error and continue with the next proc...

Страница 139: ...blem solved Action Yes No further actions required No Return to the troubleshooting of the specific error and continue with the next procedure 4 4 To clean the air filters 1 Push the tab at the centre of each air filter then pull it down 2 Pull out the air filters 2 1 3 Wash the air filters with water or clean them with a vacuum cleaner 4 Soak in lukewarm water for about 10 to 15 minutes INFORMATI...

Страница 140: ...20 25B FTXF20 42C ATXF20 71A ATXF20 42C RXF20 71A RXF20 60B RXF20 42C ARXF20 71A ARXF20 42C Split Sensira R32 ESIE18 12E 2021 02 Is the problem solved Action No Return to the troubleshooting of the specific error and continue with the next procedure ...

Страница 141: ... information setting mode 5 1 1 Detailed information setting mode Indoor unit See the installer reference guide on business portal for more information 5 1 2 Detailed information setting mode Outdoor unit See the installer reference guide on business portal for more information 5 1 3 Detailed information setting mode Remote controller See the installer reference guide on business portal for more i...

Страница 142: ...gram English Translation Wiring diagram Wiring diagram Indoor Indoor Outdoor Outdoor Transmission circuit Transmission circuit Signal receiver Signal receiver Wireless remote control Wireless remote control Horizontal Horizontal Vertical Vertical 2 Notes English Translation Connection X1M Main terminal Field supply PCB Protective earth A Rectifier Field wire NOTES BLK Black BLU Blue BRN Brown GRN ...

Страница 143: ...agnetic relay PCB1 PCB2 PCB3 Printed circuit board R1T Room thermistor R2T Suction pipe thermistor S6 S602 Connector S1W Operation switch V2 Varistor X1M Terminal strip Z C Ferrite core FTXF50 71A ATXF50 71A 1 Wiring diagram English Translation Wiring diagram Wiring diagram Indoor Indoor Outdoor Outdoor Transmission circuit Transmission circuit Wireless remote control Wireless remote control Horiz...

Страница 144: ...n When the main power is turned off and then back on again operation will resume automatically 3 Legend FG HE S6 S900 Connector F1U FU1 Fuse T1R L301 Transformer M1F Fan motor M S Swing flap motor K1R MR10 Magnetic relay A P Printed circuit board R1T R2T Thermistor BS1 S1W Operation switch R2V V2 Varistor X1M Terminal strip Z C Ferrite core IPM Intelligent power module H P LED Pilot lamp V1R DB301...

Страница 145: ...1 Wiring diagram English Translation Wiring diagram Wiring diagram Indoor Indoor Outdoor Outdoor Condenser Condenser Discharge Discharge 2 Notes English Translation Note Note Connection X1M Main terminal Field supply PCB Protective earth Earth Field wire NOTES 1 Refer to the nameplate for the power requirements 3 Legend C Capacitor D401 D402 Diode DB1 Diode bridge E1 E2 HL1 HN1 S HR1 HR2 Connectio...

Страница 146: ...h S20 S90 Connector V2 V3 Varistor X1M Terminal strip Y1S Reversing solenoid valve coil PTC1 Thermistor Y1E Electronic expansion valve Z C Noise filter ferrite core Z F Noise filter RXF50A 1 Wiring diagram English Translation Wiring diagram Wiring diagram Indoor Indoor Outdoor Outdoor Condenser Condenser Discharge Discharge 2 Notes English Translation Connection X1M Main terminal Field supply PCB ...

Страница 147: ...M1C Compressor motor M1F Fan motor MR Magnetic relay N Neutral PAM Pulse amplitude modulation PCB Printed circuit board PS Switching power supply Q1L Overload protector R1T R2T R3T Thermistor S2 S90 Terminal connector SA1 Surge arrestor V2 V3 V150 Varistor X11A Connector X1M Terminal strip Y1E Electronic expansion valve Y1S Reversing solenoid valve coil Z C Ferrite core Z F Noise filter RXF60A 1 W...

Страница 148: ...upply PCB Protective earth Earth Field wire NOTES GRY Grey BLK Black WHT White BRN Brown RED Red GRN Green YLW Yellow ORG Orange BLU Blue For the power requirements refer to the nameplate 3 Legend C Capacitor D Diode DB1 Diode bridge E1 E2 HL1 HN1 S U V W Connection FU1 FU2 FU3 Fuse IPM Intelligent power module L Live M1C Compressor motor M1F Fan motor MR Magnetic relay N Neutral N 4 N 5 Number of...

Страница 149: ...e arrestor V1 V2 V3 Varistor X11A X14A Connector X1M Terminal strip Y1E Electronic expansion valve coil Y1S Reversing solenoid valve coil Z C Ferrite core Z F Noise filter RXF71A RXF50 60B ARXF50 71A 1 Wiring diagram English Translation Wiring diagram Wiring diagram Indoor Indoor Outdoor Outdoor Condenser Condenser Discharge Discharge 2 Notes English Translation Connection X1M Main terminal Field ...

Страница 150: ...1 HN1 S U V W Connector FU1 FU2 FU3 Fuse IPM Intelligent power module L Live M1C Compressor motor M1F Fan motor MR Magnetic relay N Neutral N 4 N 5 Number of passes PAM Pulse amplitude modulation PCB Printed circuit board PS Switching power supply Q1L Overload protector R1T R2T R3T Thermistor S1PH High pressure switch S2 S90 Terminal connector SA1 Surge arrestor V1 V2 V3 Varistor X11A Connector X1...

Страница 151: ...t FTXF20 35A 6 4CuT 9 5CuT 9 5CuT 6 4CuT a b c d R2T M1F a Field piping liquid Ø6 4 mm flare connection b Field piping gas Ø9 5 mm flare connection c Crossflow fan d Heat exchanger M1F Fan motor R2T Thermistor heat exchanger Heating Cooling INFORMATION The diagrams shown in this manual may be incorrect due to changes updates to the unit Correct diagrams are supplied with the unit and can also be f...

Страница 152: ...35C 6 4CuT 9 5CuT 9 5CuT 6 4CuT a b c d R2T M1F a Field piping liquid Ø6 4 mm flare connection b Field piping gas Ø9 5 mm flare connection c Crossflow fan d Heat exchanger M1F Fan motor R2T Thermistor heat exchanger Heating Cooling INFORMATION The diagrams shown in this manual may be incorrect due to changes updates to the unit Correct diagrams are supplied with the unit and can also be found in t...

Страница 153: ...T M1F 6 4CuT 6 4CuT 9 5CuT 9 5CuT a Field piping liquid Ø6 4 mm flare connection b Field piping gas Ø9 5 mm flare connection c Crossflow fan d Heat exchanger M1F Fan motor R2T Thermistor heat exchanger Heating Cooling INFORMATION The diagrams shown in this manual may be incorrect due to changes updates to the unit Correct diagrams are supplied with the unit and can also be found in the technical d...

Страница 154: ... 7CuT 6 4CuT a b c d R2T M1F e a Field piping liquid Ø6 4 mm flare connection b Field piping gas Ø12 7 mm flare connection c Crossflow fan d Heat exchanger e Distributor M1F Fan motor R2T Thermistor heat exchanger Heating Cooling INFORMATION The diagrams shown in this manual may be incorrect due to changes updates to the unit Correct diagrams are supplied with the unit and can also be found in the...

Страница 155: ...ield piping gas Ø9 5 mm flare connection c Stop valve liquid d Stop valve with service port gas e Muffler with filter f Heat exchanger g Accumulator h Muffler M1C Compressor M1F Fan R1T Thermistor outdoor air R2T Thermistor heat exchanger R3T Thermistor compressor discharge Y1E Electronic expansion valve Y1S Solenoid valve 4 way valve S1PH High pressure switch Cooling Heating INFORMATION The diagr...

Страница 156: ...ping liquid Ø6 4 mm flare connection b Field piping gas Ø9 5 mm flare connection c Stop valve liquid d Stop valve with service port gas e Muffler with filter f Heat exchanger g Accumulator h Muffler M1C Compressor M1F Fan R1T Thermistor outdoor air R2T Thermistor heat exchanger R3T Thermistor compressor discharge S1PH High pressure switch Y1E Electronic expansion valve Y1S Solenoid valve 4 way val...

Страница 157: ... connection c Stop valve liquid d Stop valve gas e Muffler f Liquid receiver g Filter h Muffler with filter i Heat exchanger j Accumulator M1C Compressor M1F Fan R1T Thermistor outdoor air R2T Thermistor heat exchanger R3T Thermistor compressor discharge Y1E Electronic expansion valve Y1S Solenoid valve 4 way valve Cooling Heating INFORMATION The diagrams shown in this manual may be incorrect due ...

Страница 158: ...nnection c Stop valve liquid d Stop valve gas e Muffler f Liquid receiver g Filter h Muffler with filter j Heat exchanger j Accumulator M1C Compressor M1F Fan R1T Thermistor outdoor air R2T Thermistor heat exchanger R3T Thermistor discharge pipe S1PH High pressure switch Y1E Electronic expansion valve Y1S Solenoid valve 4 way valve Heating Cooling INFORMATION The diagrams shown in this manual may ...

Страница 159: ...op valve gas e Muffler f Liquid receiver g Filter h Muffler with filter i Heat exchanger j Accumulator M1C Compressor M1F Fan R1T Thermistor outdoor air R2T Thermistor heat exchanger R3T Thermistor compressor discharge S1PH High pressure switch manual reset S2PH High pressure switch automatic reset Y1E Electronic expansion valve Y1S Solenoid valve 4 way valve Cooling Heating INFORMATION The diagra...

Страница 160: ...3T Y1E Y1S e e e i j S1PH M1F a Field piping liquid Ø6 4 mm flare connection b Field piping gas Ø12 7 mm flare connection c Stop valve liquid d Stop valve gas e Muffler f Liquid receiver g Filter h Muffler with filter i Heat exchanger j Accumulator M1C Compressor M1F Fan R1T Thermistor outdoor air R2T Thermistor heat exchanger R3T Thermistor compressor discharge S1PH High pressure switch Y1E Elect...

Страница 161: ...XF20 60B RXF20 42C ARXF20 71A ARXF20 42C Split Sensira R32 ESIE18 12E 2021 02 5 4 Component overview 5 4 1 Component overview Indoor unit a b c d e f h g a Heat exchanger b Heat exchanger thermistor R2T c Fan motor d Swing flap e Swing flap motor f Room thermistor R1T PCB g Switch box h Indoor unit PCB ...

Страница 162: ...verview Outdoor unit i j h k l n m o p q a b c d e f g h m m a Air thermistor R1T j Service PCB b Heat exchanger k High pressure switch NOT for RXF50A c Expansion valve l Discharge pipe thermistor R3T d Heat exchanger thermistor R2T m Muffler e Liquid receiver n Accumulator f Stop valve with service port gas o Compressor g Stop valve liquid p Fan motor h 4 way valve coil q Fan i Main inverter PCB ...

Страница 163: ...l data Service manual 163 FTXF20 71A FTXF20 25B FTXF20 42C ATXF20 71A ATXF20 42C RXF20 71A RXF20 60B RXF20 42C ARXF20 71A ARXF20 42C Split Sensira R32 ESIE18 12E 2021 02 5 5 Field information report See next page ...

Страница 164: ...ation is required Please fill out the following form before contacting your distributor FIELD INFORMATION REPORT Key person information Name Company name Your contact details Phone number E mail address Site address Your reference Date of visit Claim information Title Problem description Error code Trouble date Problem frequency Investigation steps done Insert picture of the trouble Current situat...

Страница 165: ...PCB A1P Software version hydro PCB A5P Software version user interface Software version outdoor PCB Minimum water volume Maximum water volume Brine composition and mixture Brine freeze up temperature Space heating control leaving water temperature room thermostat external room thermostat Space heating setpoint Domestic hot water control reheat only schedule only reheat schedule Domestic hot water ...

Страница 166: ...s 1 For an overview of the available service tools check the Business Portal http www mydaikin eu 2 Go to the tab After sales support on the left navigation pane and select Technical support 3 Click the button Service tools An overview of the available service tools for the different products is shown Also additional information on the service tools instruction latest software can be found here ...

Страница 167: ... 1 Field settings Indoor unit To control the indoor unit fan during thermostat off in cooling INFORMATION As this unit has no remote controller installed order the remote controller ARC480A1 separately to perform this procedure 1 Press the centre of and simultaneously 2 Press 3 Select SU 4 Press to confirm 5 Press 6 Select 4 7 Press to confirm 8 Press 9 Select 0 0 fan ON 1 fan OFF 10 Press to conf...

Страница 168: ...ce with people 1 Cut the jumper J6 on the circuit board using nippers or a similar tool to expand the operation range of the outdoor unit down to 15 C INFORMATION The outdoor unit will stop operating when the temperature drops below 20 C and start back up once the temperature rises again 2 Below is an overview of the other jumpers settings J5 No function for this unit J8 Cold region setting changi...

Страница 169: ......

Страница 170: ......

Страница 171: ......

Страница 172: ...ESIE18 12E 2021 02 Copyright 2018 Daikin Verantwortung für Energie und Umwelt ...

Отзывы: