491
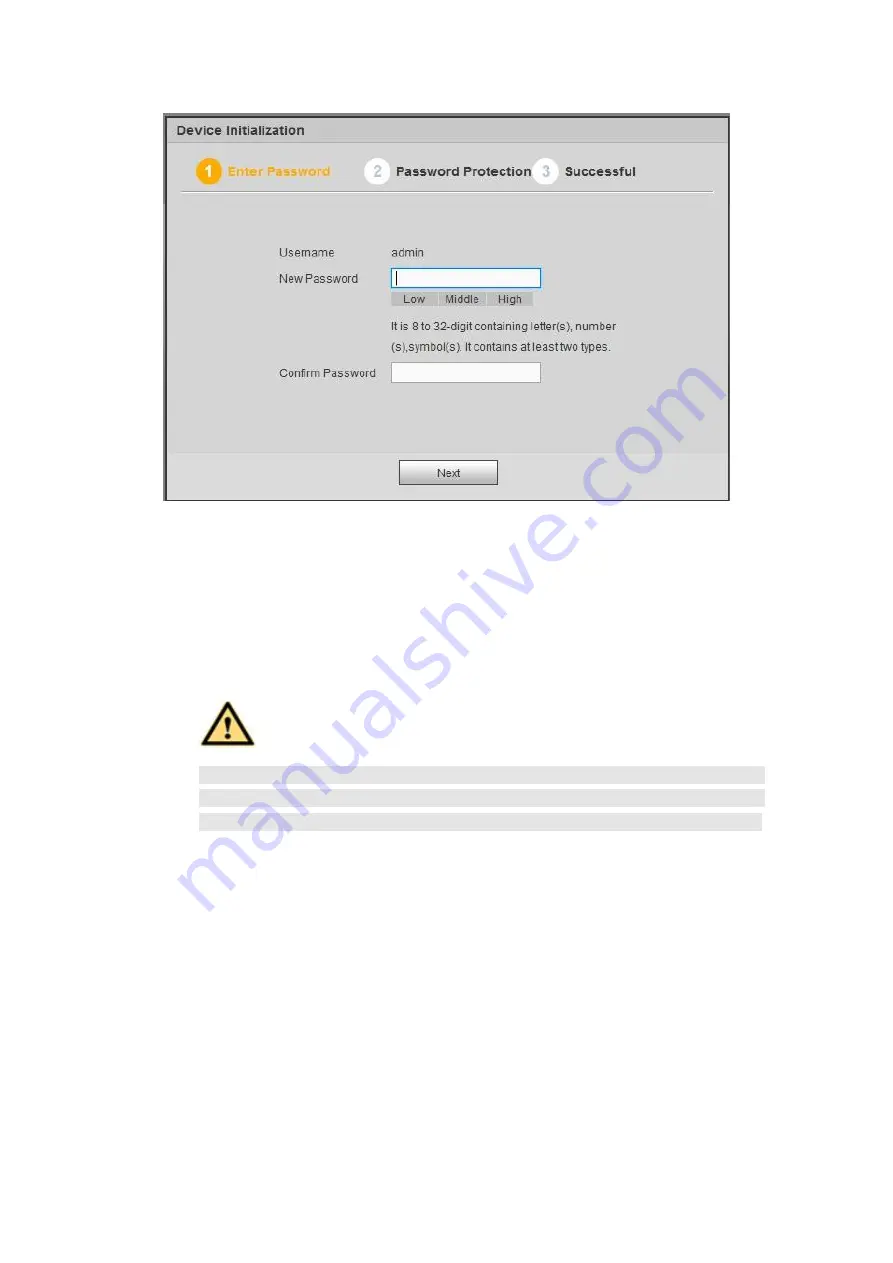
Figure 5- 1
Step 3 Set login password of
admin
.
User name: The default user name is
admin
.
Password/confirm password: The password ranges from 8 to 32 digitals. It can
contain letters, numbers and special characters (excluding
“
'
”
,
“
"
”
,
“
;
”
,
“
:
”
,
“
&
”
) . The password shall contain at least two categories. Usually we
recommend the strong password.
WARNING
STRONG PASSWORD RECOMMENDED-For your device own safety, please
create a strong password of your own choosing. We also recommend you
change your password periodically especially in the high security system.
Step 4 Click Next, device goes to the following interface. See Figure 5- 2.
Содержание HCVR5104C Series
Страница 1: ...Dahua HDCVI Standalone DVR User s Manual Dahua HDCVI Standalone DVR User s Manual V2 3 2 ...
Страница 200: ...184 ...
Страница 402: ...386 restore original status Figure 4 115 Figure 4 116 4 9 1 3 1Upgrade Camera It is to update the online camera ...
Страница 425: ...409 Figure 4 137 Figure 4 138 ...
Страница 432: ...416 Figure 4 145 Step 2 Draw tripwire 1 Click Draw button to draw the tripwire See Figure 4 146 Figure 4 146 ...
Страница 436: ...420 Figure 4 149 Step 2 Draw the zone 1 Click draw button to draw the zone See Figure 4 150 Figure 4 150 ...
Страница 438: ...422 Figure 4 151 Step 2 Draw the zone 1 Click draw button to draw the zone See Figure 4 152 Figure 4 152 ...
Страница 440: ...424 Figure 4 153 Step 2 Draw the zone 1 Click Draw button to draw a zone See Figure 4 154 ...
Страница 446: ...430 Figure 4 157 Figure 4 158 ...
Страница 447: ...431 Figure 4 159 Figure 4 160 ...
Страница 448: ...432 Figure 4 161 Figure 4 162 ...
Страница 451: ...435 Figure 4 165 Figure 4 166 ...
Страница 452: ...436 Figure 4 167 Figure 4 168 ...
Страница 458: ...442 Figure 4 177 Figure 4 178 4 9 4 1 2 2 Trigger Snapshot ...
Страница 460: ...444 Figure 4 180 Figure 4 181 4 9 4 1 2 3 Priority ...
Страница 466: ...450 Figure 4 186 Figure 4 187 ...
Страница 471: ...455 Figure 4 193 Figure 4 194 ...
Страница 484: ...468 Figure 4 209 For digital channel the interface is shown as below See Figure 4 210 Figure 4 210 ...
Страница 491: ...475 Figure 4 218 Step 2 Click Add user button in Figure 4 218 The interface is shown as in Figure 4 219 Figure 4 219 ...
Страница 557: ...541 Figure 5 69 Figure 5 70 ...
Страница 573: ...557 device Figure 5 86 Figure 5 87 ...
Страница 579: ...563 Figure 5 94 Figure 5 95 ...
Страница 580: ...564 Figure 5 96 Figure 5 97 Please refer to the following sheet for detailed information ...
Страница 584: ...568 Figure 5 101 Figure 5 102 Figure 5 103 Please refer to the following sheet for detailed information ...
Страница 607: ...591 Figure 5 136 Note For admin you can change the email information See Figure 5 137 ...
Страница 637: ...621 448K 196M 512K 225M 640K 281M 768K 337M 896K 393M 1024K 450M 1280K 562M 1536K 675M 1792K 787M 2048K 900M ...


