background image


12 

4.7.1.2.2 Configuring the Allowlist 

Configure IP addresses that are allowed to access the box. Only IP addresses on the allowlist can be 
used to log in to the web interface. This is to enhance data security. 
Step 1 

On the home page, select 

Settings

 > 

Network Setting

 > 

Allowlist

Step 2 

Click 

  to enable the allowlist. 

Step 3 

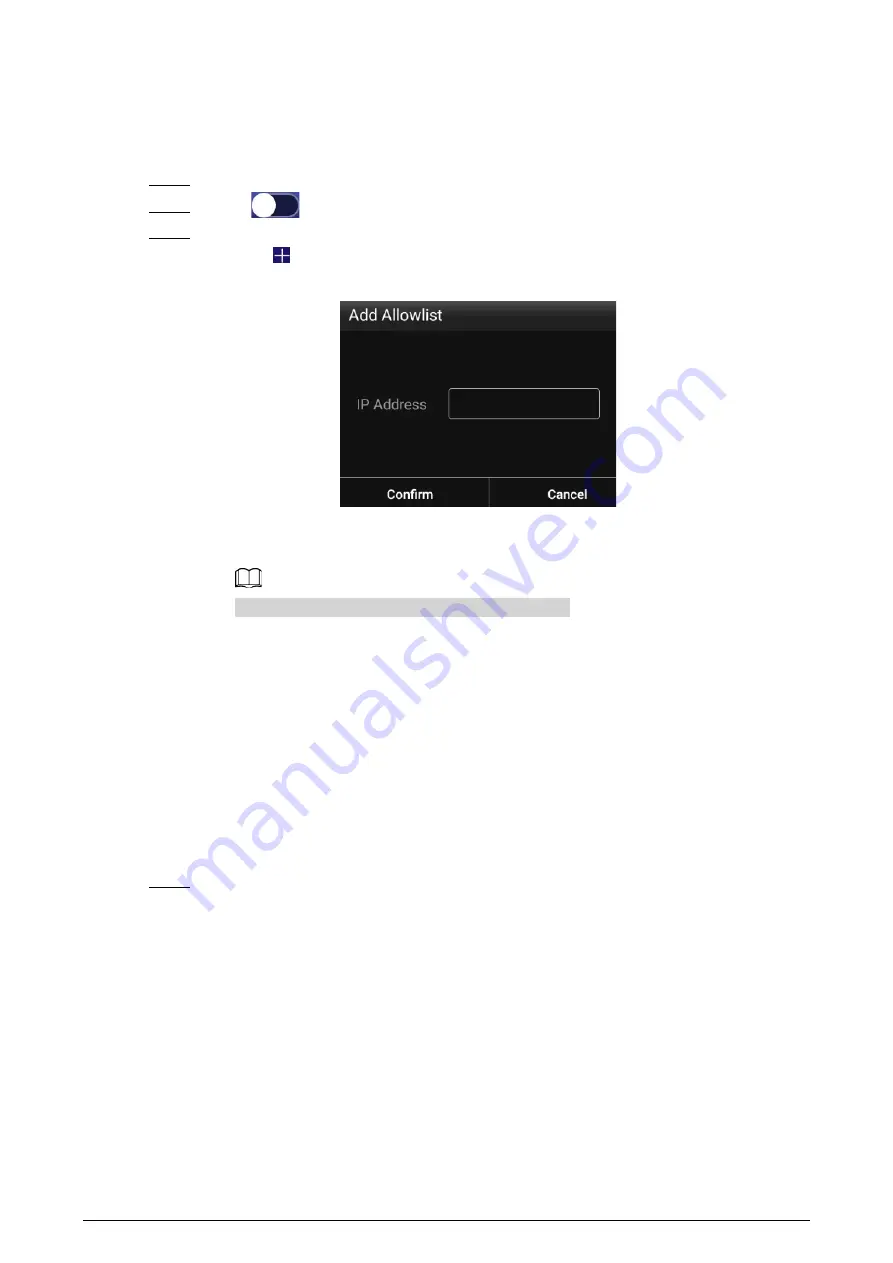
Add the IP address of the target device to the allowlist. 
1)   Click 

Figure 4-10 Add allowlist 


2)   Enter an IP address. 
3)   Click 

Confirm


You can add multiple IP addresses to your allowlist. 

4.7.1.3 Registering the Box to the Platform 

Register the box to the platform, and then you can release projects through the platform and play 
the projects on the box. 

  The box and the platform are connected to the same network. To connect the box and the 

platform to the network, see "4.7.1.2.1 Connecting the Box to the Network". 

  If allowlist is enabled, make sure that the IP address of the platform is added to the allowlist. For 

allowlist configuration, see "4.7.1.2.2 Configuring the Allowlist". 

Procedure 

Step 1 

On the home page, click 

Network Release

Содержание DS04-AI400

Страница 1: ...Distributed Play Box User s Manual V1 0 1...

Страница 2: ...se April 2022 Privacy Protection Notice As the device user or data controller you might collect the personal data of others such as their face fingerprints and license plate number You need to be in c...

Страница 3: ...the functions operations and technical data If there is any doubt or dispute we reserve the right of final explanation Upgrade the reader software or try other mainstream reader software if the manual...

Страница 4: ...oot Install the box on a stable surface to prevent it from falling Put the box in a well ventilated place and do not block its ventilation The power supply must conform to the requirements of ES1 in I...

Страница 5: ...Projects 10 4 7 1 Network Release 10 4 7 1 1 Configuration Flow of Network Release 10 4 7 1 2 Configuring the Network 11 4 7 1 2 1 Connecting the Box to the Network 11 4 7 1 2 2 Configuring the Allow...

Страница 6: ...uage 26 6 Maintenance and Update 27 6 1 Maintenance Requirements 27 6 2 Restoring Factory Defaults 27 6 3 Updating the System 27 6 4 Configuring Automatic Maintenance Time 27 6 5 Turning the Screen on...

Страница 7: ...box can play images videos and scroll captions in both full screen or split screen You can set multiple play modes on the platform such as loop timed playing inter cut and idle time playing for multi...

Страница 8: ...package box Unpack the box and check whether the components are complete according to the packing list Table 2 1 Packing list Name Quantity Name Quantity Distributed play box 1 Power adapter 1 Remote...

Страница 9: ...3 3 Structure 3 1 Dimensions Figure 3 1 Dimensions mm inch 3 2 Ports Figure 3 2 Ports 1...

Страница 10: ...i Fi signals 6 Operation status indicator light The light turns on when the box runs normally The light flashes when the box malfunctions 7 IR port Receives IR signals from the remote control 8 RS 232...

Страница 11: ...er supply with stable voltage and low ripple interference Starting the box Plug in the power cord and then turn on the switch The box starts Shutting down the box Turn off the switch and then unplug t...

Страница 12: ...dd network page enter network SSID select a security option and then click Save We recommend you choose a secure authentication method to connect to the Wi Fi Ethernet Connect the box to the network b...

Страница 13: ...g period of inactivity Step 1 Click any position on the screen Step 2 Enter the password and then click OK The home page or the page that was open before the screen is locked is displayed After 5 cons...

Страница 14: ...page select Settings Password Setting Password Validity Period Setting Figure 4 4 Password validity period setting Step 2 Select a password validity period Permanent is selected by default Step 3 Clic...

Страница 15: ...d settings 4 5 3 Changing Security Questions Step 1 On the home page select Settings Password Setting Modify Security Question Figure 4 6 Modify security question Step 2 Change answers to the security...

Страница 16: ...ox 4 7 Releasing Projects You can release projects locally or through the platform 4 7 1 Network Release Release projects through the network Register the box to the platform when you use network rele...

Страница 17: ...e Table 4 4 Configure network Network Type Description Ethernet Connect your box to the network by Ethernet There are 2 methods to plan the IP DHCP When there is a DHCP server on the network after sel...

Страница 18: ...P address 3 Click Confirm You can add multiple IP addresses to your allowlist 4 7 1 3 Registering the Box to the Platform Register the box to the platform and then you can release projects through the...

Страница 19: ...rtment that the box is in After registration you can only link the box with devices in the same department For details on performing operations on the platform see the corresponding user s manual Step...

Страница 20: ...Figure 4 13 Local release general template Figure 4 14 Local release special template 4 7 2 2 Releasing Projects by General Templates 4 7 2 2 1 Quick Play Use the given templates to quickly release p...

Страница 21: ...yed for 10 seconds by default and a video to its end PDF files can be imported only to Template 1 4 7 2 2 2 Custom Play Define your own templates to release information Step 1 On the home page select...

Страница 22: ...dance Stream Media and Video Surveillance Select a template as needed 4 7 2 3 1 Configuring the Face Attendance Template Add a camera channel to the box and then the face information captured by the c...

Страница 23: ...17 Figure 4 18 Configure face attendance template Step 3 Click Edit on the upper right corner Figure 4 19 Setting 1 Click Add Channel...

Страница 24: ...annel The channels must not conflict with each other Port Port for logging in to the IP camera IVSS DSS or PSS It is 37777 by default for the IP camera and IVSS and 8101 for DSS and PSS Channel You ne...

Страница 25: ...ast Click to enable voice broadcast The prompt that you customize manually does not support voice broadcast Display successful comparison results Click and then select or customize the prompt to be di...

Страница 26: ...ad multiple media contents After adding the media you can drag the media to sort them Click to delete the media 3 Click OK Step 4 Click Preview on the upper right corner to preview the project to be p...

Страница 27: ...rocedure Step 1 On the home page select Local Release Scheduled Project Step 2 Click and then on the page displayed click Add order play period Figure 4 23 Add order play period Step 3 Set the time pe...

Страница 28: ...rm to the folder and then import the schedule to the box Select a project and then click to delete it 4 8 App Manager On the home page click App Manager and then the App Center page is displayed You c...

Страница 29: ...talled Step 4 Click the installation file Step 5 Click OK The installation starts Follow the onscreen instructions to finish the installation You can view and use the app you have installed in App Cen...

Страница 30: ...the Renewal cycle 24 hours by default and then click Save The time of IPC will be synchronized with that of the box within the defined renewal cycle Step 4 Enable NTP time setting configure the Renewa...

Страница 31: ...available 5 3 Configuring Visual and Audio Parameters Adjust display effect of screen and device volume If it prompts This operation may cause power increase Do you want to continue click Confirm to c...

Страница 32: ...tive by default You can change the output resolution The box supports 4K resolution at different frequencies Screen Rotation Click Screen Rotation and then select an angle by which the screen rotates...

Страница 33: ...faults Step 2 Click Confirm After restoring factory defaults the box will restart 6 3 Updating the System Update system software Prerequisites Insert a USB drive with the update package into your box...

Страница 34: ...figuration 6 5 Turning the Screen on off at a Fixed Time Step 1 On the home page select Settings Maintenance and Upgrade Timing Screen Turn On Step 2 Click to enable turning on or off screen by week o...

Страница 35: ...e Box Manually restart your device to solve problems such as system crash Step 1 On the home page select Settings Maintenance and Upgrade Step 2 Click Restart Now Step 3 Click Confirm The box starts r...

Страница 36: ...rn off the screen When the box is turned on press and then select the operation For some models you cannot use the remote control to turn off the box You need to unplug the power cord to turn off the...

Страница 37: ...page is displayed 2 Operate arrow keys and move pointer to password box and type password 3 Move pointer to Done on virtual keyboard 4 Move pointer to OK and press on your remote control to log in to...

Страница 38: ...abinet and implement well done access control permission and key management to prevent unauthorized personnel from carrying out physical contacts such as damaging hardware unauthorized connection of r...

Страница 39: ...we suggest that you check online users regularly to see if the device is logged in without authorization Check device log By viewing the logs you can know the IP addresses that were used to log in to...

Отзывы: