Dahua DHI-ASI7213X-T1 Скачать руководство пользователя страница 13

Deployment Manual 

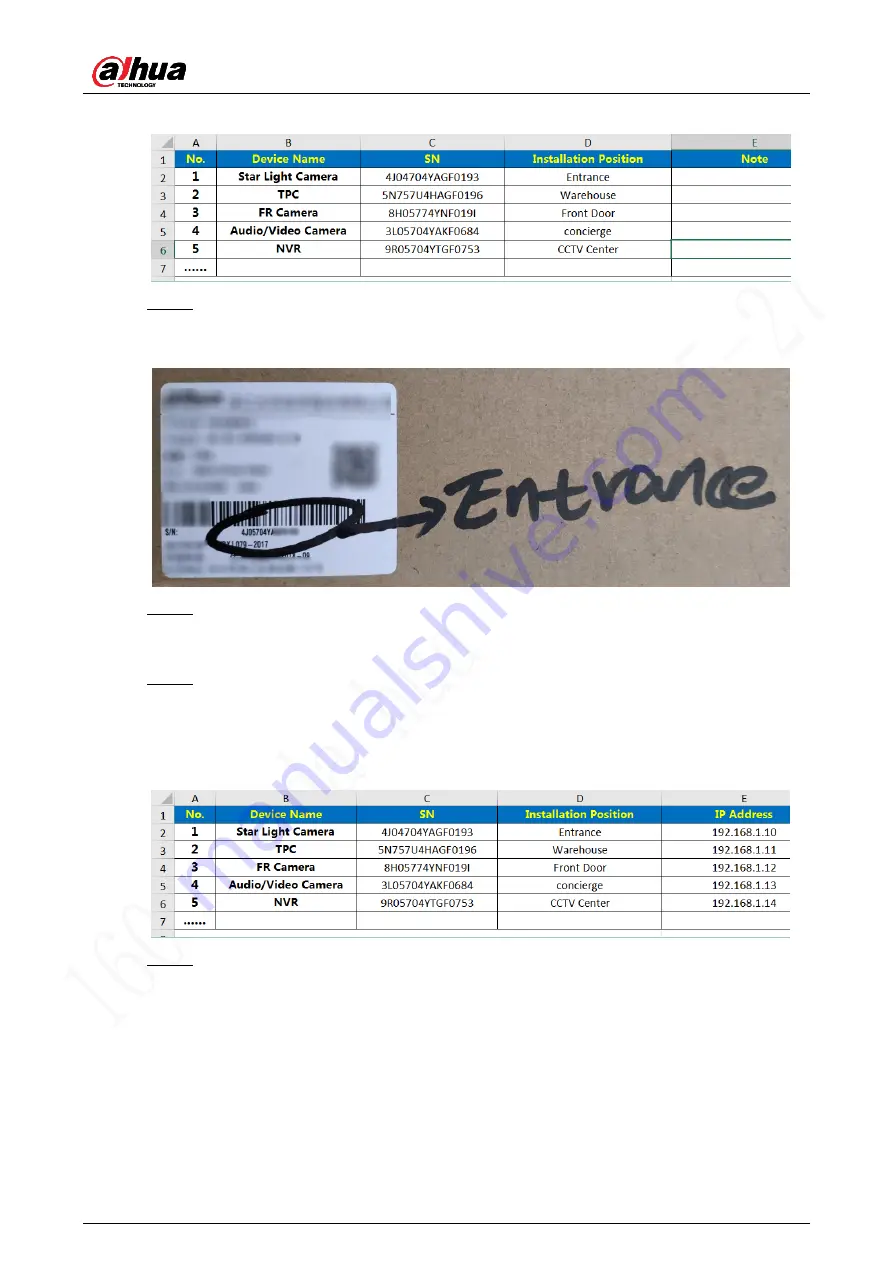
Figure 3-3 Match installation position 

Step 4  Mark the installation positions on the corresponding packing boxes as planned, and 

then install them to proper locations. See Figure 3-4 and "4 Installation." 

Figure 3-4 Mark installation position 

Step 5  Make  sure  that  all  the  devices  are  properly  connected,  and  then  power  up  all  the 

devices. Initialize all the devices and modify device IP addresses in batches. See "5 

Getting Started." 

Step 6  After modifying all the IP addresses, you can record them to the planning table too, 

and  then  you  will  have  the  matching  relationship  between  SN  number,  installation 

position, and IP address of every device. You can then easily locate every device you 

need during configuration. 

Figure 3-5 Match IP address 

Step 7  Configure  devices  and  carry  out  commissioning.  See  "6  Configuration  and 

Commissioning." 

Содержание DHI-ASI7213X-T1

Страница 1: ...Dahua Access Control Body Temperature Monitoring Solution Deployment Guide V1 0 0 V1 0 0 ZHEJIANG DAHUA VISION TECHNOLOGY CO LTD ZHEJIANG DAHUA VISION TECHNOLOGY CO LTD...

Страница 2: ...controller you might collect personal data of others such as face fingerprints car plate number email address phone number GPS and so on You need to be in compliance with the local privacy protection...

Страница 3: ...operations description or errors in print If there is any doubt or dispute please refer to our final explanation Upgrade the reader software or try other mainstream reader software if the manual in PD...

Страница 4: ...y from any liquid to avoid damage to the internal components Keep the indoor device away from rain or damp to avoid fire or lightning Keep sound ventilation to avoid heat accumulation Transport use an...

Страница 5: ...e cotton with diethyl or moisten soft cloth You can also air blower to remove dust Please strengthen the protection of network device data and personal information by adopting measures which include b...

Страница 6: ...odifying IP Address 24 5 2 3 Updating System 25 6 Configuration and Commissioning 28 6 1 Configuring Face Recognition Terminal 28 6 1 1 Configuring Unlock Mode 28 6 1 2 Creating Face Database 29 6 1 3...

Страница 7: ...Configuring DMSS 59 6 4 1 Adding Face Recognition Terminal to DMSS 59 6 4 2 Configuring Video Image Storage 61 6 4 3 Subscribing Alarms 61 6 4 4 Commissioning 62 Appendix 1 Cybersecurity Recommendati...

Страница 8: ...is solution face recognition terminals measure human body temperature and recognize faces hereinafter referred to as TPC and then upload the measurement results attached with face and identification i...

Страница 9: ...eceives and displays live videos images and alarms from the terminal and centrally manages the system Figure 2 1 Face Recognition Terminal Express DSS Express RS485 Weigand Face Recognition Terminal S...

Страница 10: ...Lock Exit Button Reader Face Recognition Terminal DMSS Face recognition terminal is connected to the network switch DMSS is installed on the mobile devices such as phone The turnstile connects to the...

Страница 11: ...4 Figure 2 3 Face Recognition Terminal DMSS Wireless DMSS RS485 Weigand Face Recognition Terminal Standing Face Recognition Terminal Turnstile Or Face Recognition Terminal Wall Mounted Magnetic Lock E...

Страница 12: ...the provided manual or guide Step 1 Confirm the device models and device quantity For details see the material list of the solution Step 2 Record all the device SN numbers from the packing boxes in Ex...

Страница 13: ...d then power up all the devices Initialize all the devices and modify device IP addresses in batches See 5 Getting Started Step 6 After modifying all the IP addresses you can record them to the planni...

Страница 14: ...r Configuration Requirement Recommended config CPU Intel Xeon CPU E3 1220 v5 3 00GHz RAM 8 GB Network adapter 1Gps DSS installation directory space Over 500 GB Minimum config CPU i3 2120 RAM 8 GB Netw...

Страница 15: ...ically after installation The system automatically detects the available space of path after the installation path is selected if available space is less than needed for system installation then the i...

Страница 16: ...enable TLS1 1 and TLS1 2 on the browser Step 7 Click OK 4 1 2 Installing Express PC Client Follow this table to prepare a PC for installing Express client Table 4 2 Configuration requirement PC Config...

Страница 17: ...ad operation Operation Description Run Download temporary file you can install after it is checked Save Download installation package to IE default path Save as Download installation package to design...

Страница 18: ...on path click Install The system displays installation progress and the installation takes about 2 3 minutes The interface is shown after installation is completed The system automatically detects the...

Страница 19: ...Step 3 Enter username and password and then click Login 4 1 4 Licensing Express Make sure that you have purchased a proper license for activating Express To purchase a license contact our local sales...

Страница 20: ...Deployment Manual 13 Step 6 Log in client again enter license configuration interface and make sure the License is the same as applied...

Страница 21: ...ntroduces how to select proper installation site and installation type The face recognition terminal can be applied to industrial park scenic area school residential community and office building etc...

Страница 22: ...Deployment Manual 15 4 3 Installing DMSS Use Google Play to download DMSS and then install it For more info see DMSS user s manual...

Страница 23: ...he on screen instructions to download and install the tool Device initialization is available only when the IP addresses of the device 192 168 1 108 by default and the PC stay in the same network segm...

Страница 24: ...addresses in batches Modifying IP addresses in batches is available only when the corresponding devices have the same login username and password You can initialize NVR either by following the on scr...

Страница 25: ...select DHCP Step 4 Click OK 5 1 3 Updating System If the NVR version does not meet your requirement you can update the NVR with ConfigTool You can do that one by one or in batches Updating devices on...

Страница 26: ...setting Figure 5 4 Search setting Step 4 Select the network segment for the target device If the IP address of the target device is in the current network segment select Current Segment Search and the...

Страница 27: ...end IP address of the network segment you need and then enter the user name and the password of the target camera Figure 5 6 Other segment search Step 5 Click OK Step 6 Select the devices to update Up...

Страница 28: ...tem starts updating You can see the update progress Update the devices in batches Click OK and the system starts updating Step 9 After restarting the device click the refresh button to confirm the sys...

Страница 29: ...rminal with ACS ConfigTool for first time use To acquire the tool go to Dahua official website and then select Support Download Center ToolBox follow the on screen instructions to download and install...

Страница 30: ...e network segment in which you want to search devices and then click OK All the devices found in the network segment are listed Step 5 Select one or several devices with Status shows Uninitialized and...

Страница 31: ...available only when the corresponding devices have the same login username and password Step 1 Do Step 1 to Step 4 in 5 2 1 Initializing Face Recognition Terminal with ACS ConfigTool to search for th...

Страница 32: ...d when multiple devices are involved and login username and passwords of cameras are the same Step 1 Double click ACSConfig exe to open the tool Step 2 Click Step 3 Click Search setting Figure 5 12 Se...

Страница 33: ...you need and then enter the user name and the password of the target camera Figure 5 14 Other segment search Step 5 Click OK The search result is displayed Figure 5 15 Search result Step 6 Select the...

Страница 34: ...ate progress Update the devices in batches Click OK and the system starts updating Step 9 After restarting the device click the refresh button to confirm the system version The update succeeded if the...

Страница 35: ...1 Configuring Face Recognition Terminal To achieve access control by face recognition temperature monitoring and mask detection you need to set and enable the relevant parameters and create face data...

Страница 36: ...n terminal to let the terminal compare the detected faces against the face database for access control accordingly If you use Express in your solution skip this section and refer to 6 3 5 Configuring...

Страница 37: ...icture 4 Perform 1 to 3 to collect face images of all the users you need to add For example collect face images of all the students Step 2 Export the face database and then import it to other face rec...

Страница 38: ...ure 6 3 USB Import 4 Tap Face Feature Value and then tap OK Face images in the terminal will be exported into the USB disk Figure 6 4 USB Import Step 3 Import the face database to other face recogniti...

Страница 39: ...o log in 2 Tap USB USB Import Figure 6 5 USB Import 3 Tap Face Feature Value and then tap OK Face images in the USB disk will be imported into the terminal 6 1 3 Configuring Face Recognition Parameter...

Страница 40: ...ameters For the introduction to more parameters on the Face Parameter interface see the user s manual Table 6 1 Face detect parameter description Parameter Description Anti fake Threshold Keep it off...

Страница 41: ...e and the actual temperature You can select multiple monitored samples for testing According to the comparison between the monitored temperature and the actual temperature you can correct the temperat...

Страница 42: ...rrectly initialized Face database face recognition parameters are correctly configured Objectives The face recognition terminal can correctly recognize human face measure face temperature and detect m...

Страница 43: ...ge of the person is in the database If not register face image first 6 1 4 3 Elevated Body Temperature Preparation Face recognition terminal and turnstile are correctly installed and connected Face re...

Страница 44: ...closed or the face recognition terminal gives a warning when a person is detected wearing no mouth mask Procedure If you have selected Mask intercept for Mask mode see 6 1 3 Configuring Face Recogniti...

Страница 45: ...the face recognition terminal For details see 6 1 2 Creating Face Database 6 2 1 Adding Face Recognition Terminal to NVR Step 1 Log in to the NVR web interface and then select MANAGEMENT CAMERA REGIST...

Страница 46: ...channel manufacturer IP address TCP port user name password remote channel No and decode buffer Delete Click to delete the corresponding device Status Shows whether a device is initialized means it i...

Страница 47: ...dress Enter the IP address of the device TCP Port Transmission control protocol port the value is 37777 by default Username Pass word Enter the user name password of the device you need Channel No If...

Страница 48: ...Temperature monitoring parameters Parameter Description Period Click Settting to set the temperature monitoring schedule Post Record Specify how many seconds you want the device to keep recording afte...

Страница 49: ...ep 1 Log in to the local interface of NVR Step 2 On the Display interface select F from the drop down list of Temperature Unit Figure 6 13 Set Fahrenheit Step 3 Click Apply 6 2 4 Commissioning Prepara...

Страница 50: ...emperature and mouth mask monitoring results Figure 6 14 Live monitoring on NVR 6 3 Configuring Express After installing and activating Express you need to add face recognition terminal set recording...

Страница 51: ...on the disk The exclusive storage space is displayed in the red box Figure 6 17 Disk status change Figure 6 18 Delete exclusive storage space 6 3 2 Adding Face Recognition Terminal to Express Add the...

Страница 52: ...add and they have the same username and password you can select this method to add them in batches Step 1 Log in to Express Client Step 2 Click Device on the client homepage Step 3 Click Auto Search...

Страница 53: ...o set different parameters if different device are connected Add encoder set correct parameters and click to view device video Table 6 5 Parameter description Parameter Description Device Category Sel...

Страница 54: ...combination screen the mode is not supported by matrix video wall or NVD under combination mode Support Combination Select when added device supports combination Picture Server Select storage location...

Страница 55: ...Express Step 1 Log in to Express Client Step 2 Click Config on the client homepage Step 3 From the device tree on the left select camera channel of the face recognition terminal and then click Record...

Страница 56: ...nformation Register people information such as face image and card No into the system and assign access permissions so that the system can identify people and let go accordingly You can add people inf...

Страница 57: ...herwise person data could be wrong Step 4 Click the Authentication tab Step 5 Add a card One person can have up to 5 cards There are two ways to issue cards by entering card No and by card reader Card...

Страница 58: ...k OK The card is added Figure 6 26 Added card By card reader 1 Click Figure 6 27 Issue card by card reader 2 Select Card Issuer or Device and then click OK If you select Card Issuer make sure you have...

Страница 59: ...on a side face image for example so as to increase recognition accuracy Step 7 Click the Authorize tab Select the accessible doors for this person Figure 6 28 Authorize Step 8 Click OK In batches Step...

Страница 60: ...ort interface see Figure 6 29 click Import File to upload the ZIP file Step 3 Add door groups 1 On the Homepage select Access Control and then click 2 Click Door Group and then click Add to add a door...

Страница 61: ...them 3 Click OK The selected people then have the right of access through the selected doors 6 3 6 Configuring Door Unlock Method Set door unlock method such as face recognition or face recognition c...

Страница 62: ...any of the selected methods Select and The door opens after all the selected methods are performed and passed Step 5 Select the method s you need In this solution you need to select Face or Face and C...

Страница 63: ...mperature Abnormal Alarm or Not mask alarm and then click to enable it indicates that the alarm is enabled Step 4 Set alarm priority and then select a template The alarm is received and reported durin...

Страница 64: ...number of the face recognition terminal is modified and the feature of the video channel is set to IVS alarm Objectives Express displays face recognition temperature monitoring and mask detection resu...

Страница 65: ...channel is set to IVS alarm Storage space and recording plan are configured on Express People information such as face card and door permission is configured Door unlock method is configured Objective...

Страница 66: ...on NVR For the face recognition terminal NVR solution you need to create face database on the face recognition terminal For details see 6 1 2 Creating Face Database 6 4 1 Adding Face Recognition Term...

Страница 67: ...4 1 2 Adding by IP Domain You can add devices by entering IP of the device or specific domain This section takes entering device IP as an example Step 1 On the Home interface tap and then select IP D...

Страница 68: ...age Store video image on SD card or DMSS cloud you need to purchase SD card or DMSS cloud separately 6 4 3 Subscribing Alarms Subscribe access control alarm messages so that you can receive the alarm...

Страница 69: ...erminal Face recognition terminal is added to DMSS Video and image storage is configured on DMSS Alarm notification is subscribed on DMSS Objectives DMSS displays face recognition temperature measurem...

Страница 70: ...Deployment Manual 63 Figure 6 42 Alarm notifications grouped by device Figure 6 43 Alarm messages...

Страница 71: ...d to enable the auto check for updates function to obtain timely information of firmware updates released by the manufacturer We suggest that you download and use the latest version of client software...

Страница 72: ...ou use safe modes including but not limited to the following services SNMP Choose SNMP v3 and set up strong encryption passwords and authentication passwords SMTP Choose TLS to access mailbox server F...

Страница 73: ...mmunication requirements between two sub networks it is suggested to use VLAN network GAP and other technologies to partition the network so as to achieve the network isolation effect Establish the 80...

Страница 74: ...ZHEJIANG DAHUA VISION TECHNOLOGY CO LTD Address No 1199 Bin an Road Binjiang District Hangzhou P R China...

Отзывы: