background image

DH-LDHxx-TAI200 

14

Figure 4-11 The customized play interface

Step 2  Click a template you want to define.
The template’s interface ready for configuration is displayed.
Step 3  Define the template.
1) 

Click a

to configure this region’s display sequence 

and content.

A program waiting box of images & videos is displayed. See Figure 

4-12.

Figure 4-12 The program waiting box

2) 

Click

on the lower left corner.

The “File Manager” interface is displayed.
3) 

Then you can select an image or a video and upload it to 

the program waiting box.
Then, you can select duration of displaying an image from 5s, 10s, 

20s, 30s and 60s. Images are displayed for 10 seconds by default 

and videos to the end.

You can repeat 2)-3) to upload multiple images or videos to the 

program waiting box.
4) 

Click OK.

If there are multiple separate regions in your template which can 

be identified by the sign (find and add the sign in your manual), to 

make the template effective, you need to repeat step1-4 to add 

programs for other regions.

Step 4  Operate the template you have almost finished. On the 

upper right corner of the current interface:

•  Click Preview to preview your template.
•  Click Save to save your template. You can view and use the 

template in Local Release > My Program then.

•  Click Publish to play your template immediately.

4.6.2.2 Releasing Programs by Special Use Templates
There are six special use templates, including “Face Attendance”, 

“Catering & Life”, “Special Offer & Promotion”, “Brand Publicity”, 

“Supermarket & Hotel”, and “Info & News”, each of which conforms 

to a specific scenario. Select according to your needs.

•  For configuration of “Face Attendance” template, see “4.6.2.2.1 

Configuring Face Attendance Template.”

•  For configuration of other five templates, see “4.6.2.2.2 Configuring 

Other Five Templates.”

4.6.2.2.1 Configuring Face Attendance Template
Add a camera channel, and face information captured by the camera 

will be displayed, such as the similarity between the face captured 

and face saved in the database, and capture time.

The 29-inch and 37-inch devices do not support the face attendance 

function.
Preparation

•  Your camera can do the face detection and face comparison and 

its face database is ready.

•  You Signage, your camera and the DSS (or PSS, or IVSS) have 

been connected to each other.

•  When you choose to connect your camera to the Signage by DSS 

or PSS, you need to operate DSS or PSS to give out a registration 

code to your Signage to achieve the connection between the DSS 

or PSS and your Signage.

Procedure

Step 1  In the main menu, select Local Release > Special.
The Special interface is displayed.
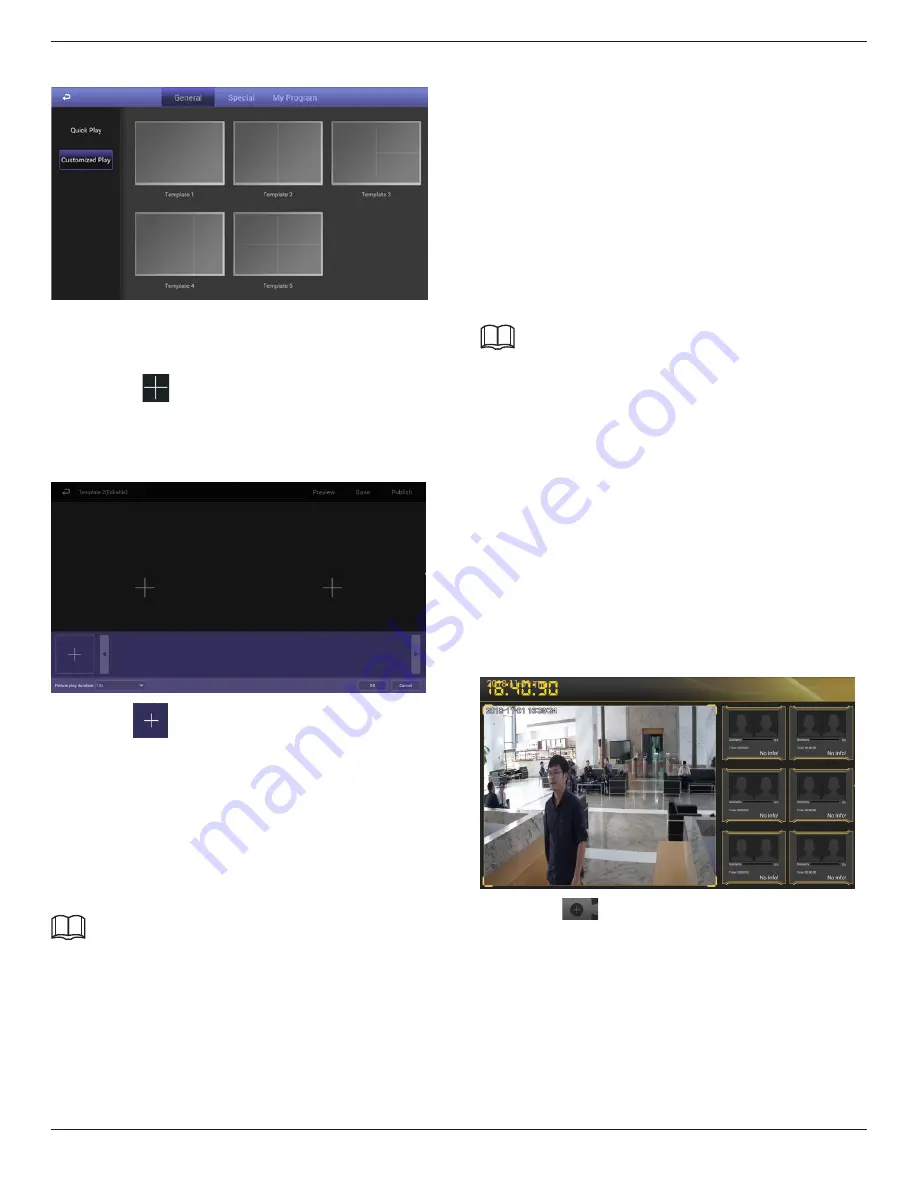
Step 2  Click Face Attendance, and the face attendance template is 

displayed. See Figure 4-13.

Figure 4-13 Configuring face attendance template

Step 3  Click

.

The Add Device interface is displayed. See Figure 4-14.

Содержание DH-LDH Series

Страница 1: ...DH LDH32 TAI200 DH LDH43 TAI200 DH LDH49 TAI200 DH LDH55 TAI200 LCD Digital Signage User Manual ...

Страница 2: ... avoid the risk of shock or permanent damage to the set do not expose the display to dust rain water or an excessively moist environment If your display becomes wet wipe it with dry cloth as soon as possible If a foreign substance or water gets in your display turn the power off immediately and disconnect the power cord Then remove the foreign substance or water and send the unit to the maintenanc...

Страница 3: ...s set out in the Council Directive on the Approximation of the Laws of the Member States relating to Electromagnetic Compatibility 2014 30 EU Low voltage Directive 2014 35 EU RoHS directive 2011 65 EU and Radio Equipment Directive 2014 53 EU This product has been tested and found to comply with the harmonized standards for InformationTechnology Equipment these harmonized standards published under ...

Страница 4: ...s with RSS 247 of the Industry Canada Rules Operation is subject to the following two conditions 1 This device may not cause harmful interference and 2 this device must accept any interference received including interference that may cause undesired operation Ce dispositif est conforme à la norme CNR 247 d Industrie Canada applicable aux appareils radio exempts de licence Son fonctionnement est su...

Страница 5: ...UE NEUTRAL N BROWN LIVE L GREEN YELLOW EARTH E 1 The GREEN YELLOW wire must be connected to the terminal in the plug which is marked with the letter E or by the Earth symbol or coloured GREEN or GREEN YELLOW 2 The BLUE wire must be connected to the terminal which is marked with the letter N or coloured BLACK 3 The BROWN wire must be connected to the terminal which marked with the letter L or colou...

Страница 6: ...ronic contact your local government office the waste disposal organization that serves your household or the store at which you purchased the product Attention users in United States Please dispose of according to all Local State and Federal Laws For the disposal or recycling information contact www mygreenelectronics com or www eiae org End of Life Directives Recycling Your new Public Information...

Страница 7: ... VCD 10 3 1 1 Using HDMI VGA video input 10 3 2 Connecting a PC 10 3 2 1 Using HDMI VGA input 10 4 Basic Operations 11 4 1 Booting Up and Shutting Down 11 4 2 Initializing Signage 11 4 3 Logging in System 11 4 4 Operating QuickTool Bar 11 4 5 Configuring Date Time 12 4 6 Displaying Programs 12 5 Configuring System Settings 16 5 1 ConfiguringVisual Audio Parameters 16 5 2 Selecting Input Source 17 ...

Страница 8: ...ay differ from those illustrated above NOTES For all other regions apply a power cord that conforms to the AC voltage of the power socket and has been approved by and complies with the safety regulations of the particular country Type H05VV F 2G or 3G 0 75 or 1mm2 should be used You might like to save the package box and packing material for shipping the display 1 3 Installation Notes Due to the h...

Страница 9: ...e Step 2 Fix the tube to the display by using M6xL41 screws Please refer to the following drawing to know the position of screws Step 3 Set up the stand by using thumb M6xL41 screws Table stand Longer portions face the front Thumb screws Thumb screws To remove table stands 1 Power off the display 2 Spread a protective sheet on a flat surface 3 Place the display face down on the protective sheet 4 ...

Страница 10: ...ed by improper installation 4 For the wall mounting kit use M6 mounting screws having a length 10 mm longer than the thickness of the mounting bracket and tighten them securely 1 5 1 VESA Grid DH LDH32 TAI200 200 H x 200 V mm DH LDH43 TAI200 400 H x 400 V mm DH LDH49 TAI200 400 H x 400 V mm DH LDH55 TAI200 400 H x 400 V mm Caution To prevent the display from falling For wall or ceiling installatio...

Страница 11: ...rtrait position 1 Remove the table stand if attached 2 Rotate 90 degrees counter clockwise 90 90 NOTE When installing the display on a wall please consult a professional technician for proper installation We accept no liability for installations not performed by a professional technician ...

Страница 12: ...display Lights green when the display is turned on Lights green when the display is in standby mode Lights off when the main power of the display is turned off Pull down the lens to have better remote control performance and easy to observe the light information of power status Push up the lens before mounting the display for video wall application Pull Push the lens until hearing the click sound ...

Страница 13: ...232 SD HDMI USB USB RJ45 VGA 1 AC IN AC power input from the wall outlet 2 RS232 IN RS232 control signal input 3 HDMI HDMI signal input 4 5 USB PORT Connect your USB storage device 6 RJ 45 Network interface 7 SD Connect your SD CARD 8 VGA IN VGA input 9 SECURITY LOCK Used for security and theft prevention ...

Страница 14: ... press right arrow button Volume down Press and press left arrow button Typing password to log 1 When you find the screen is locked you can use your remote control to type the password Press on your remote control The Login interface is displayed 2 Operate arrow keys and move pointer to password box and type password 3 Move pointer to Done on virtual keyboard 4 Move pointer to OK and press on your...

Страница 15: ...r and point to the remote sensor Ensure that the sight between the remote control and the monitor is not obstructed by furniture walls or other objects Working indicator light The shape of the product will vary between the models please take the actual machine as the standard Open monitor Please insert the power cord into the AC power outlet ...

Страница 16: ... t touch exposed battery acid as it can damage your skin NOTE If you do not intend to use the remote control for a long period remove the batteries 2 3 2 Handling the remote control Do not subject to strong shock Do not allow water or other liquid to splash the remote control If the remote control gets wet wipe it dry immediately Avoid exposure to heat and steam Other than to install the batteries...

Страница 17: ...External Equipment DVD VCR VCD 3 1 1 Using HDMI VGA video input DVD VCR VCD HDMI Output HDMI Input RS232 SD HDMI USB USB RJ45 VGA Input VGA Output 3 2 Connecting a PC 3 2 1 Using HDMI VGA input HDMI Input RS232 SD HDMI USB USB RJ45 PC HDMI Output VGA Input VGA Output ...

Страница 18: ...figure your Signage Step 1 Plug the Signage s power line into a socket The Signage boots up and the Device Initialization interface is displayed See Figure 4 1 Figure 4 1The device initialization interface Step 2 Type your password and type it again to confirm it Step 3 Click Done on your virtual keyboard Click Confirm on the Device Initialization interface Initialization begins After that the mai...

Страница 19: ...e to Network Connect your device to network by Ethernet WLAN 4G orVirtual Private Network VPN After your Signage is networked it can be used as a hotspot for other devices Step 1 In main menu select Settings Network Setting The Network Setting interface is displayed See Figure 4 7 Figure 4 7 The network setting interface Step 2 Select and configure the network type you want to use See Table 4 3 fo...

Страница 20: ...to your whitelist if you have enabled it To configure whitelist see 4 6 1 2 2 Configuring Whitelist Procedure Step 1 In main menu click Network Release The Platform Address interface is displayed See Figure 4 9 Figure 4 9 The platform address interface Step 2 Type the platform s IP address or domain name Step 3 Click OK Step 4 Receive programs from the platform 4 6 2 Displaying Programs from USB D...

Страница 21: ...ely 4 6 2 2 Releasing Programs by Special Use Templates There are six special use templates including Face Attendance Catering Life Special Offer Promotion Brand Publicity Supermarket Hotel and Info News each of which conforms to a specific scenario Select according to your needs For configuration of Face Attendance template see 4 6 2 2 1 Configuring Face AttendanceTemplate For configuration of ot...

Страница 22: ...value 4 Fill the new value in the Channel box Registration Code You need to configure this parameter only when you select DSS or PSS as the Protocol Registration code given by the DSS platform or Smart PSS client side to the Signage Step 5 Click OK After adding the camera to the face attendance template successfully the live camera shooting image and face comparison information is displayed Connec...

Страница 23: ...ou can also Click an item to start playing Click and select one or several items to delete Click and click Select All to delete all items Figure 4 16 The my program interface 5 Configuring System Settings 5 1 ConfiguringVisual Audio Parameters Adjust the screen s display effect and the Signage volume Step 1 In main menu select Settings Audiovisual Adjustment The Audiovisual Adjustment interface is...

Страница 24: ...y 5 3 Selecting System Language Step 1 In the main menu select Settings Language The Language interface is displayed See Figure 5 3 Figure 5 3 The language interface Step 2 Select the language you want The configuration takes effect immediately 6 System Maintenance 6 1 Maintenance Requirements It is recommended to Modify the user password every three months Reboot this device regularly Upgrade fir...

Страница 25: ... main menu select Settings Maintenance and Upgrade The Maintenance and Upgrade interface is displayed Step 2 Click System Upgrade The System Upgrade interface is displayed See Figure 6 4 D or E represents your USB Figure 6 4 The system upgrade interface Step 3 Select an upgrade package to start upgrade After being upgraded your device reboots 6 6 RestoringYour Signage to Factory Settings Restore y...

Страница 26: ...t lint free cloth If the surface becomes dirty soak a soft lint free cloth in a mild detergent solution Wring the cloth to remove excess liquid Wipe the surface of the display to remove dirt Then use a dry cloth of the same type to dry Do not scratch or hit the surface of the panel with fingers or hard objects of any kind Do not use volatile substances such as insert sprays solvents and thinners C...

Страница 27: ...isplay Please verify its specifications with this display s specification section Can hear sound but no picture Improperly connected source signal cable Make sure that both video inputs and sound inputs are correctly connected Can see picture but no sound is heard 1 Improperly connected source signal cable 2 Volume is turned all the way down 3 No external speaker connected 1 Make sure that both vi...

Страница 28: ...grees General Item DH LDH32 TAI200 DH LDH43 TAI200 DH LDH49 TAI200 DH LDH55 TAI200 Internal memory 16GB eMMC 12GB usable 16GB eMMC 12GB usable 16GB eMMC 12GB usable 16GB eMMC 12GB usable Power Supply AC 100 240V 50 60Hz AC 100 240V 50 60Hz AC 100 240V 50 60Hz AC 100 240V 50 60Hz Power Consumption Max 70 W 75 W 85 W 90 W Power Consumption typ 35 W 40 W 45 W 50 W Power Consumption Standby Off 0 5W 0...

Отзывы: