background image

Thank you for purchasing your Daewoo Vacuum.

As part of our commitment to quality we are offering you an extra 2 years warranty in addition to your

1 year guarantee.

Your Daewoo vacuum product is guaranteed for 1 year from the date of original purchase, with proof of 
purchase or receipt. If any defects should arise due to faulty workmanship or material, your faulty vacuum 
should be returned to the place of purchase, replacement or refund is at the discretion of the retailer.

The guarantee is subject to the following provisions:

•  The product must be correctly installed and operated in accordance with the requirements contained 
 

in the instruction manual.

•  The product must be used solely for domestic purposes.  
•  It does not cover general wear and tear, damage, misuse or any consumable parts.
•  The Guarantee is rendered invalid if the product has been resold or has been damaged through    
 

inexpert repair.

•  The guarantee is only valid within the UK and Eire.

Your standard 1 year guarantee will only be extended to the maximum available for your individual 
product upon registration. (Note: products must be registered individually and covers the main body and 
housing) If you do not register your product within 28 days of the original purchase date, your product will 
only be guaranteed for 1 year. 

T

o validate your extended 2 year warranty* please register your purchase online within 28 days of the 

original purchase date by registering at 

www.daewoowarrantyregistration.com/warranty-registration

*Your extended warranty is only valid with proof of purchase receipt and

subject to the conditions outlined above. 

Daewoo® is a registered trademark.

Produced and imported under licence by ESG Ltd

ESG Ltd

Manchester M3 1JS

www.esgltd.com

WARRANTY

Содержание TORNADO F1

Страница 1: ......

Страница 2: ...olved Children shall not play with the appliance Keep the appliance and its cord out of reach of children less than 8 years when it is energised or cooling down Do not immerse the appliance or its cor...

Страница 3: ...ther than its intended use Do not push objects into any openings as damage to the appliance and or electric shock may occur Unplug after each use Grasp the plug not the cord Do not pull or carry the V...

Страница 4: ...re release valve Hose anti topple ring On Off button Hose anti topple hook Lower cable storage hook Hose connector Power cord Upper cable storage hook Hose hook Handle pole Cable clip Rectangular HEPA...

Страница 5: ...ozidrive screwdriver not supplied and tighten Using your vacuum cleaner The floor head of the vacuum cleaner can be raised or lowered to suit the floor surface to be cleaned Turn the selector dial clo...

Страница 6: ...ull the cable away then unhook from the lower cable hook Insert the plug into a suitable socket outlet For upright use place your foot on the floor head and pull back gently on the handle right then t...

Страница 7: ...r difficult to remove soiling on upholstery such as pet hairs the pet brush can be used This should be fitted onto the hose as shown above The fixed combs and rotating pneumatic brush clean up even th...

Страница 8: ...hose and multi tool Attach the multi tool to the hose by simply sliding onto the end of the hose The multi tool can be used as a crevice tool or as an upholstery brush To use the upholstery brush slid...

Страница 9: ...ower ON OFF button When cleaning stairs always place the vacuum cleaner at the bottom of the stairs so it is always positioned below you and up against the bottom stair see right Clean the stairs usin...

Страница 10: ...linder release button at the top of the cylinder and pull the cylinder away from the top To empty the cylinder hold over a dustbin and release the catch on the bottom of the cylinder Shake the cylinde...

Страница 11: ...e filter assembly from the cylinder lid by rotating the lid anti clockwise The HEPA filter is located in the filter assembly and can be simply pulled out Tap the filter assembly and filter over a dust...

Страница 12: ...angular HEPA filter To access the rectangular HEPA filter remove the cylinder as described The rectangular filter is located in the body of the vacuum cleaner behind the cylinder To remove the filter...

Страница 13: ...ted at the base of the filter assembly With your thumb and forefinger pinch the filter and pull out towards you It is important to regularly clean the filters A clogged filter reduces the suction powe...

Страница 14: ...disconnected from the mains supply Lay the vacuum on the floor face down so the base can be accessed Remove the four retaining screws circled right 1 and remove the brush guard 2 Unhook the belt by sl...

Страница 15: ...ushroll Ensure the belt sits in the middle section in between the two grooves on the brushroll Pull the brushroll down and back into the casing Ensure the flat edge of the brushroll is facing outwards...

Страница 16: ...away from the vacuum see right Lay the hose flat and look through it to see if there are any blockages If there are use a broom handle or similar to clear them taking care not to damage the hose in t...

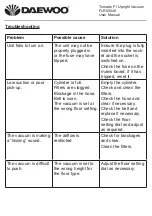
Страница 17: ...Blockage in the hose Belt is worn The vacuum is set at the wrong floor setting Empty the cylinder Check and clean the filters Check the hose and clear if necessary Check the belt and replace if necess...

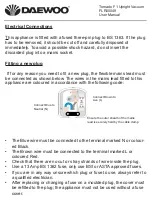
Страница 18: ...ured in accordance with the following code Connect Brown to Live L Connect Blue to Neutral N Ensure the outer sheath of the mains lead is securely held by the cable clamp The Blue wire must be connect...

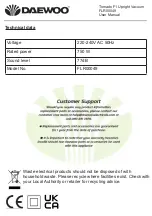
Страница 19: ...ousehold waste Please recycle where facilities exist Check with your Local Authority or retailer for recycling advice Tornado F1 Upright Vacuum FLR00049 User Manual Voltage 220 240V AC 50Hz Rated powe...

Страница 20: ...r any consumable parts The Guarantee is rendered invalid if the product has been resold or has been damaged through inexpert repair The guarantee is only valid within the UK and Eire Your standard 1 y...

Страница 21: ......

Отзывы: