background image

10

Station names

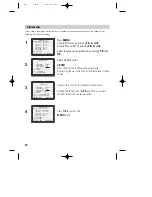
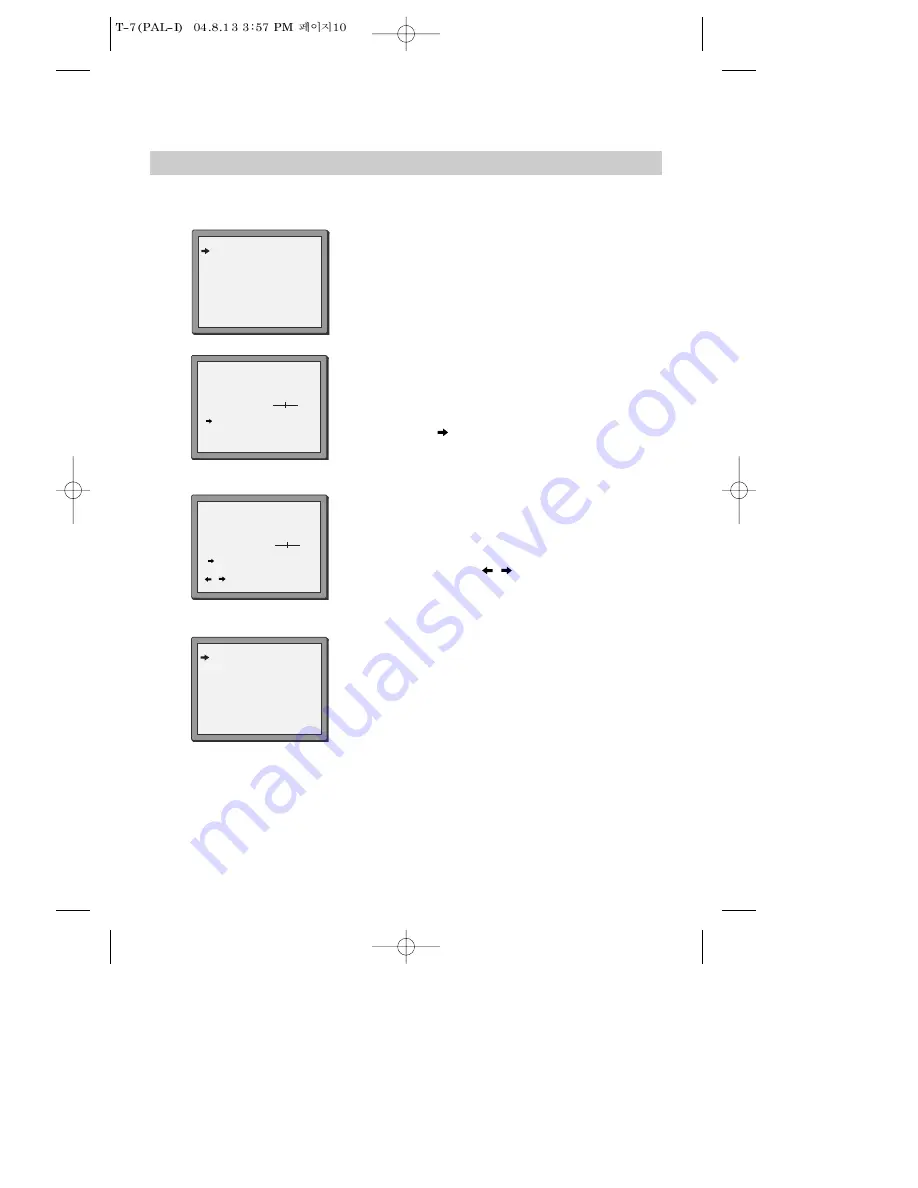
If your video is showing no station name or is showing a station name incorrectly, you can change this by
following the instructions below.

1

Press 

MENU

.

Choose ‘PR Preset’ by pressing 

PR-

then 

OK

.

Choose ‘Manual Set’ by pressing 

PR-

then 

OK

.

Select the channel to be renamed by pressing 

PR-

then

OK

.

Select NAME position.

EITHER

Press the 0 button to change the given name.
By pressing the 

button this will select preset station

names.

Or press the 1 button to create the station name.

Change the letters with the 

PR +/–

buttons, move to

the next letter with the 

/

buttons.

Press 

OK

to confirm and

MENU

to end.

2

3

4

MANUAL SET

PR01 BBC1

PR08 SKYS

PR02 BBC2

PR09 MTVE

PR03 ITV

PR10 P-10

PR04 CHA4

PR11 P-11

PR05 SKY1

PR12 ----

PR06 SKYN PR13 ----
PR07 SKYM PR14 ----

PR+/-:SELECT

OK:CONFIRM       MENU:END

MANUAL SET

PR+/-: UP/DOWN

0/1: CHANGE/CREATE

OK:CONFIRM            MENU:END

PR

01

RECEPTION

AERIAL

AUTOSEARCH

CH01

FINE TUNING
DECODER

OFF

NAME

_ _ _ _

MANUAL SET

PR+/-: SELECT CHARACTER

/

: SELECT POSITION

OK:CONFIRM            MENU:END

PR

01

RECEPTION

AERIAL

AUTOSEARCH

CH_ _

FINE TUNING
DECODER

OFF

NAME

O_ _ _

MANUAL SET

PR01 BBC1

PR08 SKYS

PR02 BBC2

PR09 MTVE

PR03 ITV

PR10 P-10

PR04 CHA4

PR11 P-11

PR05 SKY1

PR12 ----

PR06 SKYN PR13 ----
PR07 SKYM PR14 ----

PR+/-:SELECT
OK:CONFIRM      MENU:END

Содержание SV-877P

Страница 1: ...e back cover for quick start guide NTSC playback See page 13 MESECAM tape playback See page 13 Index scan See page 14 Wide screen format See page 15 Commercial skip See page 15 High speed rewind UK English INSTRUCTION MANUAL Helpline number 0870 100 2525 With queries please quote the page number reference number and model number ...

Страница 2: ... placed at least 10cm apart from other home appliances or obstacles to get sufficient ventilation This apparatus shall not be exposed to dripping or splashing and no objects filled with liquids such as vases shall be placed on top of the video Put the video on a steady flat surface Only clean the video with a soft lint free cloth Do not use harsh or alcohol based cleaning agents AUTO SET CH OP EJE...

Страница 3: ...et 8 Tuning in new stations Manual tuning 9 Station names 10 Sorting programme locations Clearing programme locations 11 Front panel controls 12 Playing cassettes Play 13 Still Variable picture search Variable slow motion Finding new recordings index scan 14 16 9 Wide Screen format CM skip commercial skip 15 Auto Repeat Child lock OSD On Screen Display ON OFF 16 Recording cassettes Recording casse...

Страница 4: ...shown in option 1 turn to page 5 1 Setting up your video Option 2 Connecting your video through a scart lead Television Aerial Scart lead If supplied With this connection if your video is receiving BBC1 and your TV is displaying CH3 when you press the TV VCR button on the remote control your TV will automatically display the BBC1 VCR will be displayed In this mode to change the viewing channels th...

Страница 5: ...t unplug all the equipment from the mains supply Television Plug a phono cable into the Audio L R sockets on the back panel and into the audio sockets on any audio amplifier if needed If your video does not have this connection see below Option 2 Video 200 240V 50 60 Hz You can also use a scart lead to improve picture and sound quality from your video 4 Hi Fi Aerial Connecting your video to the hi...

Страница 6: ...deo has two scart sockets you can use the other socket AV2 to connect other equipment To use this function see page 8 6 200 240V 50 60 Hz How to connect your video to a camcorder Before you start unplug all the equipment from the mains supply Camcorder Aerial 200 240V 50 60 Hz If you have connected your camcorder in this way you can also connect a scart lead from AV1 on the back panel of the video...

Страница 7: ...R12 P 12 PR06 P 06 PR13 P 13 PR07 P 07 PR14 PR SELECT OK CONFIRM MENU END Unless you are living in an area with poor reception Auto Set or Auto Search tunes in all the stations you can receive in your country and sorts them in a common order for example BBC1 on programme 1 BBC2 on programme 2 and so on See page 10 and page 11 if you need to change any of the automatic settings You should finish th...

Страница 8: ...K Select RF Output Set Up by pressing PR twice then OK Change the channel number using buttons 0 9 Press OK to confirm Press MENU to end Option 3 Buy a scart lead from your local electrical shop Connect the scart lead as shown on page 2 diagram 2 If you want to change the RF output in the future due to new broadcasting stations or equipment and so on press and hold the OK button on the remote cont...

Страница 9: ... OK to confirm the settings and press MENU to end Auto Clock VCR SETUP CLOCK SET RF OUTPUT SET 16 9 SET OSD ON OFF AUTO CLOCK PR SELECT OK CONFIRM MENU END AUTO CLOCK ON OFF PR SELECT OK CONFIRM MENU END Auto Clock is only available for models with the PDC function see page 18 Some broadcasting stations may send the time and date along with the PDC data The video will automatically use this time a...

Страница 10: ...r equipment the video PR PR buttons have no effect To return to normal video use the other equipment must be turned off Recording from other Equipment Simple recording can be performed refer to page 17 ensure the equipment is turned on and is displaying the correct channel Timer recording refer to page 19 set the video to perform a timed recording ensuring AV1 is selected as the channel to be reco...

Страница 11: ...END MANUAL SET PR01 BBC1 PR08 SKYS PR02 BBC2 PR09 MTVE PR03 ITV PR10 P 10 PR04 CHA4 PR11 P 11 PR05 SKY1 PR12 PR06 SKYN PR13 PR07 SKYM PR14 PR SELECT OK CONFIRM MENU END 2 3 4 5 These buttons are used on the following two pages MANUAL SET PR UP DOWN SELECT OK CONFIRM MENU END PR 04 RECEPTION AERIAL AUTOSEARCH CH__ FINE TUNING DECODER OFF NAME ____ MANUAL SET PR UP DOWN SELECT OK CONFIRM MENU END PR...

Страница 12: ... with the PR buttons move to the next letter with the buttons Press OK to confirm and MENU to end 2 3 4 MANUAL SET PR01 BBC1 PR08 SKYS PR02 BBC2 PR09 MTVE PR03 ITV PR10 P 10 PR04 CHA4 PR11 P 11 PR05 SKY1 PR12 PR06 SKYN PR13 PR07 SKYM PR14 PR SELECT OK CONFIRM MENU END MANUAL SET PR UP DOWN 0 1 CHANGE CREATE OK CONFIRM MENU END PR 01 RECEPTION AERIAL AUTOSEARCH CH01 FINE TUNING DECODER OFF NAME ___...

Страница 13: ...R03 ITV PR10 P 10 PR04 CHA4 PR11 P 11 PR05 SKY1 PR12 PR06 SKYN PR13 PR07 SKYM PR14 Clearing programme locations Clearing programme locations allows you to erase any stored programmes you no longer want 1 Press MENU Choose PR Preset by pressing PR then OK Choose PR Erase by pressing PR twice and then OK Press PR or PR to select the station you want to clear Press and hold to watch the picture 2 PR ...

Страница 14: ...t and right channels This is only available on some models Check the front of your video to see if this connection is available Change the station Recording or one touch record Every time you press the button the recording time is increased by 30 minutes Rewind or fast forward a cassette from stop or picture search backwards or forwards if the video is playing a cassette ...

Страница 15: ...used on the following two pages When you load a protected cassette such as pre recorded film see page 23 playback will start automatically When you are playing tapes of poor quality or tapes which have been recorded on another machine you can use the PR or PR buttons while the cassette is playing to reduce horizontal interferences stripes Playing NTSC tapes on PAL TV If you play cassettes which ha...

Страница 16: ...n speed in six steps Press to switch back to normal playback After approximately five minutes on still the cassette will automatically switch to normal playback If the still picture is jumping you can steady it by using the PR and PR button Finding new recordings index scan The video index search system allows you to find the beginning of any recording you have made on your video Your video automa...

Страница 17: ...format only 2 3 VCR SETUP CLOCK SET RF OUTPUT SET 16 9 SET OSD ON OFF AUTO CLOCK PR SELECT OK CONFIRM MENU END 16 9 SET AUTO OFF ON PR SELECT OK CONFIRM MENU END Press PR to choose the setting you want for example AUTO ON or OFF Confirm the setting with OK 16 9 Set Auto This video automatically detects the program format 16 9 or 4 3 and records or plays this program in the same format For the abov...

Страница 18: ...haracters will not be displayed in the normal picture at the start of each mode change 1 2 3 Auto Repeat If you press the PLAY button for 5secs during playback mode REP should appear on your display the video goes into Auto repeat mode This video repeatedly plays the tape from beginning to end To release this mode press any mode operation button such as PLAY FF REW or STOP Child lock Press the but...

Страница 19: ...R VCR VCR These buttons are used on the following two pages One touch recording OTR VCR Press PR or PR to choose the station you want to record Every time you press the recording time will increase by 30 minutes It is possible to record for up to 10 hours if there is enough room on the cassette To cancel OTR press and hold the STOP button for about five seconds until the video stops recording If y...

Страница 20: ... video to adjust the start times of your timed recording This happens even if a programme starts earlier or later than advertised PDC works when the broadcaster sends a signal but the signal is not always sent If you are not sure the signal will be sent it is best to switch PDC off If there is no programme number displayed under PR in the change menu the video doesn t yet know the number for the p...

Страница 21: ... or 0 to 9 for other channels Start time Use buttons 0 to 9 to enter the start time End time Use buttons 0 to 9 to enter the end time Start date Use buttons 0 to 9 to enter the date Tape Speed Use PR if you want to choose LP see page 17 PDC Use PR if you want to switch PDC on see page 18 If PDC does not appear on the screen it is not available on your video If you want to change any of the details...

Страница 22: ...the timer to start recording a second programme before the first programme has finished If you don t adjust the times the video will record the first programme completely then start to record the second one If there is not enough free space for the recording on the cassette the video will automatically switch to LP to double the recording time left on the cassette The recorder will eject cassettes...

Страница 23: ...e bottom line of the screen Press OK Remember to load a cassette and switch the video off by pressing TIMER PROGRAM PR START END DATE 01 18 10 20 30 15 08 03 21 20 22 20 21 08 PR SELECT OK CONFIRM MENU END TIMER PROGRAM ONCE PR 03 START TIME 21 20 END TIME 22 20 START DATE 21 08 SAT TAPE SPEED SP PDC ON 0 ERASE CORRECT MENU END TIMER PROGRAM PR START END DATE 01 18 10 20 30 15 08 03 21 20 22 20 21...

Страница 24: ... cassette length Choose Tape Remain by pressing OK Press PR or PR to select the length of your current cassette Press OK to confirm The display will show how long is left to the end of the cassette This will be displayed for several seconds only Finding the counter zero position Press MENU and choose Tape Control by pressing PR and then OK Choose Go to Zero by pressing PR and then OK The video wil...

Страница 25: ... the full spool at the bottom Always keep cassettes in their cases You can protect your precious recordings from being recorded over by breaking off the safety tab on the side of the cassette some cassettes have a slide When you have removed the tab your video will eject the cassette if ever you try to record onto it If you want to record onto the cassette after removing the tab cover the hole wit...

Страница 26: ...nd If this screen does not appear when you press the A SEL button this function is not available on your video PLAY SP Hi Fi L R HI Fi LEFT Hi Fi RIGHT Hi Fi OFF 1 4X STOP SP PR10 P 10 BIL BIL I II BIL I II BIL OFF First press the on screen display of sound output appears and the main language original sound track is selected Second press the video selects the sub language Third press the video se...

Страница 27: ...s cable you should cut it off and replace it with a suitable replacement You cannot use the moulded plug for any other appliance so remove the fuse and throw it away immediately and safely to prevent anyone especially children from plugging it into a wall socket which would be very dangerous If the mains lead ever needs replacing a qualified electrician should replace it with a flexible cord from ...

Страница 28: ...t 15 Technical information Dimensions Width x height x depth 360 x 91 x 280 mm Weight 3 3 kg Power supply Voltage 200 240 V 50 60 Hz Power consumption Mono 14 Watts Hi Fi 16 Watts System For UK Video PAL I Channel range UHF 21 69 Channel locations 99 AUX RF Out UHF CH 21 69 52 System For Ireland Video PAL I I Channel range VHF 2 12 UHF 21 69 CATV S1 S41 x y z Hyperband Channel locations 99 AUX RF ...

Страница 29: ...equired if service is needed on this product during the guarantee period KEEP THIS SECTION FOR FUTURE REFERENCE On the expiry date of the manufacturer s guarantee you will be sent details of our annual insurance plan but if you have already bought an extended warranty for this product from your retailer please tick box The information provided will be held on computer by the DAEWOO Registration De...

Страница 30: ...ntained in the manual It must be used solely for domestic purposes For further information regarding your guarantee please see the section at the rear of your user manual The guarantee will be rendered invalid if the product is resold or has been damaged by inexpert repair DAEWOO disclaims any liability for incidental or consequential damages The guarantee is in addition to and does not diminish y...

Страница 31: ... TV VCR button on the video remote control will not work This button will only work if the TV has the appropriate internal switch and a scart lead is connecting the TV and video The television will not change channel when the video is turned on If the television will not change channel while the video is on check whether a scart lead has been connected See page 2 option 2 If a scart lead has been ...

Страница 32: ...F number during the next stage auto set or auto search Press OK to confirm the new number Should the video not recommend a new number see option 2 or 3 on page 6 Stage 3 Auto Set or Auto Search When you have got a clear picture MENU END PLEASE WAIT CH 25 A Point the remote control at the video and press OK B The video is now tuning all the television stations available in your area C If Clock Set ...

Отзывы: