3
ADJUSTMENTS
SECTION 2.
ELECTRICAL ADJUSTMENTS
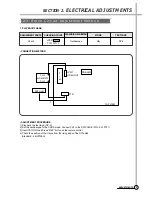
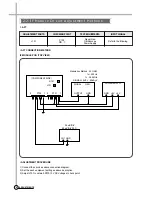
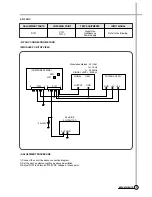
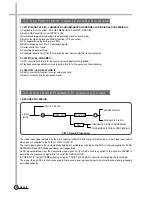
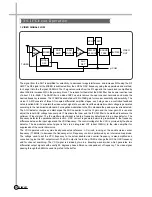
1. PLAYBACK PHASE
• CONNECTION METHOD
• ADJUSTMENT PROCEDURE
1) Play back the test tape. (DP-2)
2) Set the oscilloscope to the CHOP mode. Connect CH1 to the SW PULSE (PIN
3
of PT01).
3) Insert PATH JIG and Press “REC” button on the remote control.
4) Check the position of the V-sync from the rising edge of the SW pulse.
(Standard : 6.5H
±
0.5H)
2-1. Servo Circuit Adjustment Method
ADJUSTMENT PARTS
Check
CHECKING POINT
JP037
PT01 PIN
4
Oscilloscope
MODE
Play
TEST TAPE
DP-2
V.OUT
TOP VIEW
PT01
PRE-AMP
CH-2
OSCILLOSCOPE
CH-1
PATH JIG
T
•
M
7
JP037
VIDEO OUT
MEASURING EQUIPMENT
Содержание DV-K88 series
Страница 71: ...68 CIRCUIT DIAGRAMS 9 1 Connection Diagram SECTION 9 CIRCUIT DIAGRAM 68...
Страница 72: ...69 CIRCUIT DIAGRAMS R819 5 1 9 2 Power Circuit Diagram...
Страница 73: ...70 CIRCUIT DIAGRAMS 9 3 Syscon and Logic Circuit Diagram...
Страница 74: ...71 CIRCUIT DIAGRAMS 9 4 AV SW Circuit Diagram...
Страница 75: ...72 CIRCUIT DIAGRAMS 9 5 IF PDC Circuit Diagram TM...
Страница 76: ...73 CIRCUIT DIAGRAMS 9 6 If Module Circuit Diagram A2...
Страница 77: ...74 CIRCUIT DIAGRAMS 9 7 If Module Circuit Diagram Nicam...
Страница 78: ...75 CIRCUIT DIAGRAMS 9 8 Hi Fi Pre Amp Circuit Diagram...
Страница 79: ...76 CIRCUIT DIAGRAMS 9 9 Video Audio Circuit Diagram...
Страница 80: ...77 CIRCUIT DIAGRAMS 9 10 Remocon Circuit Diagram...
Страница 81: ...SECTION 10 COMPONENTS LOCATION GUIDE ON PCB BOTTOM VIEW 78 P C B LOCATION 10 1 PCB Main...
Страница 82: ...80 P C B LOCATION 10 3 PCB Logic DV K8K S S Series DV K86 S S Series DV K82 S S Series...
Страница 83: ...81 P C B LOCATION DV K88 S S Series...
Страница 84: ...SECTION 11 DISASSEMBLY 83 DISASSEMBLY 11 1 Packing Ass y...
Страница 85: ...84 DIAGRAMS DV K88 Series DV K82 Series DV K8K Series DV K86 Series 11 2 Front Panel Assembly...


