12
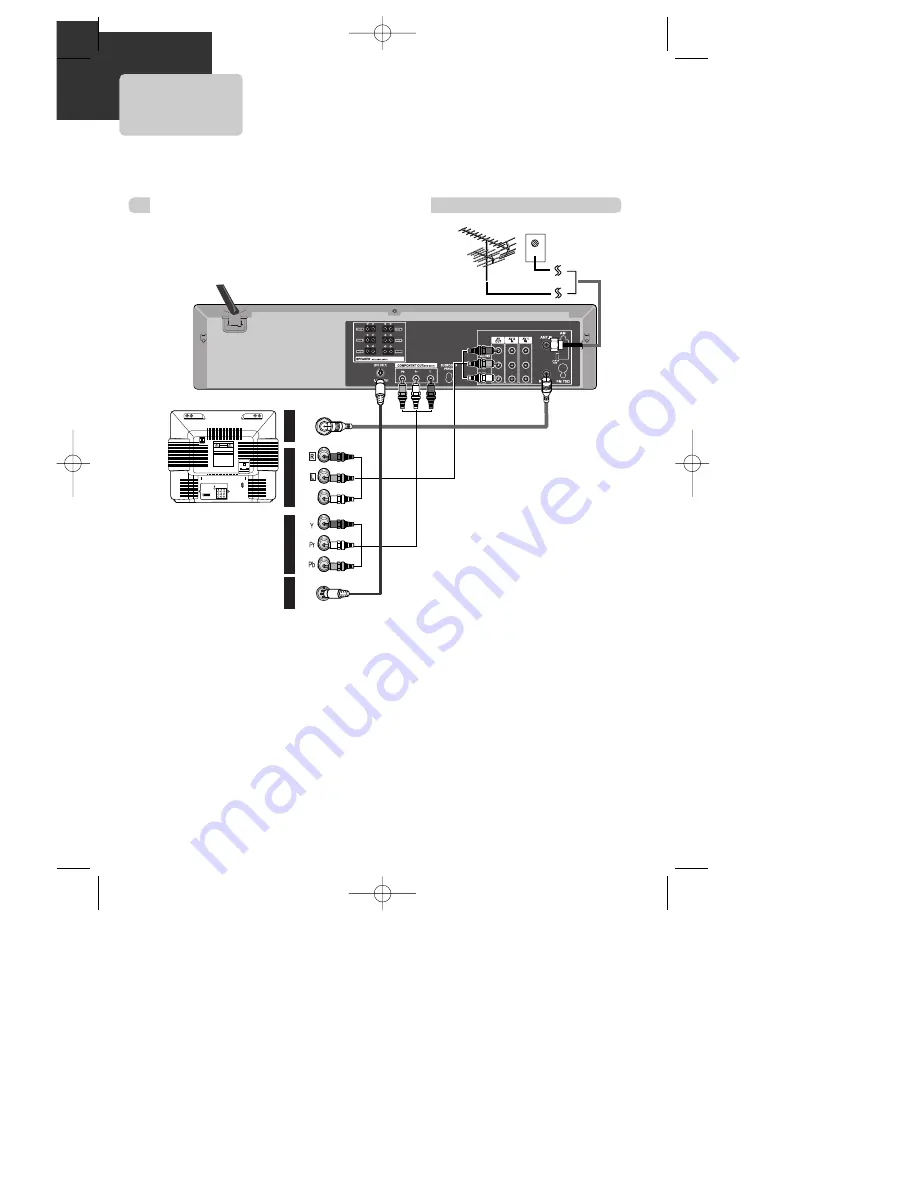
Various methods in connecting with TV
AUDIO
VIDEO
S-VIDEO
ANT INPUT
S-VIDEO INPUT
A/V INPUT
COMPONENT INPUT
CAUTION
CAUTION: TO REDUCE THE RISK OF ELECTRIC SHOCK.
DO NOT REMOVE COVER (OR BACK).
NO USER SERVICEABLE PARTS INSIDE.
REFER SERVICING TO QUALIFIED SERVICE PRESONNEL.
RISK OF ELECTRIC SHOCK
DO NOT OPEN
20
18
16
14
12
10
8
6
4
3
21
19
17
15
13
11
9
7
5
3
1
Method
Method
1
1
Remove circular cable (RF cable) (surplus cable) plugged in ÒANT.INÓ Jack in rear panel of TV. Connect the
cable to Ò
ANT.IN
Ó jack in rear panel of DVD-Video. Connect TV to DVD-Video. Connect Ò
RF OUT
Ó jack in DVD-
Video with Ò
ANT.IN
Ó jack in TV with RF cable.
Method
Method
2
2
: Connecting to a TV that has a audio/video in jacks
Connect
VIDEO OUT
jack in DVD-Video to
VIDEO IN
jack in TV, and
AUDIO OUT
jack in DVD-Video to
AUDIO IN
jack in TV with connecting cable of Audio/Video jack. Select VCR mode by pressing [TV/INPUT] button in TV, you
can view more clear screen and sound than connection with RF cable only.
Method
Method
3
3
: Connecting to a TV that has a component video in jacks
Use a component video cable (commercially available) in place of the yellow video cable to enjoy higher quality
pictures. The component video connection only supplies video (picture) in the DVD mode of the DVD-Video.
Therefore, in order to use the VCR features or view TV channels at the DVD-Video, you still need to either
connect the RF coaxial cable between the ANT-OUT jack of the DVD-Video and the TVÕs Antenna In jack, or
connect the video cable.
■
In the initial SET, exclusive channel for video is set to CH 3. To change this setting, set again in ÒCHANNEL
SETÓ screen in VCR operation.
■
In connecting RF cable to TV, set TV channel to CH3.
<Outside Antenna or
Wall Antenna Outlet>
<Rear Panel of unit>
<Rear Panel of TV>
Method 1
Method 2
Method 3
Method 4
Connecting with TV
DR-C91/92D1N-BS 04.1.19 9:51 PM ˘
`
12


