background image

SETUP

29

Initial Setup

Set Parental Level

The Parental Controls feature allows you to prevent DVDs from being played
based on their ratings or to have certain discs played with alternative scenes.
You can set the parental level from ‘ADULT’ to ‘Kid safe’.

1

Press [SETUP].

2

Use [

œ

/

] to select ‘Preferences‘.

3

While ‘Preferences‘ is selected, press [

] to select ‘Parental Controls‘. And

press [ENTER].

4

Use [

/

] to select ‘Set Parental Level’ and press [ENTER].  The Password

Input dialog will appear. Enter a 4-digit password using the [0-9] buttons. If
this is the first time you have entered a password, you will be prompted to
enter the password again to confirm it.

5

After setting the password, press [ENTER] while 'Set Parental Level' is
displayed.

6

Enter your new password.

7

Use [

/

] to select the desired parental level and press [ENTER] to

confirm. 

Off : 

If you select Unlock, the Lock feature is not active. All discs will play in

full.

ADULT to Kid safe: 

Some discs contain scenes not suitable for children. If you

set a rating for the DVD RVCR, all scenes with the same rating or
lower will be played. Higher rated scenes will not be played unless an
alternative scene is available on the disc. The alternative must have the
same rating or a lower one. If no suitable alternative is found, playback will
stop. You must enter the 4-digit password or change the rating level in order to play the disc.
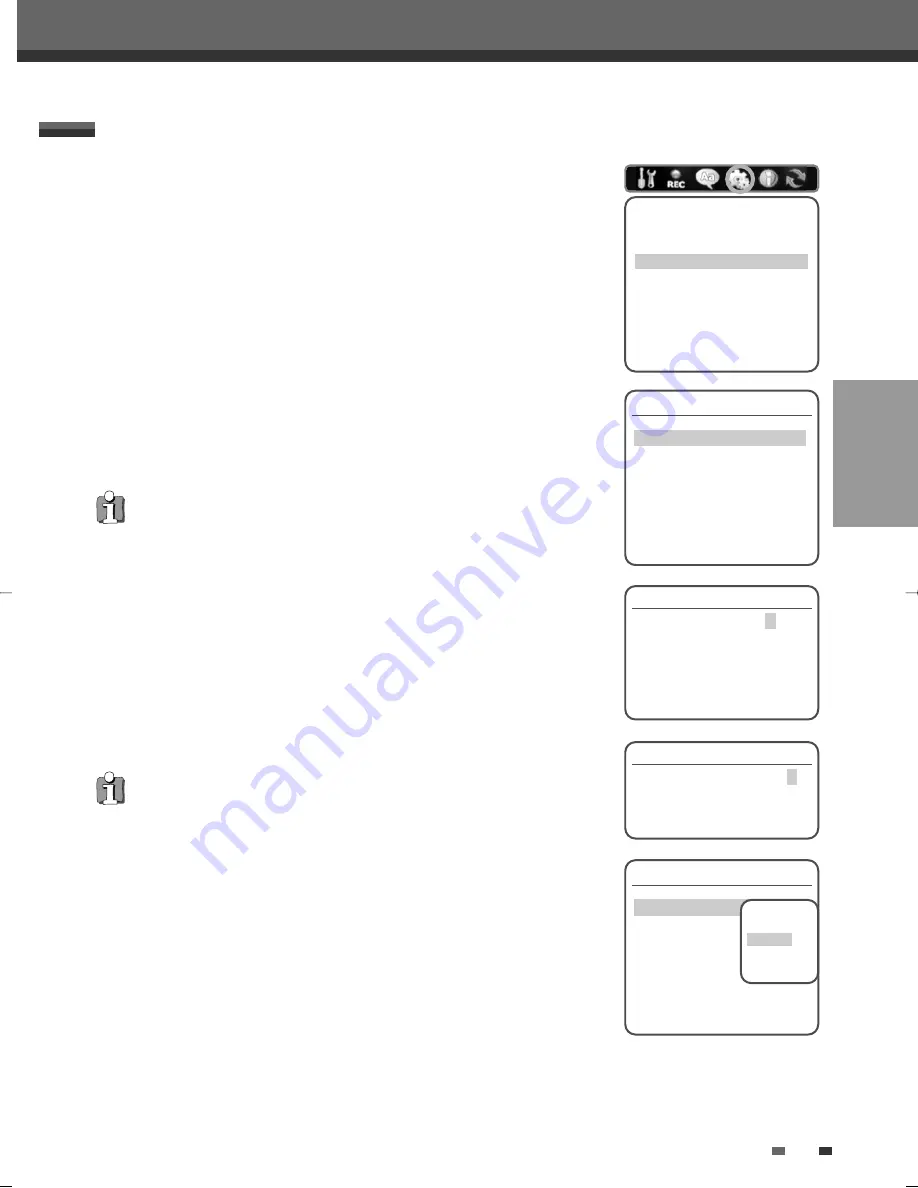
Preferences

Video
Audio
Parental Controls
Auto Settings
VCR

Instructions

Enter-Confirm   Setup-Exit
Move

…†

• The initial password is ‘0000‘. You must enter this password before you can

change the Parental Level.

• Set the new password to something other than '0000'.

Parental Control

Set Parental Level

Off

Change Password
Set Parental Country Code

Instructions

Enter-Confirm  Setup-Exit  Move

…†

Change Password

Current Code

_ _ _ _  

Enter New Code

_ _ _ _  

Confirm Code

_ _ _ _ 

Instructions

Setup-Exit

PREFERENCES / Parental Controls

Password  

Enter Password

* * _ _

Instructions

Setup-Exit

Parental Control

Set Parental Level

Off

Change Password
Set Parental Country Code

Instructions

Enter-Confirm  Setup-Exit  Move

…†

Select the
parental level
Off
ADULT
NC-17

DF-L71D1P-UA/TA  04.11.24 11:51 PM  페이지29

Содержание DF-4100P

Страница 1: ...DVD Recorder VCR DVD Recorder VCR DF 4100P 4150P 8100P 8150P User Manual P N 97P95600P0 46 HELP LINE 0870 100 2525 With queries please quote the page number reference number and model number...

Страница 2: ...x 2 hrs for it to reach room temperature Make sure the DVD Recorder VCR is placed at least 10 cm apart from other home appliances or obstacles to ensure sufficient ventilation The apparatus should not...

Страница 3: ...htning flash with arrowhead symbol within an equilateral triangle is intended to alert the user to the presence of uninsulated dangerous voltage within the product s enclosure that may be of sufficien...

Страница 4: ...ngs must not be blocked or covered These openings must not be blocked by placing the unit on a bed sofa rug or other similar surface This unit should never be placed near or over a radiator or heat ra...

Страница 5: ...d or objects have fallen into the unit C If the unit has been exposed to rain or water D If the unit does not operate normally by following the operating instructions Adjust only those controls that a...

Страница 6: ...32 On Screen Display Overview __________________33 Setup DVD Playback _________________________________36 VCR Playback _________________________________39 Other Disc Playback _________________________...

Страница 7: ...Unlike a DVD RW disc a DVD R write once DVD can only be written to once If it is not finalized after a recording further recordings can be added to it Old recordings can be deleted but they can no lo...

Страница 8: ...d by your player Notes on Recording The recording times shown are not exact because the DVD Recorder VCR uses variable bit rate video compression This means that the exact recording time will depend o...

Страница 9: ...act your nearest dealer Remote Control Operation Range Point the remote control at the remote sensor and press the buttons Distance Within 23 ft 7 m of the remote sensor Angle Within 30 in each direct...

Страница 10: ...e a considerable temperature increase inside the car Cleaning Discs Fingerprints and dust on the disc can cause poor picture quality and sound distortion Before playing clean the disc with a clean clo...

Страница 11: ...yback or recording temporarily STOP Stops playback FF DVD Skips to next chapter VCR Advances the tape during Stop mode Press during Play mode for fast forward picture search 1 REC SPEED 2 SELECT DVD V...

Страница 12: ...r VCR is locked Indicates when the DVD Recorder VCR is outputting the video signal in Progressive Scan mode Disc Type indicators Indicates the type of disc loaded Circle Indicates a DVD R RW is record...

Страница 13: ...elections Selects menu options PR Selects channels Accesses DVD disc menus Selects numbered options in menus Selects TV channels Manually adjusts tracking Resets the tape counter in VCR mode Starts pl...

Страница 14: ...t chapter track title or the entire disc Repeats playback between two points A and B Searches for a specific title or a chapter Progressive Scan Mode If your TV supports Progressive Scan you can view...

Страница 15: ...er etc Scart socket 1 Connection of a TV set Composite output and RGB output RF IN FROM ANT Connect to your antenna or cable TV outlet RF OUT TO TV Connect to a TV with an RF coaxial input COAXIAL Dig...

Страница 16: ...ther equipment Use only one of the connections described below Whichever TV connection you use will work with all input sources Please refer to the manuals for your TV VCR stereo system or other devic...

Страница 17: ...Pr is available on your TV 2 Connect the Left and Right AUDIO OUT jacks from the DVD Recorder VCR to the left right audio in jacks on your TV using the audio cables Connecting a TV Connections This se...

Страница 18: ...er that supports one or more of the audio formats supported by your DVD Recorder VCR MPEG 2 Dolby Digital and DTS Check the receiver manual and the logos on the front of the receiver Connecting an Amp...

Страница 19: ...R RW recorder and digitally transfer DV tapes or DVD R RW discs to DVD R RW Use a DV cable not supplied to connect the DV In Out jack of your DV camcorder video deck to the front panel DV IN jack of t...

Страница 20: ...ion Installation Please select your language to begin auto install procedure English Spanish French Czech Danish German Dutch Instructions Enter Confirm Setup Exit Move Installation Please select your...

Страница 21: ...ish Spanish French Czech Danish German Instructions Enter Confirm Setup Exit Move Installation Searching for available TV stations 2 channels found Please wait Instructions Setup Exit Set Clock Please...

Страница 22: ...level 5 Use to select the desired setting then press ENTER to confirm your selection Some items require additional steps Press SETUP at any time to return to the previous menu 6 Press SETUP to exit th...

Страница 23: ...with the move the next letter with the Manual Setup Standard PAL BG Reception Aerial Auto Search CH02 Fine Tune Decoder Off Store Channel PR01 Program Name P 01 Instructions Enter Confirm Setup Exit...

Страница 24: ...hown in Connecting Antenna Cable on page 15 1 Follow steps 1 2 as shown under Manual Set 2 While Installation is selected press to select Auto Set 3 Press ENTER to begin the channel search The tuner w...

Страница 25: ...nnels 3 Press ENTER The Adjust Channels menu appears 4 Use to select the PR number you want to adjust Then press ENTER Delete After tuning TV stations into your DVD Recorder VCR you may wish to delete...

Страница 26: ...pter Off Instructions Enter Confirm Setup Exit Move Select VCR Quality LP SP Recording Options DVD Record Quality HQ VCR Record Quality LP Auto Chapter Off Instructions Enter Confirm Setup Exit Move S...

Страница 27: ...guage Default Instructions Enter Confirm Setup Exit Move Select Menu Language Default English Spanish French Language OSD Language English Menu Language Default Subtitle Language Default Audio Languag...

Страница 28: ...s set Video Output to RGB Interlace or Progressive If you connect the DVD Recorder VCR to a digital television DTV or Monitor using the COMPONENT jacks set Video Output to Interlace or Progressive Fol...

Страница 29: ...tape recorded with a Dolby Digital only for DVD or MPEG soundtrack If the DVD is recorded with a DTS sound track then no sound will be heard Bitstream Select when connected to a Dolby Digital or DTS d...

Страница 30: ...le for children If you set a rating for the DVD Recorder VCR all scenes with the same rating or lower will be played Higher rated scenes will not be played unless an alternative scene is available on...

Страница 31: ...Instructions Enter Confirm Setup Exit Move Set Parental Country Code 1 While Preferences is selected press to select Parental Controls Then press to select Set Parental Country Code 2 Press ENTER Ent...

Страница 32: ...as Auto Clock Set to set the AV Link status VPS PDC VPS PDC is a service provided by some stations to enable you to perform timer recordings precisely even if the broadcaster delays the start time of...

Страница 33: ...t your DVD Recorder VCR in case service is required System Info Version EP Set 1 0 Main Build DR3 1 0 2 Micom Software 0 0 0 DVD Navigation 1 0 0 Loader Version DVS RA20 Instructions Enter Confirm Set...

Страница 34: ...the currently loaded disc or tape To access the On Screen Display or OSD press DISPLAY To display information about the currently loaded disc or tape On screen display operation 1 Press DISPLAY repea...

Страница 35: ...le Shows the current angle number and total number of angles and changes the angle number 1 Press DISPLAY during playback The on screen display appears on the TV screen 2 Use to select the Angle icon...

Страница 36: ...s the elapsed playing time and skips to the desired time 1 Press DISPLAY during playback The on screen display appears on the TV screen 2 Use to select the Elapsed icon on the on screen display Press...

Страница 37: ...s set and the disc is below the current Parental Level setting the 4 digit code must be entered and or the disc must be authorized see Set Parental Level on page 29 The DVD Recorder VCR will not play...

Страница 38: ...k on some DVDs The Zoom function does not work in PAUSE mode The Camera Angle icon is displayed on the TV screen when alternate angles are available Changing the Audio Language Press AUDIO and then pr...

Страница 39: ...ter 2 To skip directly to any chapter during playback press DISPLAY Use to select the Chapter icon then press ENTER to display a submenu Use to select the desired chapter number and press ENTER to con...

Страница 40: ...CR 3 Press STOP to stop playback The STOP icon appears on the TV screen If the tape reaches the end before STOP is pressed the DVD Recorder VCR will automatically stop rewind and eject the tape Playin...

Страница 41: ...TV screen If a still picture vibrates vertically stabilize it by using the TRACKING buttons on the remote control If the DVD Recorder VCR is left in Still mode for more than 5 minutes the DVD Recorder...

Страница 42: ...ck while the disc is playing 5 To stop playback at any time press STOP Audio CD MP3 PLAYBACK Press REPEAT to repeat a track file and press again to repeat the whole disc If the disc contains JPEG file...

Страница 43: ...iles by pressing TITLE When a CD contains both MP3 files and JPEG files the default Play mode is JPEG image files The DVD Recorder VCR can playback up to 1000 files per disc MP3 files encoded below 64...

Страница 44: ...st is in Stereo then setting the DVD Recorder VCR to Stereo will record the broadcast in Stereo and the Monitor Audio will also be in Stereo 5 Press REC once Recording will start The REC indicator lig...

Страница 45: ...To change channels during recording first press PLAY PAUSE to put the unit in Pause mode Then select the desired channel on the DVD Recorder VCR and press REC again to resume recording You cannot rec...

Страница 46: ...mpting to copy is copy protected you will not be able to copy the disc It is not permitted to copy Macrovision encoded DVDs Copy to VCR does not work in Progressive Scan Mode If you want to start copy...

Страница 47: ...per Long Play 6 hrs disc 7 Press COPY again to start copying 8 Stop the Copy Process To stop copying at any time press STOP Copying will stop automatically when the VHS tape ends One Touch Copy VHS to...

Страница 48: ...Press ENTER to save the program The Timer Record List will appear 6 Press SETUP to exit the Timer Record List 7 Timer indicator will light or blinking Power Off the DVD Recorder VCR to start the Timer...

Страница 49: ...pears after confirmation You can go back at any time to change the information by pressing ENTER Select the appropriate input field using If required change the information using If all the informatio...

Страница 50: ...nfirmation is not possible when The DISC Protect setting is set to ON There are already 49 titles recorded on the disc If the disc is damaged the recording may not complete successfully even if the Ch...

Страница 51: ...VCR You can use the DVD Recorder VCR remote to control both the camcorder and the DVD Recorder VCR Before recording make sure the digital camcorder is properly connected to the front panel DV IN jack...

Страница 52: ...VHS video recorders are not compatible You cannot connect more than one DV camcorder at a time to the DVD Recorder VCR You cannot control the DVD Recorder VCR from external equipment connected via the...

Страница 53: ...players The DVD RW Disc Menu allows you to erase lock or unlock your disc You can also make it compatible with most other DVD players Information Erase the disc DVD RW 1 Press MENU to go to Disc Menu...

Страница 54: ...NU or TITLE 1 Use to go to the top menu 2 Press to display the Disc Information Menu 3 Press and select Finalize for a DVD R or Make Compatible for DVD RW 4 Press ENTER as shown on the screen 5 Select...

Страница 55: ...Menu appears 6 Use to select and press ENTER to enter the name of the disc CLR Clear the disc name SP Space DEL Delete a character SAVE Save the disc name 7 Press ENTER again 8 To save the name of the...

Страница 56: ...3 Press ENTER to erase the title 4 Select Yes and press ENTER to confirm 5 The Erase Title progress bar will be displayed This may takes several seconds 6 After erasing is complete the erased title re...

Страница 57: ...nk title Allows you to record your new title until the end of the disc The last recorded title Allows you to record over your last recorded title and then stop Allows you to record over your last reco...

Страница 58: ...number and then press ENTER Edit Chapters You can add a chapter marker anywhere in a title during playback Once the chapter is marked you can use the chapter search feature as described above You can...

Страница 59: ...ws you to split a title into two titles 1 Use to select Split Title 2 Press ENTER to display the submenu 3 Use to select Yes if you prefer to split the title 4 Press ENTER to confirm It may take a few...

Страница 60: ...les are loose Wrong Tuning Band is selected in the DVD Recorder VCR Setup menu Camcorder is off DVD Recorder VCR s source is not set to AV1 AV2 AVF or DV DV DF 8100P 8150P only The disc was not finali...

Страница 61: ...rder VCR The batteries in the remote control are dead No solution Use another disc You cannot record the source Select the channel on the DVD Recorder VCR s built in TV tuner Set clock to correct time...

Страница 62: ...esolution Over 240 lines Standard recording DVD Specifications Laser system Semiconductor laser wavelength 650 nm Frequency response DVD PCM 48 kHz 8 Hz to 22 kHz CD 8 Hz to 20 kHz Video S N Audio S N...

Страница 63: ...quired if service is needed on this product during the guarantee period KEEP THIS SECTION FOR FUTURE REFERENCE On the expiry date of the manufacturer s guarantee you will be sent details of our annual...

Страница 64: ...tained in the manual It must be used solely for domestic purposes For further information regarding your guarantee please see the section at the rear of your user manual The guarantee will be rendered...

Отзывы: