12
13
INST
ALLA
TION
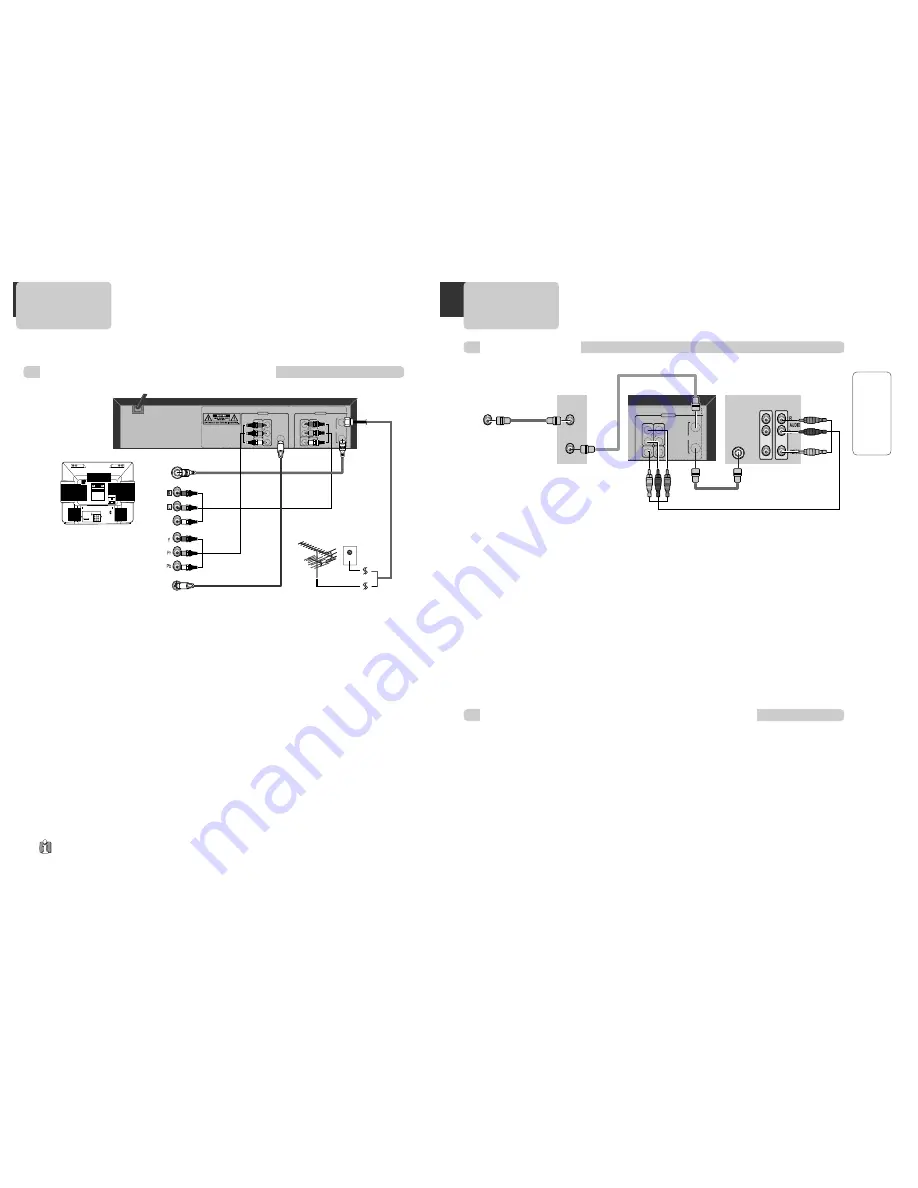
Various methods of connecting your TV
AUDIO
VIDEO
S-VIDEO
ANT INPUT
S-VIDEO INPUT
A/V INPUT
COMPONENT INPUT
CAUTION
CAUTION: TO REDUCE THE RISK OF ELECTRIC SHOCK.
DO NOT REMOVE COVER (OR BACK).
NO USER SERVICEABLE PARTS INSIDE.
REFER SERVICING TO QUALIFIED SERVICE PRESONNEL.
RISK OF ELECTRIC SHOCK
DO NOT OPEN
20
18
16
14
12
10
8
6
4
3
21
19
17
15
13
11
9
7
5
3
1
DVD ONLY
DVD + VCR
AUDIO
OUT
R
L
R
L
Y
Pr
Pb
DIGITAL
AUDIO OUT
COAXIAL
COMPONENT
VIDEO OUT
VIDEO
OUT
VIDEO 1
IN
IN
(FROM ANT.)
OUT
(TO TV)
RF
S-VIDEO OUT
AUDIO
VIDEO
Method
1
Unplug the RF cable from the “ANT.IN” Jack on the rear panel of the TV. Plug this cable into the
“
ANT.IN
” jack on the rear panel of the DVD+VCR. Connect the “
RF OUT
” jack on the DVD+VCR to
the “
ANT.IN
” jack on the TV with another RF cable.
If your cable system provides all your channels, connect an RF Cable from the OUT jack of the
Cable Box to the "IN From Antenna" jack on the DVD+VCR unit.
Method
2
: Connecting to a TV equipped with audio/video in jacks
Use the supplied audio/video cable to connect the
Video Out
jack on the DVD+VCR to the
Video In
jack on your TV. Connect the
Audio Out
jack on the DVD+VCR to the
Audio In
jack on the TV.
Match the color of the cable to the color of the jack.
Method
3
: Connecting to a TV equipped with component video in jacks
Connect component video cables (not supplied) from the Component Video Out jacks on the
DVD+VCR to the Component Video In jacks on the TV. If you do not receive a clear picture using
the Component Video Pr, Pb, Y jacks, try connecting to the Cr, Cb, Y jacks instead. The component
video connection only works in DVD playback mode.
To use the VCR or view TV channels, you still need to connect the RF cable or the audio/video
cables.
Method
4
: Connecting to a TV equipped with S-Video in jacks
Connect an S-Video cable (not supplied) between the S-Video Out jack on the DVD+VCR to the S-
Video In jack on the TV. The S-Video connection only works in DVD playback mode. To use the
VCR or view TV channels, you still need to connect the RF cable or the audio/video cables.
■
The default RF Output channel is CH3. If Channel 3 is used by a TV station, you must change it
to Channel 4. See "To Set Output Channel" on page 25.
C
ONNECTING TO A
TV
• VHF: TV channels 2~13, UHF: TV channels 14~69, CATV: Cable TV
Outside Antenna or Wall
Antenna Outlet
Rear Panel of DVD+VCR
Rear Panel of TV
Method 1
Method 2
Method 3
Method 4
C
ONNECTING A
C
ABLE
B
OX
How to connect
INPUT 1
IN
OUT
ANT IN
INPUT 2
DVD + VCR
R
L
VIDEO
OUT
VIDEO 1
IN
IN
(FROM ANT.)
OUT
(TO TV)
RF
AUDIO
VIDEO
How to watch regular TV and record Cable TV
1
Set the Channel Select switch on your cable Box to CH 3. If Channel 3 is used by a local TV
station, you must change it to Channel 4.
2
Select the channel to be recorded on the Cable Box.
3
Press the
[REC]
button on the DVD+VCR.
4
To watch regular TV while you record from cable, press the [TV/VCR] button on the DVD+VCR
and select the desired channel on your TV. Because of the nature of cable boxes, you cannot
watch one Cable TV channel and record another at the same time.
1
Connect the RF cable from the cable wall outlet to the RF In jack on your Cable Box.
2
Connect a second RF cable from the RF Out jack on the Cable Box to the IN (FROM ANT.) jack
on the back panel of the DVD+VCR.
3
Connect the supplied RF cable from the OUT (TO TV) jack on the back panel of the DVD+VCR
to your television’s Antenna In jack. Or for improved picture and sound quality, connect an
audio/video cable from the Audio/Video Out jacks on the DVD+VCR to the Audio/Video In jacks
on your TV.
4
Connect the DVD+VCR power cord to a standard wall outlet.
5
Power on the DVD+VCR, TV, and Cable Box.
6
If you are using the RF connection, set your TV to Channel 3 or 4 to view the DVD+VCR. If you
are using the Audio/Video connection, set your TV to its line input to view the DVD+VCR.
Rear Panel of DVD+VCR
Cable Box/
Satellite Receiver
Rear Panel of TV
RF Cable
AUDIO/VIDEO Cable
Cable Antenna
RF Cable
RF Cable


