background image

12

English

Grates (3)

SimmerSear Burner Rings (2),

Burner Heads (2)

18” Standard Oven Rack (1)

HDRP/HDER 48” only

Griddle (1)

Literature Kit

Standard Burner Caps*: 

Porcelain (4), Brass (4)

GlideRack

TM

 Oven Rack (2)

Burner-Control Knobs (6—

4 standard, 2 MAX GRIDDLE)

Wok Ring (1)

SimmerSear Burner Caps*: 

Porcelain (2), Brass (2)

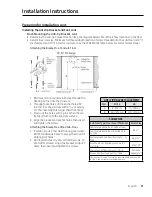
Standard Oven Rack (1)

Anti-Tip Bracket w/Screws 

and Anchors

Broiler Pan and Grill

Standard Burner Rings (4)

18” GlideRack

TM

 Oven Rack (2)

HDRP/HDER 48” only

Temperature Probe (1)

Stainless-Steel Cleaner

Product Specifications

Included Accessories: HDPR36S, -48S/HDER36S, -48S

*The range comes with brass and porcelain burner caps to suit customer preference.

Porcelain

Porcelain

Brass

Brass

HDERS

HDPRS

Содержание HDER30C/LP

Страница 1: ...Installation Instructions Heritage Pro Range HDPR30S HDPR36S HDPR48S HDER30S HDER36S HDER48S Part No 113428 Rev A ...

Страница 2: ...S 48S Ranges 9 HDER30S 36S 48S Ranges 10 Included Accessories HDPR30S HDER30S 11 Included Accessories HDPR36S 48S HDER36S 48S 12 Needed Parts and Tools 13 Installation Requirements 14 Pre installation Checklist 14 General Requirements 15 Location Requirements 17 Gas Requirements 18 Electrical Requirements 19 Installation Instructions 20 Preparing for Installation 20 Making the Electrical Connectio...

Страница 3: ...rsonal and professional reference Service Technician The wiring diagram is in an envelope attached to the inside of the rangetop DacorCustomerAssurance Phone 833 35 ELITE 833 353 5483 USA Canada Hours of Operation Mon Fri 5 00 a m to 5 00 p m Pacific Time Website www dacor com customer care contact us Model Identification HDPR48S NG H HDER48S NG H HDPR48S NG HDER48S NG HDPR48S LP H HDER48S LP H HD...

Страница 4: ...ed Afterinstalling the anti tip bracket see Installing the Anti Tip Bracket Pg 17 verify properinstallation by carefully tipping the range forward The bracket should keep the range safely in place When the range is put back in place aftermaintenance be sure it engages the anti tip bracket To avoid personal property damage do not step sit lean on the range State of California Proposition 65 Warning...

Страница 5: ...installershall ensure properconversion Installation of the range must follow local codes or in theirabsence the National Fuel Gas Code ANSI Z223 1 NFPA 54 latest edition In Canada installation must follow the current Natural Gas and Propane In stallation Code CAN CGA B149 1 orthe current Propane Installation Code CAN CGA B149 2 and local codes where applicable The range is UL certified according t...

Страница 6: ... Do not use a towel orotherbulky cloth as a pot holder Grease fires Turn off the burner and if needed use a multi purpose dry chemical orfoam extinguisher Oven fires Keep the doorclosed and turn off the oven Do not open the dooruntil the fire is out If needed use a multipurpose dry chemical orfoam extinguisher Do not heat sealed containers Electrical and Grounding Safety Do not use a damaged plug ...

Страница 7: ... du fabricant et aux réglementations locales L installateurdoit assurerune conversion correcte L installation de la cuisinière doit respecterles codes locaux ou en leurabsence le Code national du gaz combustible ANSI Z223 1 NFPA 54 dernière édition Au Canada l installation doit respecterle Code d in stallation du gaz naturel et du propane CAN CGA B149 1 ou le Code d installation du propane actuel ...

Страница 8: ...utiliserune serviette ou un autre chiffon volumineux comme porte pot Feux de graisse Éteignez le brûleuret si nécessaire utilisez un extincteurà poudre à usage chimique ou à usage multiple Fourallumé Gardez la porte fermée et éteignez le four N ouvrez pas la porte tant que le feu n est pas éteint Au besoin utilisez un extincteurà usages multiples à poudre chimique ou à mousse Ne pas chaufferles co...

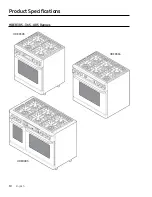
Страница 9: ...9 English Product Specifications HDPR30S 36S 48S Ranges HDPR48S HDPR36S HDPR30S ...

Страница 10: ...10 English Product Specifications HDER30S 36S 48S Ranges HDER48S HDER36S HDER30S ...

Страница 11: ...ture Probe 1 Stainless Steel Cleaner SimmerSearBurnerCaps Porcelain 1 Brass 1 Standard Oven Rack 1 Griddle 1 Literature Kit Standard BurnerRings 3 Burner Control Knobs 4 2 standard 2 MAX GRIDDLE Wok Ring 1 Product Specifications Included Accessories HDPR30S HDER30S The range comes with brass and porcelain burnercaps to suit customerpreference Porcelain Porcelain Brass Brass HDERS HDPRS ...

Страница 12: ...E Wok Ring 1 SimmerSearBurnerCaps Porcelain 2 Brass 2 Standard Oven Rack 1 Anti Tip Bracket w Screws and Anchors BroilerPan and Grill Standard BurnerRings 4 18 GlideRackTM Oven Rack 2 HDRP HDER 48 only Temperature Probe 1 Stainless Steel Cleaner Product Specifications Included Accessories HDPR36S 48S HDER36S 48S The range comes with brass and porcelain burnercaps to suit customerpreference Porcela...

Страница 13: ...rewdriver Needle Nose Pliers Pipe Joing Compound Flexible Metal Appliance Conduit 1 2 in ID x 5 ft Phillips Screwdriver Open End orAdjustable Wrench Flare Union Adapter3 4 in NPT x 1 2 in ID Nutdriver Pencil Ruler Flare Union Adapter1 2 in NPT x 1 2 in ID Pipe Wrench 2 Level Needed Tools Utility Knife Soap and WaterSolution ...

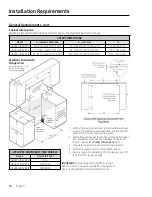
Страница 14: ...ll adjacent surfaces The range complies with the maximum allowable wood cabinet temperature of194 F 90 C Adjacent wall coverings countertops and cabinets must tolerate such heat to avoid discoloration delamination melting Minimum Dimensions Regarding overhead cabinets A hood should be installed that projects at least 5 12 7 cm beyond the cabinet face to dissipate heat in those cabinets The hood mu...

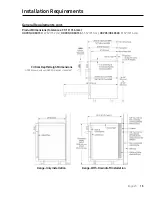
Страница 15: ...roduct Dimensions tolerances 1 16 1 6 mm HDPRS HDERS30 29 7 8 75 9 cm HDPRS HDERS36 35 7 8 91 1 cm HDPRS HDERS48 47 7 8 121 6 cm Range Only Installation Range With Downdraft Installation Critical Depth Height Dimensions HDPRS shown unique HDERS dimensions indicated ...

Страница 16: ...installing an overhead hood see hood specifi cations forminimum required clearances 2 Cabinet countertop depth is at the customer s discretion but cabinet face must not protrude beyond the rearof the front panel See Product Dimensions Pg 13 3 Consult local codes forexact location requirements 4 Vertical from grate level to combustible surface 5 Does not apply to cabinets that horizontally are over...

Страница 17: ...ping shut off valve and the electrical junction box receptacle must not interfere with the placement requirements forthe range The junction box and gas shut off valve must be located so the range can be pulled out forservice without being disconnected GAS ELECTRICAL ACCESS DIMENSIONS Model A B C D E HDPR30S HDER30S 3 1 4 8 3 cm 27 68 6 cm 6 3 4 17 1 cm 6 3 4 17 1 cm 7 8 2 2 cm dia HDPR36S HDER36S ...

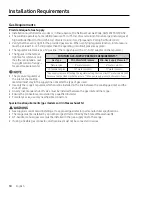
Страница 18: ...approved gas detectorpermanufacturerspecifications The range must be installed by a plumberorgas fittercertified by the State of Massachusetts A T handle manual gas valve must be installed in the gas supply line to the range If using a flexible gas connector multiple lines must not be connected in series The pressure regulatorat the inlet of the cooktop manifold must stay in the supply line no mat...

Страница 19: ...s closed loop terminals or open ended spade lugs with upturned ends connect to a junction box or receptacle installed by a licensed electrician Connect the range via electical conduit or power cord Conduit A 4 wire conduit connected to a 4 wire junction box or where local code permits excludes new branch circuit installations A 3 wire conduit connected to a 3 wire junction box Suggested wiring col...

Страница 20: ...lling the Anti tip Bracket and Foot There are two ways to mount the anti tip bracket Floormounting preferred and wall mounting Pg 19 Wall mount the bracket if floormounting is unsuitable however if the range s front panel is over26 1 2 67 3 cm from the back wall orif the flooris too thick floormounting must be used Floor Mounting the Anti tip Bracket To perform as designed the anti tip bracket mus...

Страница 21: ...he concrete surface 4 Align the bracket and anchorholes then insert and tighten the screws Attaching the Bracket to a Wood Sub Floor 1 Ceramic stone otherhard flooring overwood Drill 4 countersink holes to access the wood for drilling pilot holes 2 Drill 4 pilot holes 1 dia bit for 8 screws 1 8 dia for 12 screws Align the bracket and pilot holes then insert and tighten the screws Installation Inst...

Страница 22: ...es shown 7 Attach the bracket to the wall as shown with the fourincluded 12 x1 screws ANTI TIP BRACKETPLACEMENT Dim 30 36 48 C 14 1 8 35 9 cm 3 1 2 8 9 cm 1 Using product dimensions on Pg 13 and actual cabinet cutout dimensions determine the position of the range s centerline and front panel when the range is in its final position 2 Based on the diagram on Pg 18 determine and mark the position of ...

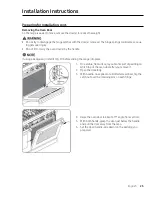
Страница 23: ...by the handle If using a backguard install it Pg 17 before sliding the range into place 1 On a stable flat surface lay out some sort of padding on which to put the oven doorafteryou remove it 2 Open the doorfully 3 With needle nose pliers ora slotted screwdriver flip the catch out overthe retaining arm on each hinge 4 Raise the oven doorto about a15 angle from vertical 5 With both hands grasp the ...

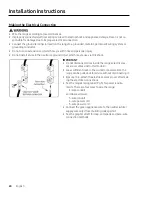
Страница 24: ...rground circuit which may cause electric shock IMPORTANT Do not disconnect wires inside the range s electrical ac cess coverunless instructed to do so Leave sufficient slack in the conduit orpowercord so the range can be pulled out forservice without disconnecting it Be sure to re attach the electrical access coveraftermak ing the electrical connections See the range s rating label Pg 3 forpowerre...

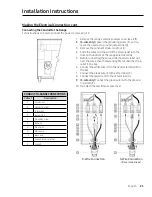
Страница 25: ...unding screw E and re move the neutral to ground jumperlink D 3 Remove the conduit s strain relief nut J 4 Slide the wires and the end of the strain relief into the hole on the bottom of the range s electrical box 5 Before connecting the wires slide the strain relief nut overthe wires then thread and tighten it onto the strain relief in the box 6 Connect the white wire H to the neutral terminal B ...

Страница 26: ... 2 Afterconnecting the conduit to the range Pg 22 connect the range s white wire to the neutral white supplywire in the junction box 3 Connect the range s black wire to the black L1 power supplywire 4 Connect the range s red wire to the red L2 power supplywire 5 4 wire only Connect the green wire to a grounded supplywire in the junction box orto a grounded cold waterpipe Concern ing this pipe Use ...

Страница 27: ...rain relief down through the hole in the box s bottom b Reassemble the strain relief so the tabs are underthe box and the strain relief itself is in the box Installation Instructions Making the Electrical Connection cont Connecting a PowerCord to the Range Do not connect the range s green wire to the neutral white supplywire unless local code allows The range does not come with a powercord purchas...

Страница 28: ...e G Green ground wire H White wire I L1 wire J Strain relief 4 Wire Cord Connection 5 Insert the end of the cord up through the hole strain relief 6 Attach the powercord s a white neutral wire H to the neutral termi nal B b L1 wire I to the L1 terminal C c L2 wire F to the L2 terminal A d 4 wire only ground wire G underthe box s ground screw E 7 Snug the strain relief J around the cord 8 Re attach...

Страница 29: ...tructed Do not use a flame to check forleaks The range s gas pressure regulatoris factory set fora specific type of gas To verify that the range is compati ble with the home gas supply check the rating label see Pg 3 forlocation Ranges intended forLP gas have LP in the model number Consult yourdealerif the range is incompatible with the home gas supply Before Sliding the Range Into the Cutout 1 Cl...

Страница 30: ... the the anti tip foot is under the anti tip bracket 6 With a level check that the range does not tilt in any direction adjust the legs as needed to level the range 1 Grasping the oven dooron each side below the handle and facing the oven tilt the door15 out from vertical 2 Slide the hinges into theiropenings resting the hinges on theirreceptacles 3 Keeping the doorat a15 angle push in on the door...

Страница 31: ...8 and right side burners 30 feature the words MAX GRIDDLE which refers to the maximum heat setting fora burneroverwhich the griddle is placed Exceeding the MAX GRIDDLE heat level may damage the griddle Pro Knob for HDPRS Models Epicure Knob for HDERS Models Do not operate the cooktop unless all burnercomponents are properly assembled Installing SimmerSear Burner Components 1 Unpackage the burnerco...

Страница 32: ...nerring so its base fits within the ridge around the burnerhead and rotate the ring until it drops into place 3 Install the burnercap so the ridge on the bottom of the cap fits overthe perimeterof the ring Eitherstyle of cap brass orporcelain may be used Installing the Grates 1 Unpackage the grates 2 Place the feet of each grate in the corresponding dimples formed into the cooktop The grates are i...

Страница 33: ...s 7 Open the doorto verify that the oven is heating BAKE and the preheating temp appearon the display 8 Touch CANCEL SECURE orCANCEL RIGHT 48 models The oven s heating elements turns off 9 Push turn a burner control knob to maximum flame Shortly the burnerignites and the ignitorstops sparking If the burnerdoes not ignite in 4 seconds turn it off wait 5 minutes forgas to dissipate then try again 10...

Страница 34: ...ure due to improperinstallation of the range F F Was the plastic coating been peeled off the outside of the range F F Were all packaging materials removed from the oven chamber F F Were the leveling legs lowered to the floorand the unit leveled Pg 27 F F Was the range secured with the provided anti tip bracket and foot Pgs 17 21 27 F F Was the range wired grounded and the electrical access coverre...

Страница 35: ...35 English Notes ...

Страница 36: ...Dacor 14425 Clark Avenue City of Industry CA 91745 Phone 800 793 0093 Fax 626 403 3130 www dacor com ...

Отзывы: