background image

9

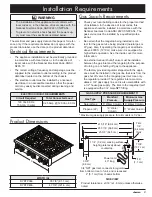
Installation Instructions

Gas Line Connection

 WARNING

•  Verify that the gas supply meets specifications before connection. See page 3.
•  The maximum gas supply pressure to the regulator must never exceed 1/2 pounds per square inch (psi) or 3.5 kPa.
•  Do not install or use the rangetop without the included gas regulator installed.
•  Ensure that the arrow on the regulator points in the direction of the gas flow, towards the rangetop.
•  Do not apply excessive pressure when tightening gas connections and fittings.
•  Do not use Teflon tape or plumber’s putty on flexible gas line connections.
•  Test the gas lines for leaks as instructed before use. Do not use a flame to check for leaks. 
•  The gas supply pressure for testing the regulator setting shall be at least 1 inch water column (249 Pa) above the 

specified manifold pressure. See page 3.

•  The rangetop and shut-off valve must be disconnected from the gas supply piping system during any pressure test-

ing exceeding 1/2 psi (3.5 kPa).

•  The rangetop must be isolated from the gas supply piping system by closing the shut-off valve to the rangetop dur-

ing any gas supply piping system pressure testing equal to or less than 1/2 psi (3.5 kPa).

•  For LP gas installations, the LP gas tank must have its own high-pressure regulator in addition to the pressure regu-

lator supplied with the rangetop.

 IMPORTANT

Within the Commonwealth of Massachusetts, this appliance must be installed by a licensed plumber or gas fitter.

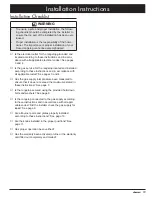
1.  Attach the gas pressure regulator (included with the 

rangetop) to the 3/4” (1.9 cm) male NPT gas inlet on 

the rangetop. The inlet is located on the bottom, at the 

right rear portion of the chassis. For tight installations, 

the regulator may be installed upstream from the pipe 

nipple, anywhere between the shut-off valve and the 

rangetop. For best performance, minimize gas pressure 

loss by attaching the regulator as close as possible to 

the rangetop gas inlet.

2.  Complete connection of the gas supply to the ran-

getop by installing a minimum 1/2” flexible gas line (not 

included) between the pressure regulator and the shut-

off valve.

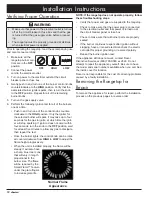
3.  Check for gas leaks:

◊ 

Turn all rangetop control valves to the 

OFF

 posi-

tion.

◊ 

Turn on the gas supply valve and check all lines 

and connections for leaks using a soap and water 

solution or a gas leak detector.

◊ 

Turn the gas supply valve off.

Содержание DYRTP366

Страница 1: ...lation Instructions Discovery Rangetop Models DYRTP366 DYRTP486 Part No 108317 Rev C THIS APPLIANCE HAS BEEN TESTED IN ACCORDANCE WITH THE LATEST EDITION OF ANSI Z21 1 STANDARD FOR HOUSEHOLD GAS APPLI...

Страница 2: ...f California to cause cancer or reproductive harm California law requires businesses to warn customers of potential exposure to such substances To minimize exposure to these substances always operate...

Страница 3: ...se a fire extinguisher ONLY if You have a Class ABC extinguisher and you already know how to operate it The fire is small and contained in the area where it started The fire department is being called...

Страница 4: ...ing tasks expected of a home appliance as outlined in the literature accom panying it This rangetop is not intended for commer cial or laboratory use WARNING General Safety Precautions To reduce the r...

Страница 5: ...d in accordance with the National Fuel Gas Code ANSI Z223 1 NFPA 54 The gas service must be installed by a qualified profes sional Be certain that the rangetop being installed is cor rect for the gas...

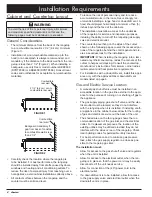
Страница 6: ...ing the rangetop into a lami nated or synthetic countertop radius the corners of the cutout to help avoid cracking Consult the countertop manufacturer s instructions for minimum corner radius reinforc...

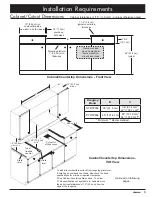
Страница 7: ...herwise noted Rangetop Model B C DYRTP366 36 91 4 cm 36 91 4 cm 42 106 7 cm DYRTP486 48 121 9 cm 48 121 9 cm 54 137 2 cm Minimum Recommended continued on following pages See note 2 2 See Cabinet Count...

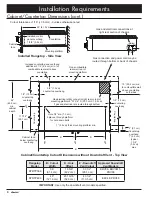
Страница 8: ...ng 1 2 5 cm thick mounting platform min Countertop Countertop 1 2 1 3 cm countertop overhang 2 5 1 cm Counterop overhang 1 2 5 cm typical 1 3 8 3 5 cm max 11 7 16 29 1 cm 24 63 5 cm min cabinet depth...

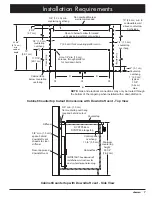
Страница 9: ...electrical connections Countertop Countertop 1 2 1 3 cm countertop overhang 2 5 1 cm 11 7 16 29 1 cm C L D D E B C L C L C L 26 5 8 67 6 cm min cabinet depth Counterop overhang 1 2 5 cm typical 1 3 8...

Страница 10: ...ainless Steel Cleaner WOK ring Griddle 2 hold down bolts 2 washers for hold down bolts Gas regulator Product literature The rangetop is supplied with two different types of burner caps brass and porce...

Страница 11: ...off valve to the rangetop dur ing any gas supply piping system pressure testing equal to or less than 1 2 psi 3 5 kPa For LP gas installations the LP gas tank must have its own high pressure regulator...

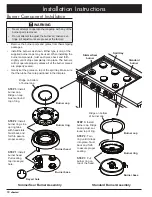
Страница 12: ...ype color of the supplied burner caps may be used When installing the burner components twist each piece back and forth slightly until it drops completely into place The burners will not operate prope...

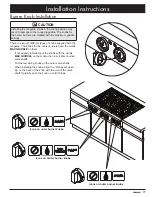
Страница 13: ...ith the rangetop The knobs for the center burners have the words MAX GRIDDLE on them If not already installed put the knobs with the words MAX GRIDDLE on them onto the inner center burner valve shafts...

Страница 14: ...en repeat the test Once the burner lights the control knob can be rotat ed counterclockwise from HIGH to LOW to adjust the flame height progressively When the unit is installed properly the flame will...

Страница 15: ...d installed according to these instructions and in accordance with all applicable codes See pages 3 and 4 Has the gas supply inlet pressure been measured to ensure that it does not exceed the maximums...

Страница 16: ...ARNESS O O O O O O B B B B B B B B RL BURNER IGNITOR IGNITOR RC BURNER RR BURNER IGNITOR IGNITOR FR BURNER IGNITOR FL BURNER FC BURNER IGNITOR S1 S2 S3 S4 S6 S5 B B B B BLACK WHITE FR LED HARNESS W W...

Страница 17: ...15 Notes...

Страница 18: ...16 Notes...

Страница 19: ......

Страница 20: ...Dacor 14425 Clark Avenue City of Industry CA 91745 Phone 800 793 0093 Fax 626 403 3130 www dacor com...

Отзывы: