background image

10

Installation Instructions

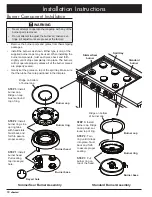
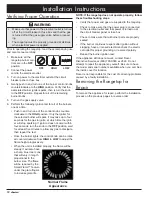
SimmerSear Burner Assembly

Standard Burner Assembly

Spill tray

Standard 

burner

SimmerSear 

burner

Burner cap

Burner cap

Burner ring

Burner ring

Burner head

Burner base

Burner base

Keyed hole

Ridge on bottom

of burner cap

Ridge on bottom

of burner cap

Burner Component Installation

 WARNING

•  Never attempt to operate the rangetop with any of the 

burner parts removed.

•  Do not attempt to adjust the burner air mixture set-

tings. All adjustments are preset at the factory.

•  Remove the burner parts and grates from their shipping 

packages.

•  Install the burners as shown. Either type (color) of the 

supplied burner caps may be used. When installing the 

burner components, twist each piece back and forth 

slightly until it drops completely into place. The burners 

will not operate properly unless all of the burner pieces 

are properly seated.

•  Gently set the grates on top of the spill tray. Make sure 

that the rubber feet are positioned in the dimples. 

STEP 1:

 Install 

burner head. 

Put locating 

tap into keyed 

hole.

STEP 1:

 Put 

burner ring on 

top of the head.

STEP 3:

 Install 

burner cap. 

Ridge on cap 

must surround 

top of ring.

STEP 3:

 Install 

burner cap. Ridge 

on cap must sur-

round top of ring.

STEP 2:

 Install 

burner ring. Line 

up ring tabs 

with head slots. 

Twist back and 

forth to assure 

proper seating.

STEP 2:

 Turn 

ring until it drops 

into place. Twist 

back and forth 

to assure proper 

seating.

Содержание DYRTP366

Страница 1: ...lation Instructions Discovery Rangetop Models DYRTP366 DYRTP486 Part No 108317 Rev C THIS APPLIANCE HAS BEEN TESTED IN ACCORDANCE WITH THE LATEST EDITION OF ANSI Z21 1 STANDARD FOR HOUSEHOLD GAS APPLI...

Страница 2: ...f California to cause cancer or reproductive harm California law requires businesses to warn customers of potential exposure to such substances To minimize exposure to these substances always operate...

Страница 3: ...se a fire extinguisher ONLY if You have a Class ABC extinguisher and you already know how to operate it The fire is small and contained in the area where it started The fire department is being called...

Страница 4: ...ing tasks expected of a home appliance as outlined in the literature accom panying it This rangetop is not intended for commer cial or laboratory use WARNING General Safety Precautions To reduce the r...

Страница 5: ...d in accordance with the National Fuel Gas Code ANSI Z223 1 NFPA 54 The gas service must be installed by a qualified profes sional Be certain that the rangetop being installed is cor rect for the gas...

Страница 6: ...ing the rangetop into a lami nated or synthetic countertop radius the corners of the cutout to help avoid cracking Consult the countertop manufacturer s instructions for minimum corner radius reinforc...

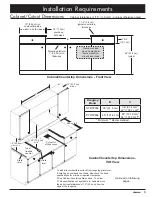
Страница 7: ...herwise noted Rangetop Model B C DYRTP366 36 91 4 cm 36 91 4 cm 42 106 7 cm DYRTP486 48 121 9 cm 48 121 9 cm 54 137 2 cm Minimum Recommended continued on following pages See note 2 2 See Cabinet Count...

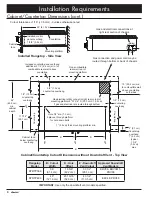
Страница 8: ...ng 1 2 5 cm thick mounting platform min Countertop Countertop 1 2 1 3 cm countertop overhang 2 5 1 cm Counterop overhang 1 2 5 cm typical 1 3 8 3 5 cm max 11 7 16 29 1 cm 24 63 5 cm min cabinet depth...

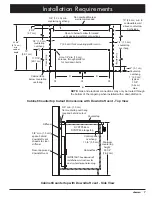
Страница 9: ...electrical connections Countertop Countertop 1 2 1 3 cm countertop overhang 2 5 1 cm 11 7 16 29 1 cm C L D D E B C L C L C L 26 5 8 67 6 cm min cabinet depth Counterop overhang 1 2 5 cm typical 1 3 8...

Страница 10: ...ainless Steel Cleaner WOK ring Griddle 2 hold down bolts 2 washers for hold down bolts Gas regulator Product literature The rangetop is supplied with two different types of burner caps brass and porce...

Страница 11: ...off valve to the rangetop dur ing any gas supply piping system pressure testing equal to or less than 1 2 psi 3 5 kPa For LP gas installations the LP gas tank must have its own high pressure regulator...

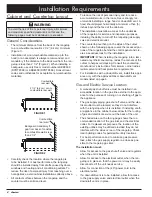
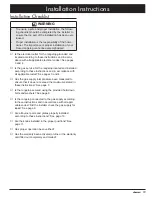
Страница 12: ...ype color of the supplied burner caps may be used When installing the burner components twist each piece back and forth slightly until it drops completely into place The burners will not operate prope...

Страница 13: ...ith the rangetop The knobs for the center burners have the words MAX GRIDDLE on them If not already installed put the knobs with the words MAX GRIDDLE on them onto the inner center burner valve shafts...

Страница 14: ...en repeat the test Once the burner lights the control knob can be rotat ed counterclockwise from HIGH to LOW to adjust the flame height progressively When the unit is installed properly the flame will...

Страница 15: ...d installed according to these instructions and in accordance with all applicable codes See pages 3 and 4 Has the gas supply inlet pressure been measured to ensure that it does not exceed the maximums...

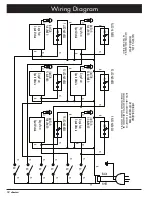
Страница 16: ...ARNESS O O O O O O B B B B B B B B RL BURNER IGNITOR IGNITOR RC BURNER RR BURNER IGNITOR IGNITOR FR BURNER IGNITOR FL BURNER FC BURNER IGNITOR S1 S2 S3 S4 S6 S5 B B B B BLACK WHITE FR LED HARNESS W W...

Страница 17: ...15 Notes...

Страница 18: ...16 Notes...

Страница 19: ......

Страница 20: ...Dacor 14425 Clark Avenue City of Industry CA 91745 Phone 800 793 0093 Fax 626 403 3130 www dacor com...

Отзывы: