background image

22

D-Link GO-RT-N300 User Manual

Section 3 - Configuration

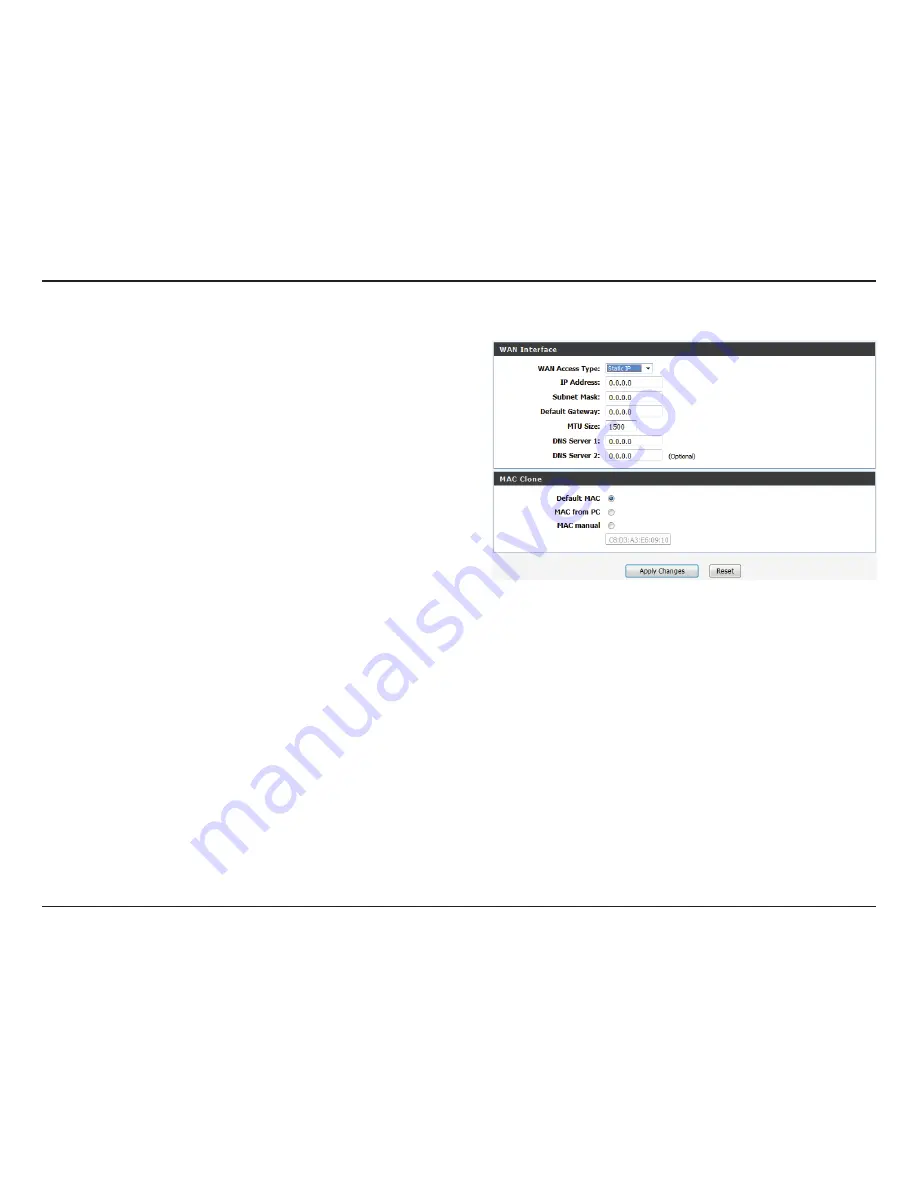
Select 

Static.IP

 from the drop-down menu. 

Enter the static IP address which was provided to you by your 

Internet Service Provider (ISP).

Enter the subnet provided by your ISP.

Enter the default gateway provided by your ISP.

Enter the Maximum Transmission Unit size. The default value 

is 1500.

Enter the primary DNS server address provided by your ISP.

Enter the secondary DNS server address provided by your ISP.

Select the MAC address to be used for the connection. Select 

Default


MAC

 to use 

the router’s MAC address. Select 

MAC.from.PC

 to copy your PC’s MAC address, 

or select 

MAC.Manual.

to manually enter a MAC address in the field provided. 

Click 

Apply.Changes

 to save the current configuration, or click 

.Reset

 to discard. 

WAN Access 

Type:

IP Address:

Subnet Mask:

Default 

Gateway:

MTU Size:

DNS Server 1:

DNS Server 2:

MAC Clone:

If you choose Static IP, please configure the following fields;

Содержание GO-RT-N300

Страница 1: ...Version 1 0 07 02 2013 GO RT N300 User Manual Wireless N 300 Easy Router ...

Страница 2: ...or registered trademarks of D Link Corporation or its subsidiaries in the United States or other countries All other company or product names mentioned herein are trademarks or registered trademarks of their respective companies Copyright 2013 by D Link Systems Inc All rights reserved This publication may not be reproduced in whole or in part without prior expressed written permission from D Link ...

Страница 3: ... based Configuration Utility 12 Setup 13 Wizard 13 Local Network 17 LAN Interface Setup 18 DHCP Server Settings 19 DHCP Static IP Configuration 20 Setup 21 Internet Setup 21 Wireless 24 Wireless Basics 24 Wireless Security 25 Wi Fi Protected WPS Setup 27 Advanced Wireless 28 Wireless Repeater 31 Advanced 33 Access Control List 33 Port Triggering 34 DMZ 35 URL Block 36 Dynamic DNS 37 Traffic Contro...

Страница 4: ...ndows 8 53 WPA WPA2 53 Using Windows 7 55 Configure WPS 58 Using Windows Vista 62 Configure Wireless Security 63 Using Windows XP 65 Configure WPA PSK 66 Troubleshooting 68 Wireless Basics 72 What is Wireless 73 Tips 75 Wireless Modes 76 Networking Basics 77 Check your IP address 77 Statically Assign an IP address 78 Technical Specifications 79 ...

Страница 5: ...w Product Overview Note Using a power supply with a different voltage rating than the one included with the GO RT N300 will cause damage and void the warranty for this product Package Contents GO RT N300 Wireless N 300 Easy Router Power Adapter Ethernet Cable ...

Страница 6: ...ration Utility Requirements Computer with the following Windows Macintosh or Linux based operating system An installed Ethernet adapter Browser Requirements Internet Explorer 7 or higher Firefox 12 0 or higher Safari 4 0 or higher Chrome 20 0 or higher Windows Users Make sure you have the latest version of Java installed Visit www java com to download the latest version System Requirements ...

Страница 7: ...ltering based on URL Secure Multiple Concurrent Sessions The GO RT N300 can pass throughVPN sessions It supports multiple and concurrent PPTP sessions so users behind the GO RT N300 can securely access corporate networks User friendly Setup Wizard Through its easy to use Web based user interface the GO RT N300 lets you control what information is accessible to those on the wireless network whether...

Страница 8: ...r to its original factory default settings The Internet port is the connection for the Ethernet cable to the Cable or DSL modem The On Off button turns the device on or off LAN Ports Connect Ethernet devices such as computers switches and hubs Receptor for the Power Adapter Hardware Overview Connections ...

Страница 9: ...k GO RT N300 User Manual Section 1 Product Overview INTERNET A solid light indicates connection on the WAN port Power LED A solid light indicates a proper connection to the power supply Hardware Overview LEDs ...

Страница 10: ...r then you must turn off your modem disconnect the USB cable and connect an Ethernet cable to the Internet port on the router and then turn the modem back on In some cases you may need to call your ISP to change connection types USB to Ethernet If you have DSL and are connecting via PPPoE make sure you disable or uninstall any PPPoE software such as WinPoet Broadjump or Enternet 300 from your comp...

Страница 11: ...at is 1 5 feet thick 5 meters at a 45 degree angle appears to be almost 3 feet 1 meter thick At a 2 degree angle it looks over 42 feet 14 meters thick Position devices so that the signal will travel straight through a wall or ceiling instead of at an angle for better reception 3 Building Materials make a difference A solid metal door or aluminum studs may have a negative effect on range Try to pos...

Страница 12: ...our modem from your computer and place it into the Internet port on the router 4 Plug an Ethernet cable into one of the four LAN ports on the router Plug the other end into the Ethernet port on your computer 5 Plug in your modem Wait for the modem to boot about 30 seconds 6 Plug the power adapter to the router and connect to an outlet or power strip 7 Use the power switch to power on the router Wa...

Страница 13: ...ings write down your existing settings before making any changes In most cases your computer should be set to receive an IP address automatically in which case you will not have to do anything to your computer 2 Open a web browser and enter http 192 168 0 1 and press Enter When the login window appears set the user name to Admin and leave the password box empty Click Log In to continue 3 Click on ...

Страница 14: ... and connect it to your other router Do not plug anything into the Internet WAN port of the D Link router 8 You may now use the other 3 LAN ports to connect other Ethernet devices and computers To configure your wireless network open a web browser and enter the IP address you assigned to the router Refer to the Configuration and Wireless Security sections for more information on setting up your wi...

Страница 15: ...ommended to write down the SSID and security key followed by the login password Open a web browser such as Internet Explorer and enter the IP address of the router http 192 168 0 1 in the address bar The setup wizard will start automatically Thenetworkmapatthetopofthepageshowsyourcurrentnetwork connections A green tick represents a successful connection between two devices The IP address of each d...

Страница 16: ...nfiguration utility Web based Configuration Utility To access the configuration utility open a web browser such as Internet Explorer and enter the IP address of the router 192 168 0 1 Enter Admin in the User Name field Leave the password blank as the default password If you get a Page Cannot be Displayed error please refer to the Troubleshooting section for assistance ...

Страница 17: ...nectionusingawizard or manually Click Next to use the SetupWizard or click Manual to configure the WAN connection manually which will take you to the Setup Internet Setup page Setup Wizard will be explainedinthenextpagesandInternetSetupwillbeexplained in the Internet Setup section Setup GO RT N300 ...

Страница 18: ...Section 3 Configuration Select the connection type for your WAN and click Next to continue IfyouselectedPPPoE enteryourPPPoEusernameandpassword twice and click Next to continue Click the Account Validate button to validate the account ...

Страница 19: ...ID name Use the dropdown menu to select the wireless channel Use the dropdown menu to specify the wireless mode Use the dropdown menu to select the channel bandwidth If you selected the 802 11n 802 11 b g or 802 11 b g n wireless modes the available options are 20 MHz and 20 40MHz For the others 20MHz is the only option You can also choose to not use security by selecting this but this is not reco...

Страница 20: ...16 D Link GO RT N300 User Manual Section 3 Configuration Click Finish to complete the setup process When the router has finished saving the Status Device Info window will open ...

Страница 21: ...k settings Use this section to configure the GO RT N300 s built in DHCP server settings UsethissectiontoaddanewDHCPStaticIPconfiguration Displays information about the devices that have a static DHCP assigned from the GO RT N300 The information includes the IP Address and MAC Address You can delete or edit an existing Static IP configuration in the table LAN Interface DHCP Server Settings DHCP Sta...

Страница 22: ... 192 168 0 1 If you change the IP address once you click Apply you will need to enter the new IP address in your browser to get back into the configuration utility Enter the Subnet Mask The default subnet mask is 255 255 255 0 IP Address Default Subnet Mask LAN Interface Setup Click the Apply Changes button to save any changes made ...

Страница 23: ...ool Choose the DHCP Server option in the pulldown menu to enabletheDHCPserveronyourrouter ChooseNonetodisable this function EnterthestartingandendingIPaddressesfortheDHCPserver s IP assignment Note If you statically manually assign IP addresses to your computers or devices make sure the IP addresses are outside of this range or you may have an IP conflict The maximum length of time for the IP addr...

Страница 24: ...ss must be within the DHCP IP Address Range Enter the MAC address of the computer or device IP Address MAC Address Local Network DHCP Static IP Configuration When you have finished configuring the new DHCP Reservation click the Add button to activate your reservation It will then be displayed in the DHCP Static IP Table below The DHCP Static IP Table displays the IP reservations that have been cre...

Страница 25: ... the DNS is to be obtained automatically Click this to specify a DNS Server You can enter up to three DNS servers Select the MAC address to be used for the connection Select Default MAC to use the router s MAC address Select MAC from PC to copy your PC s MAC address or select MAC Manual to manually enter a MAC address in the field provided WAN Access Type Host Name MTU Size Attain DNS Automaticall...

Страница 26: ...ry DNS server address provided by your ISP Enter the secondary DNS server address provided by your ISP SelecttheMACaddresstobeusedfortheconnection SelectDefaultMACtouse the router s MAC address Select MAC from PC to copy your PC s MAC address or select MAC Manual to manually enter a MAC address in the field provided Click ApplyChanges to save the current configuration or click Reset to discard WAN...

Страница 27: ...ou by your ISP Enter the idle time in minutes after which the router will disconnect due to inactivity To disable this feature select Continuous as the connection type below Enter the MaximumTransmission Unit size The default value is 1492 If your ISP or network administrator requires you to have a static IP address for your connection enter it here Select Continuous Connect on Demand or Manual as...

Страница 28: ...annel Usethedropdownmenutoselectthechannelbandwidth If you selected the 802 11n 802 11 b g or 802 11 b g n wireless modes the available options are 20 MHz and 20 40MHz For the others 20MHz is the only option Select the maximum transmission rate for the wireless network Select a wireless security encryption option You can also choose to not use one by selecting None but this is not recommended Enab...

Страница 29: ...he newer WPA or WPA2 protocols Select WEP from the drop down menu Select either Automatic or Shared Key as the authentication type Select the encryption strength from the drop down menu 64 bit A 64 bit key comprises a string of 10 hexadecimal characters or 5 ASCII characters 128 bit A 128 bit key comprises a string of 26 hexadecimal characters or 13 ASCII characters You can predetermine up to 4 WE...

Страница 30: ...s network It is recommended that you use this security method if it is supported by your wireless clients Select WPA PSK WPA2 PSK AES from the drop down menu Enter a pre shared key password to secure your wireless network Wireless clients will require this password in order to connect to your network It is recommended that you make a record of this password for future reference Click Apply to save...

Страница 31: ...reduction in setup and ease of use are quite beneficial while the highest wireless security setting of WPA2 is automatically used If you wish to use the Push Button Connection PBC method simply press the WPS button on the side of the router The power LED will begin to flash Within 120 seconds press the WPS button on the device that you wish to connect The power LED will turn solid green if the con...

Страница 32: ...e The preamble type defines the length of the CRC Cyclic Redundancy Check block for communication between the Router and roaming wireless adapters USet the transmit power of the antennas in pecentage Enable this feature to force the use of the 40 MHz band even in heavily congested areas Enabling this feature may reduce transmission speeds when there are a number of other wireless N devices operati...

Страница 33: ...connection method If this option is disabled clients can only use the PBC method to connect Check this box to lock the current configuration If this option is disabled wireless clients will not be able to automatically adjust the router s WPS settings when connecting Click this button to be taken to the Access Control setup tab where you can configure filters to control which wireless clients acce...

Страница 34: ...s mode only listed wireless devices will be allowed to connect to the wireless network Click the Apply button when you are done Enter the MAC Address of a device you wish to allow access for to the WLAN Click the Add button when you are done This will add the device s MAC Address to the table above Click the Delete button and the button in the Select field to delete the device Enable Wireless Acce...

Страница 35: ...rch for nearby wireless networks This will take about 30 seconds Repeater Enabled SSID of AP Wireless Repeater A list of wireless networks that have been found will then appear Select a network and click the Next button to move to the next step This page allows you to configure wireless repeater settings for the GO RT N300 GO RT N300 GO RT N300 ...

Страница 36: ...lowing settings below will appear Select the authentication type Select the encryption strength Select up to four WEP keys If you have selected any WPA option the following setting will appear Enter a pre shared key You can then set up wireless security for the network Enter the IP address Enter the subnet mask Click the Finish button to save the configuration Click the Apply button to save any ch...

Страница 37: ... for this rule Select the type of Internet service of which packets will be allowed into the network Web Allows web services from the specified IP address into the network You will also be required to enter a port number for the IP address range Ping Allows your network to receive ping requests from the specified IP address range The Current ACL Table will show a summary of current access control ...

Страница 38: ...on Enter a start match port Enter a end match port Select a protocol from the pulldown menu Enter a start relate port Enter an end relate port Select a protocol from the pulldown menu Select whether it will be outgoing or incoming Usual Application Name User defined Application Name Start Match Port End Match Port Trigger Protocol Start Relate Port End Relate Port Open Protocol Nat Type Click the ...

Страница 39: ...on will expose the chosen computer completely to the outside world Check the box to enable the DMZ function Enter the IP address of the machine that you wish to place in the DMZ If the machine receives an IP address from the DHCP server you should create a static DHCP reservation to ensure that the machine always receives the same address from the DHCP server Click Apply Changes to save the curren...

Страница 40: ... Blocking URL Blocking Capability Click the Apply Changes button to save any changes made Type a keyword or a URL site that you want to prevent network users from accessing Keyword Click the Add Keyword button to save any changes made The keyword will then be added to the URL Blocking Table below To delete a keyword select the keyword in the table and click the Delete Selected Keyword button GO RT...

Страница 41: ...allows you to host a server Web FTP Game Server using a domain name thatyouhavepurchased www whateveryournameis com withyourdynamicallyassignedIPaddress MostbroadbandInternet Service Providers assign dynamic changing IP addresses Using a DDNS service provider your friends can enter your domain name to connect to your server no matter what your IP address is Click the Add button to save any changes...

Страница 42: ... destination IP Enter the source port number if applicable This box will be greyed out for certain protocols Enter the minimum upload speed Total Bandwidth 0 Unlimited Auto Traffic Shaping Protocol Source IP Dest IP Source Port Up Floor Traffic Control This page allows you to configure traffic bandwidth and rules for network traffic QoS Rules Click the Add button once to view the QoS Rules setting...

Страница 43: ... download speed Enter the source netmask Enter the destination netmask Enter the destination port Enter the maximum upload speed Enter maximum download speed Click the Add button to save any changes made The QoS Rule will then be added to the QoS RulesTable To delete an existing QoS Rule select it in the QoS rules Table and click the Delete button ...

Страница 44: ...ck Enable to use the UPnP feature UPNP provides compatibility with networking equipment software and peripherals UPnP UPnP This page allows you to enable the Universal Plug and Play UPnP feature Click the Apply Changes button to save any changes made GO RT N300 ...

Страница 45: ...d with the GO RT N300 are invisible to the outside world If you wish you can make some of the LAN computers accessible from the Internet by enabling Virtual Server Depending on the requested service the GO RT N300 redirects the external service request to the appropriate server within the LAN network The GO RT N300 is also capable of port redirection meaning that incoming traffic to a particular p...

Страница 46: ...r the WAN port number Enter the LAN Open port number Enter the IP address of the computer on your local network that you want to allow the incoming service to Usual Service Name User defined Service Name Protocol WAN Port LAN Open Port LAN IP Address Click the Apply Changes button to save any changes made The virtual server will then be added to the Current Virtual Server Forwarding Table below To...

Страница 47: ...This page allows you to reboot your system with the current setting or reset it to the factory default setting Reboot Maintenance Click the Reboot button to reboot the system To reset the system to the factory default setting click the Reset button GO RT N300 ...

Страница 48: ... the computer Please check the D Link support site for firmware updates at http support dlink com You can download firmware upgrades to your hard drive from the D Link support site After you have downloaded the new firmware click Browse to locate the firmware update on your hard drive Choose File Click the Upload button to upload a file to the router after you have selected it or click theReset bu...

Страница 49: ...ation file onto your computer s hard drive or load a saved file from your hard drive Click the Save button to download the current configuration settings as a file onto your hard drive To load a previously saved settings file click the Choose File button to locate the file on your hard drive then click the Upload button GO RT N300 ...

Страница 50: ...a user account to the router s Web server You can also delete or modify existing accounts Click the Add button to save any changes made The user account will also be added to the User Account Table below To modify an existing user account click the Select tab next to the user account in the table edit the user settings you wish to change and then click the Modify button To delete an existing accou...

Страница 51: ...rnet based time server Select Enable to enable the NTP server Enter the name of the NTP server Enter the name of the second NTP server Enter the time period that you want the NTP server to synchronize time with the devices on the network The default value is one hour Select the time zone you are in from the pulldown menu This shows the current GMT Greenwich MeanTime time System Time Daylight Savin...

Страница 52: ...router Displays the wireless MAC address and your wireless settings such as SSID and Channel Displays the MAC address and the public IP settings for the router System Device Info This page displays the current status and basic settings of the router Status LAN Configuration WLAN Configuration WAN Configuration Click the Refresh button to view the most current information ...

Страница 53: ...ed clients This table displays all active wireless clients Active Wired Client Table Active Wireless Client Table This page displays lists of all wired and wireless clients The IP address and MAC address of each client is displayed in the tables Click the Save Settings button to save any changes made GO RT N300 ...

Страница 54: ...uration Statistics This page displays the statistics for packets that have been transmitted and received on the network on the router s WAN and LAN ports and wireless bands Click the Refresh button to refresh the router s traffic statistics GO RT N300 ...

Страница 55: ...User Manual Section 3 Configuration Help This section provides an explanation of each configuration or setting for the GO RT N300 Click on the links to be taken to the help text for that particular section of router s setup ...

Страница 56: ...2 11i and uses Advanced Encryption Standard AES instead of TKIP User authentication which is generally missing in WEP through the extensible authentication protocol EAP WEP regulates access to a wireless network based on a computer s hardware specific MAC address which is relatively simple to be sniffed out and stolen EAP is built on a more secure public key encryption system to ensure that only a...

Страница 57: ...ing an existing network you will need to know the security key Wi Fi password being used To join an existing network locate the wireless network icon in the taskbar next to the time display Wireless Icon Clicking on this icon will display a list of wireless networks which are within connecting proximity of your computer Select the desired network by clicking on the network name Connect to a Wirele...

Страница 58: ...work Enter the password into the box and click Next If you wish to useWi Fi Protected Setup WPS to connect to the router you can also press the WPS button on your router at this point to enable the WPS function When you have established a successful connection to a wireless network the word Connected will appear next to the name of the network to which you are connected ...

Страница 59: ... WPA2 on your wireless router or access point before configuring your wireless adapter If you are joining an existing network you will need to know the security key or passphrase being used 1 Click on the wireless icon in your system tray lower right corner 2 The utility will display any available wireless networks in your area Wireless Icon ...

Страница 60: ...would like to connect to and click the Connect button If you get a good signal but cannot access the Internet check your TCP IP settings for your wireless adapter Refer to the Networking Basics section in this manual for more information 4 The following window appears while your computer tries to connect to the router ...

Страница 61: ...rase that is on your router and click Connect You can also connect by pushing the WPS button on the router It may take 20 30 seconds to connect to the wireless network If the connection fails please verify that the security settings are correct The key or passphrase must be exactly the same as on the wireless router ...

Страница 62: ...ss Network Configure WPS TheWPS feature of the router can be configured usingWindows 7 Carry out the following steps to useWindows 7 to configure the WPS feature of the router 1 Click the Start button and select Computer from the Start menu 2 Click the Network option ...

Страница 63: ... RT N300 User Manual Section 5 Connecting to a Wireless Network 3 Double click the GO RT N300 4 Input the WPS PIN number on the Router label or in the Setup Wireless Setup menu in the Router s Web UI and click Next ...

Страница 64: ...60 D Link GO RT N300 User Manual Section 5 Connecting to a Wireless Network 5 Type a name to identify the network 6 To configure advanced settings click the icon Click Next to continue ...

Страница 65: ...is being configured Wait for the configuration to complete 8 The following window informs you that WPS on the GO RT N300 has been setup successfully Make a note of the security key as you may need to provide this security key if adding an older wireless device to the network in the future 9 Click Close to complete WPS setup ...

Страница 66: ...sta utility as seen below Right click on the wireless computer icon in your system tray lower right corner next to the time Select Connect to a network If you receive the Wireless Networks Detected bubble click on the center of the bubble to access the utility or The utility will display any available wireless networks in your area Click on a network displayed using the SSID and click the Connect ...

Страница 67: ...int before configuring your wireless adapter If you are joining an existing network you will need to know the security key or passphrase being used 2 Highlight the wireless network SSID you would like to connect to and click Connect 1 Open theWindowsVista Wireless Utility by right clicking on the wireless computer icon in your system tray lower right corner of screen Select Connect to a network ...

Страница 68: ...he same security key or passphrase that is on your router and click Connect It may take 20 30 seconds to connect to the wireless network If the connection fails please verify that the security settings are correct The key or passphrase must be exactly the same as on the wireless router ...

Страница 69: ...site survey option similar to the Windows XP utility as seen below Right click on the wireless computer icon in your system tray lower rightcornernexttothetime SelectViewAvailableWirelessNetworks If you receive the Wireless Networks Detected bubble click on the center of the bubble to access the utility or Theutilitywilldisplayanyavailablewirelessnetworksinyourarea Click on a network displayed usi...

Страница 70: ...onfiguring your wireless adapter If you are joining an existing network you will need to know the WPA key being used 2 Highlight the wireless network SSID you would like to connect to and click Connect 1 Open the Windows XP Wireless Utility by right clicking on the wireless computer icon in your system tray lower right corner of screen Select View AvailableWireless Networks ...

Страница 71: ... Network Connection box will appear Enter theWPA PSK passphrase and click Connect It may take 20 30 seconds to connect to the wireless network If the connection fails please verify that the WPA PSK settings are correct The WPA PSK passphrase must be exactly the same as on the wireless router ...

Страница 72: ...he device itself Your computer must be on the same IP subnet to connect to the web based utility Make sure you have an updated Java enabled web browser We recommend the following Microsoft Internet Explorer 6 0 and higher Mozilla Firefox 3 0 and higher Google Chrome 2 0 and higher Apple Safari 3 0 and higher Verify physical connectivity by checking for solid link lights on the device If you do not...

Страница 73: ...r This should open the login page for your web management If you still cannot access the configuration unplug the power to the router for 10 seconds and plug back in Wait about 30 seconds and try accessing the configuration If you have multiple computers try connecting using a different computer 2 What can I do if I forgot my password If you forgot your password you must reset your router Unfortun...

Страница 74: ...n increments of ten Ex 1492 1482 1472 etc Note AOL DSL users must use MTU of 1400 To find the proper MTU Size you ll have to do a special ping of the destination you re trying to go to A destination could be another computer or a URL Click on Start and then click Run Windows 95 98 and Me users type in command Windows NT 2000 and XP users type in cmd and press Enter or click OK Once the window open...

Страница 75: ...th 1452 28 1480 Once you find your MTU you can now configure your router with the proper MTU size To change the MTU rate on your router follow the steps below Open your browser enter the IP address of your router 192 168 0 1 and click OK Enter your username admin and password blank by default Click OK to enter the web configuration page for the device Click on Setup and then click Manual Configure...

Страница 76: ...relessLANsareusedincreasinglyinbothhomeandofficeenvironments andpublicareassuchasairports coffeeshops and universities Innovative ways to utilize WLAN technology are helping people to work and communicate more efficiently Increased mobility and the absence of cabling and other fixed infrastructure have proven to be beneficial for many users Wireless users can use the same applications they use on ...

Страница 77: ... as to how you can access the network You must be within the wireless network range area to be able to connect your computer There are two different types of wireless networks Wireless Local Area Network WLAN and Wireless Personal Area Network WPAN Wireless Local Area Network WLAN In a wireless local area network a device called an Access Point AP connects computers to the network The access point...

Страница 78: ...s Wireless technology has become so popular in recent years that almost everyone is using it whether it s for home office business D Link has a wireless solution for it Home Gives everyone at home broadband access Surf the web check email instant message etc Gets rid of the cables around the house Simple and easy to use Small Office and Home Office Stay on top of everything at home as you would at...

Страница 79: ...s of setting up a wireless network Tips Here are a few things to keep in mind when you install a wireless network Centralize your router or Access Point Make sure you place the router access point in a centralized location within your network for the best performance Try to place the router access point as high as possible in the room so the signal gets dispersed throughout your home If you have a...

Страница 80: ...o peer communication using wireless network adapters on each computer such as two or more GO RT N300 wireless network Cardbus adapters An Infrastructure network contains an Access Point or wireless router All the wireless devices or clients will connect to the wireless router or access point An Ad Hoc network contains only clients such as laptops with wireless cardbus adapters All the adapters mus...

Страница 81: ...fy your IP address please follow the steps below Click on Start Run In the run box type cmd and click OK Windows 7 Vista users type cmd in the Start Search box At the prompt type ipconfig and press Enter This will display the IP address subnet mask and the default gateway of your adapter Iftheaddressis0 0 0 0 checkyouradapterinstallation security settings and the settings on your router Some firew...

Страница 82: ...tep 2 Right click on the Local Area Connection which represents your network adapter and select Properties Step 3 Highlight Internet Protocol TCP IP and click Properties Step 4 Click Use the following IP address and enter an IP address that is on the same subnet as your network or the LAN IP address on your router Example If the router s LAN IP address is 192 168 0 1 make your IP address 192 168 0...

Страница 83: ...ature 0 C to 40 C 32 F to 104 F Storage Temperature 20 C to 65 C 4 F to 149 F Humidity 10 minimum non condensing 95 maximum non condensing Safety Emissions CE Wi Fi Certified Dimensions L 160 mm 6 3 inches W 120 mm 4 72 inches H 59 mm 2 32 inches 1 Maximum wireless signal rate derived from IEEE Standard 802 11b 802 11g and 802 11n specifications Actual data throughput will vary Network conditions ...

Отзывы: