background image

71

Subject to the terms and conditions set forth herein, D-Link Systems, Inc. (“D-Link”) provides this Limited

warranty for its product only to the person or entity that originally purchased the product from:

D-Link or its authorized reseller or distributor and
Products purchased and delivered within the fifty states of the United States, the District of

Columbia, U.S. Possessions or Protectorates, U.S. Military Installations, addresses with an

APO or FPO.

Limited Warranty:


D-Link warrants that the hardware portion of the D-Link products described

below will be free from material defects in workmanship and materials from the date of original retail

purchase of the product, for the period set forth below applicable to the product type (“Warranty

Period”), except as otherwise stated herein.
1-Year Limited Warranty for the Product(s) is defined as follows:

Hardware (excluding power supplies and fans) One (1) Year
Power Supplies and Fans One (1) Year
Spare parts and spare kits Ninety (90) days

D-Link’s sole obligation shall be to repair or replace the defective Hardware during the Warranty Period

at no charge to the original owner or to refund at D-Link’s sole discretion.  Such repair or replacement will

be rendered by D-Link at an Authorized D-Link Service Office.  The replacement Hardware need not be

new or have an identical make, model or part.  D-Link may in its sole discretion replace the defective

Hardware (or any part thereof) with any reconditioned product that D-Link reasonably determines is

substantially equivalent (or superior) in all material respects to the defective Hardware.  Repaired or

replacement Hardware will be warranted for the remainder of the original Warranty Period from the date

of original retail purchase.  If a material defect is incapable of correction, or if D-Link determines in its sole

discretion that it is not practical to repair or replace the defective Hardware, the price paid by the original

purchaser for the defective Hardware will be refunded by D-Link upon return to D-Link of the defective

Hardware.  All Hardware (or part thereof) that is replaced by D-Link, or for which the purchase price is

refunded, shall become the property of D-Link upon replacement or refund.

Limited Software Warranty:  

D-Link warrants that the software portion of the product (“Software”)

will substantially conform to D-Link’s then current functional specifications for the Software, as set forth

in the applicable documentation, from the date of original retail purchase of the Software for a period of

ninety (90) days (“Warranty Period”), provided that the Software is properly installed on approved

hardware and operated as contemplated in its documentation. D-Link further warrants that, during the

Warranty Period, the magnetic media on which D-Link delivers the Software will be free of physical

defects.  D-Link’s sole obligation shall be to replace the non-conforming Software (or defective media)

with software that substantially conforms to D-Link’s functional specifications for the Software or to

refund at D-Link’s sole discretion.  Except as otherwise agreed by D-Link in writing, the replacement

Software is provided only to the original licensee, and is subject to the terms and conditions of the

license granted by D-Link for the Software.  Software will be warranted for the remainder of the original

Warranty Period from the date or original retail purchase.  If a material non-conformance is incapable of

correction, or if D-Link determines in its sole discretion that it is not practical to replace the non-

conforming Software, the price paid by the original licensee for the non-conforming Software will be

refunded by D-Link; provided that the non-conforming Software (and all copies thereof) is first returned

to D-Link.  The license granted respecting any Software for which a refund is given automatically

terminates.

Non-Applicability of Warranty:  

The Limited Warranty provided hereunder for hardware and software

of D-Link’s products will not be applied to and does not cover any refurbished product and any product

purchased through the inventory clearance or liquidation sale or other sales in which D-Link, the sellers,

or the liquidators expressly disclaim their warranty obligation pertaining to the product and in that case,

the product is being sold “As-Is” without any warranty whatsoever including, without limitation, the

Limited Warranty as described herein, notwithstanding anything stated herein to the contrary.

Submitting A Claim

:  The customer shall return the product to the original purchase point based on its

return policy.  In case the return policy period has expired and the product is within warranty, the

customer shall submit a claim to D-Link as outlined below:

The customer must submit with the product as part of the claim a written description of the

Hardware defect or Software nonconformance in sufficient detail to allow D-Link to confirm

the same.

Warranty and Registration

Содержание Express Ethernetwork DI-704P

Страница 1: ...Express Ethernetwork Manual Building Networks for People Broadband Router DI 704P D Link TM...

Страница 2: ...n 4 Getting Started 10 Using the Configuration Menu 11 Networking Basics 40 Reset to Factory Default Settings 68 Technical Specifications 69 Contacting Technical Support 70 Warranty and Registration 7...

Страница 3: ...sh or Linux based operating system with an installed Ethernet adapter Internet Explorer version 6x or Netscape Navigator version 6x and above with JavaScript enabled Ethernet Based Cable or DSL Modem...

Страница 4: ...he reach and number of computers connected to your network After completing the steps outlined in the Quick Installation Guide included in your package you will have the ability to share information a...

Страница 5: ...the Cable or DSL modem Broadband modem and IP sharing Connects multiple computers to a broadband cable or DSL modem to surf the Internet Auto sensing Ethernet Switch Equipped with a 4 port auto sensi...

Страница 6: ...outer is a device that forwards data packets from a source to a destination Routers forward data packets using IP addresses and not a MAC address A router will forward data from the Internet to a part...

Страница 7: ...ea Networking LAN is the term used when connecting several computers together over a small area such as a building or group of buildings LAN s can be connected over large areas A collection of LAN s c...

Страница 8: ...tary means of connecting two private networks over the Internet PPTP is a way of securing the information that is communicated between networks PPTP secures information by encrypting the data inside o...

Страница 9: ...M1 LED M2 LED Lights up when the device is busy WAN A solid light indicates connection on the WAN port This LED blinks during data transmission LAN This LED blinks during data transmission Flashes on...

Страница 10: ...ion line into your home or office Consult with your Cable or DSL provider for proper installation of the modem Connect the Cable or DSL modem to the DI 704P wireless broadband router see the Quick Ins...

Страница 11: ...g the Setup Wizard http 192 168 0 1 Note if you have changed the default IP Address assigned to the DI 704P make sure to enter the correct IP Address The factory default User name is admin and the def...

Страница 12: ...SP which of the following represents your connection mode to the Internet Static IP Address Your ISP assigns you a Static IP Address Dynamic IP Address Obtain an IP address from your ISP automatically...

Страница 13: ...the Router MAC Address The default MAC Address is set to the WAN s physical inter face MAC address on the Router Clone MAC Address This feature will copy the MAC address of the Ethernet card and repla...

Страница 14: ...P has provided to you Secondary DNS Optional Input the Secondary DNS address provided by your ISP Primary DNS Input the primary DNS address provided by your ISP WAN Gateway Input the Gateway address p...

Страница 15: ...oE Service Name Optional Check with your ISP for more information if they require the use of service name Maximum Idle Time Enter a maximum idle time during which Internet connection is maintained dur...

Страница 16: ...n ID Optional Enter the connection ID if required by your ISP Maximum Idle Time Enter a maximum idle time during which Internet connection is maintained during inactivity To disable this feature enabl...

Страница 17: ...d Enter the password for the BigPond account Login Server Optional enter the Login Server name if required Renew IP forever If enabled the device will automatically connect to your ISP after your unit...

Страница 18: ...cally load the proper TCP IP settings provided by the DI 704P The DHCP Server will automatically allocate an unused IP address from the IP address pool to the requesting computer You must specify the...

Страница 19: ...ssible from the Internet by enabling Virtual Server Depending on the requested service the DI 704P redirects the external service request to the appropriate server within the LAN network Service Ports...

Страница 20: ...creen there are already defined special applications To use them select one from the drop down list and select an ID number you want to use Then click the Copy to button and the router will fill in th...

Страница 21: ...Disabled MAC Filter Select this option if you do not want to use MAC filters Only allow computers with MAC address listed below to access the network Select this option to only allow computers that a...

Страница 22: ...c cess to the Internet based on their IP ad dress Deny all computers access to the Internet except those listed below Select this option to deny all computers access to the Internet except those that...

Страница 23: ...access the following domains and block all other domains Select this option to allow users to access the specified Internet domains listed below Users will be denied access to all other Internet doma...

Страница 24: ...Enter the password private in this field to gain Read and Write access to the network using SNMP software The ad ministrator can configure the network with this setting Local Remote SNMP Simple Networ...

Страница 25: ...a domain name Users who have a Dynamic DNS account may use this feature on the DI 704P DDNS When an IP address is automatically assigned by a DHCP server DDNS automatically updates the DNS server Sele...

Страница 26: ...behind the DI 704P then you can allow that computer to have unrestricted Internet access Enter the IP address of that computer as a DMZ Demilitarized Zone host with unrestricted Internet access Addin...

Страница 27: ...ows the device to be configured through the WAN Wide Area Network port from the Internet using a web browser A username and password is still required to access the browser based management inter face...

Страница 28: ...rnet that sychronizes the time settings accurately for all the computers on your network Click Sync to activate the synchronization with the NTP server that you input in the default NTP server field D...

Страница 29: ...ings can be saved as a file onto the local hard drive The saved file or any other saved setting file created by the DI 704P can be uploaded into the unit To reload a system settings file click on Brow...

Страница 30: ...d automatically You can upgrade the firmware by using this tool First check the D Link support site for firmware updates at http support dlink com Make sure that the firmware you want to use is saved...

Страница 31: ...rnet will not get a reply back from the DI 704P when it is being ping ed This may help to increase security Restart Device Click reboot to restart the unit Non standard FTP port If an FTP server you w...

Страница 32: ...32 Using the Configuration Menu Status Device Info This screen displays information about the DI 704P Refresh Click Refresh to update the current information...

Страница 33: ...ation Menu Status Log This screen displays activities occurring on the DI 704P Log Settings Click for advanced features see next page Back Click Back to return to the top of the log Refresh Click Refr...

Страница 34: ...s of a syslog server within the network Click Enable to activate the policy The DI 704P will send all of it s logs to the specified syslog server IP Address of the Syslog Server E Mail Alert The DI 70...

Страница 35: ...35 Using the Configuration Menu Help This screen displays the complete Help menu For help at anytime click the Help tab in the Configuration menu...

Страница 36: ...llation CD ROM into the CD ROM drive The following window will be shown automatically If it is not please run install exe on the CD ROM Installing the Print Server Software Click Install Print Server...

Страница 37: ...ext After rebooting your computer the software installation procedure is finished Installing the Print Server Software continued Click OK Click Finish Click Browse to select a destination folder Selec...

Страница 38: ...s window in the My Computer menu Now you can configure the print server of the DI 704P Find out the corresponding icon of your print server for example the HP LaserJet 6L Right click on that icon and...

Страница 39: ...e for a Windows 2000 XP platform is similar to that of Windows 95 98 except the screen of printer Properties Note Screen shots are taken in Windows 2000 similar screens will appear in Windows XP Click...

Страница 40: ...soft Windows XP Note Please refer to websites such as http www homenethelp com and http www microsoft com windows2000 for information about networking computers using Windows 2000 ME or 98 Go to Start...

Страница 41: ...ctions in this window Networking Basics Click Next In the following window select the best description of your computer If your computer connects to the internet through a gateway router select the se...

Страница 42: ...42 Enter a Computer description and a Computer name optional Networking Basics Click Next Enter a Workgroup name All computers on your network should have the same Workgroup name Click Next...

Страница 43: ...wait while the Network Setup Wizard applies the changes Networking Basics When the changes are complete click Next Please wait while the Network Setup Wizard configures the computer This may take a fe...

Страница 44: ...w select the option that fits your needs In this example Create a Network Setup Disk has been selected You will run this disk on each of the computers on your network Click Next Insert a disk into the...

Страница 45: ...the information under Here s how in the screen below After you complete the Network Setup Wizard you will use the Network Setup Disk to run the Network Setup Wizard once on each of the computers on yo...

Страница 46: ...ings will take effect when you restart the computer Click Yes to restart the computer You have completed configuring this computer Next you will need to run the Network Setup Disk on all the other com...

Страница 47: ...dows XP Click Start in the lower left corner of the screen Right click on My Computer Select Properties and click Select the Computer Name Tab in the System Properties window You may enter a Com puter...

Страница 48: ...same Workgroup name Click OK Checking the IP Address in Windows XP The wireless adapter equipped computers in your network must be in the same IP Ad dress range see Getting Started in this manual for...

Страница 49: ...Routers will automatically assign IP Ad dresses to the computers on the network using DHCP Dynamic Host Configura tion Protocol technology If you are using a DHCP capable Gateway Router you will not n...

Страница 50: ...50 Networking Basics Assigning a Static IP Address in Windows XP 2000 Double click on Network Connections Double click on Properties Right click on Local Area Connections...

Страница 51: ...68 0 4 The subnet mask must be the same for all the computers on the network Select Use the following DNS server addresses The DNS server information will be supplied by your ISP Internet Service Prov...

Страница 52: ...he Apple Menu and se lect System Preferences cClick on Network Select Built in Ethernet in the Show pull down menu Select Manually in the Con figure pull down menu Input the Static IP Address the Subn...

Страница 53: ...Go to the Apple Menu and select System Preferences Click on Network Select Built in Ethernet in the Show pull down menu Select Using DHCP in the Configure pull down menu Click Apply Now The IP Addres...

Страница 54: ...r share a network printer a printer connected to your network through a Gateway Router use the Add Printer Wizard Please follow the directions below First make sure that you have run the Network Setup...

Страница 55: ...ter A printer that is not shared on the network and is connected directly to one computer is called a local printer If you do not need to share your printer on a network follow these directions to add...

Страница 56: ...this computer Deselect Automati cally detect and install my Plug and Play printer if it has been selected Click Next Select Use the follow ing port From the pull down menu select the correct port for...

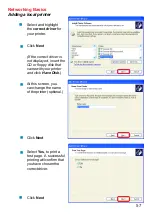
Страница 57: ...t If the correct driver is not displayed insert the CD or floppy disk that came with your printer and click Have Disk At this screen you can change the name of the printer optional Click Next Select Y...

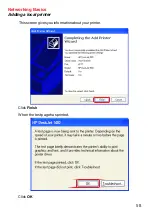
Страница 58: ...58 Networking Basics Adding a local printer This screen gives you information about your printer Click Finish When the test page has printed Click OK...

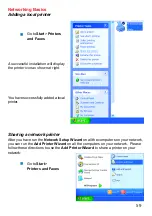
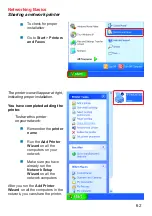
Страница 59: ...You have successfully added a local printer Sharing a network printer After you have run the Network Setup Wizard on all the computers on your network you can run the Add Printer Wizard on all the com...

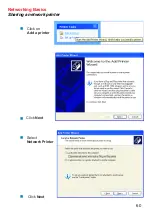
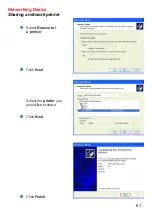
Страница 60: ...60 Networking Basics Sharing a network printer Click on Add a printer Click Next Select Network Printer Click Next...

Страница 61: ...61 Networking Basics Sharing a network printer Select Browse for a printer Click Next Select the printer you would like to share Click Next Click Finish...

Страница 62: ...r installation You have completed adding the printer To share this printer on your network Remember the printer name Run the Add Printer Wizard on all the computers on your network Make sure you have...

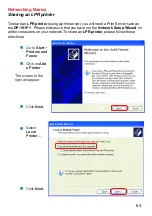
Страница 63: ...Server such as the DP 101P Please make sure that you have run the Network Setup Wizard on all the computers on your network To share an LPR printer please follow these directions Go to Start Printers...

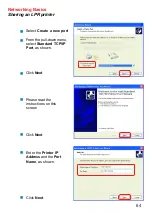
Страница 64: ...LPR printer Select Create a new port From the pull down menu select Standard TCP IP Port as shown Click Next Please read the instructions on this screen Click Next Enter the Printer IP Address and th...

Страница 65: ...n LPR printer In this screen select Custom Click Settings Enter the Port Name and the Printer Name or IP Address Select LPR Enter a Queue Name if your Print Server Gateway has more than one port you w...

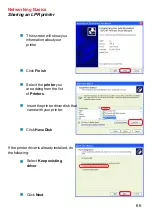
Страница 66: ...g driver If the printer driver is already installed do the following Click Have Disk Insert the printer driver disk that came with your printer Select the printer you are adding from the list of Print...

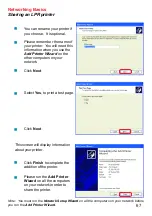
Страница 67: ...s on your network in order to share the printer Click Finish to complete the addition of the printer This screen will display information about your printer Click Next Select Yes to print a test page...

Страница 68: ...do the following Resetting the DI 704P to the Factory Default Settings Use a paper clip to press the Reset button and power on Locate the Reset button on the back of the DI 704P Turn off the DI 704P...

Страница 69: ...NWay auto negotiation Web Based Internet Explorer 6x or later Netscape Navigator 6x or later or other Java enabled browsers LEDs WAN LAN M1 M2 Operating Temperature 41 F to 131 F 5 C to 55 C Humidity...

Страница 70: ...t D Link technical support through our web site or by phone D Link Technical Support over the Telephone 877 453 5465 24 hours a day seven days a week D Link Technical Support over the Internet http su...

Страница 71: ...specifications for the Software as set forth in the applicable documentation from the date of original retail purchase of the Software for a period of ninety 90 days Warranty Period provided that the...

Страница 72: ...and removal of the product for repair and shipping costs Operational adjustments covered in the operating manual for the product and normal maintenance Damage that occurs in shipment due to act of Go...

Страница 73: ...ass B product In a domestic environment this product may cause radio interference in which case the user may be required to take adequate measures FCC Statement This equipment has been tested and foun...

Отзывы:

Похожие инструкции для Express Ethernetwork DI-704P