background image

12

D-Link DSL-500B User Manual

Installation

Installation

This section will walk you through the installation process. Placement of the ADSL Router is very important. Do not 

place the Router in an enclosed area such as a closet, cabinet, or in the attic or garage. Place the ADSL Router in a 

location where it can be easily connected to Ethernet devices, the telephone line as well as to a power source.

Overview

Please read and make sure you understand all the prerequisites for proper installation of your new Router. 

Have all the necessary information and equipment on hand before beginning the installation.

In order to establish a connection to the Internet it will be necessary to provide information to the Router that will 

be stored in its memory. For some users, only their account information (Username and Password) is required. For 

others, various parameters that control and define the Internet connection will be required. You can print out the 

two pages below and use the tables to list this information. This way you have a hard copy of all the information 

needed to setup the Router. If it is necessary to reconfigure the device, all the necessary information can be easily 

accessed. Be sure to keep this information safe and private.

Low Pass Filters

Since ADSL and telephone services share the same copper wiring to carry their respective signals, a filtering 

mechanism may be necessary to avoid mutual interference. A low pass filter device can be installed for each 

telephone that shares the line with the ADSL line. These filters are easy to install passive devices that connect to 

the ADSL device and/or telephone using standard telephone cable. Ask your service provider for more information 

about the use of low pass filters with your installation. 

Operating Systems

The DSL-500B uses an HTML-based web interface for setup and management. The web configuration manager 

may be accessed using any operating system capable of running web browser software, including Windows 98 SE, 

Windows ME, Windows 2000, Windows XP, and Windows Vista.

Installation Notes

Содержание DSL-500B

Страница 1: ......

Страница 2: ...Link Corporation or its subsidiaries in the United States or other countries All other company or product names mentioned herein are trademarks or registered trademarks of their respective companies Copyright 2009 by D Link Systems Inc All rights reserved This publication may not be reproduced in whole or in part without prior expressed written permission from D Link Systems Inc Revision Date Desc...

Страница 3: ... Connect the equipment into an outlet on a circuit different from that to which the receiver is connected Consult the dealer or an experienced radio TV technician for help This device complies with Part 15 of the FCC Rules Operation is subject to the following two conditions 1 This device may not cause harmful interference and 2 this device must accept any interference received including interfere...

Страница 4: ...ower on 18 Factory Reset 19 Network Connections 20 Web Configuration 21 Introduction to Web Configuration 21 Quick Setup 22 DSL Router Device Information 39 Summary of Device Information 39 WAN Interface Information 40 Statistics LAN 40 Statistics WAN 40 Statistics ATM 40 Statistics ADSL 41 Route Table Information 42 ARP Table Information 42 Advanced Setup 43 WAN Configuration 43 LAN Configuration...

Страница 5: ...User Manual Appendix A Troubleshooting 79 Troubleshooting 79 Appendix B Networking Basics 82 Check Your IP Address 82 Statically Assign An IP Address 83 Appendix C Technical Specifications 84 Technical Specifications 84 ...

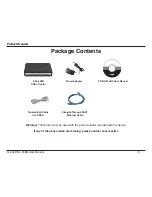
Страница 6: ... Router must be used with the power adapter included with the device If any of the above items are missing please contact your reseller Twisted Pair Cable for ADSL DSL 500B ADSL Router Power Adapter Straight Through CAT5 Ethernet Cable CD ROM with User Manual Package Contents ...

Страница 7: ... Requirements ADSL Internet Service Computer With 200MHz Processor 64MB Memory CD ROM Drive Ethernet Adapter with TCP IP Protocol installed Internet Explorer v6 or later FireFox v1 5 Windows 2000 Windows XP or Windows Vista D LINK Click n Connect Utility ...

Страница 8: ...rity in effect by hiding the private network behind one global and visible IP address NAT address mapping can also be used to link two IP domains via a LAN to LAN connection TCP IP Transfer Control Protocol Internet Protocol The DSL 500B supports TCP IP protocol the standard language used for Internet access It is compatible with access servers manufactured by major vendors RIP 1 RIP 2 Routing Inf...

Страница 9: ... to establish the Quality of Service for ATM data transfer G hs Auto handshake This allows the Router to automatically choose either the G lite or G dmt ADSL connection standards High Performance The Router provides up to 8 Mbps downstream bit rate using the G dmt standard Full Network Management The DSL 500B incorporates SNMP Simple Network Management Protocol support for web based management and...

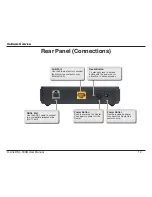
Страница 10: ...ne line RJ 11 port Power Button Push to power on the Router Push again to power off the Router Reset Button To manually reset depress button with the power on for about five to seven seconds LAN Port Use the Ethernet ports to connect the Router to a computer or an Ethernet LAN Power Outlet Use the included adapter to connect the Router to a power source ...

Страница 11: ...ng transmitted through the LAN interface On LAN link is established and active DSL Green Off DSL line is disconnected Blink DSL line is initializing On DSL line is connected Internet Green Off The device is running under Bridge mode a DSL connection is not present or the power is off Blink DSL traffic is flowing On The device is connected and has an IP Red On The device attempted to connect but fa...

Страница 12: ...ou can print out the two pages below and use the tables to list this information This way you have a hard copy of all the information needed to setup the Router If it is necessary to reconfigure the device all the necessary information can be easily accessed Be sure to keep this information safe and private Low Pass Filters Since ADSL and telephone services share the same copper wiring to carry th...

Страница 13: ...he Router If you must install an adapter follow the installation instructions that come with the Ethernet NIC adapter Additional Software It may be necessary to install software on your computer that enables the computer to access the Internet Additional software must be installed if you are using the device as a simple bridge For a bridged connection the information needed to make and maintain th...

Страница 14: ...ttings listed in parenthesis PPPoE PPoA PPPoE LLC PPPoA LLC or PPPoA VC Mux Dynamic IP Address 1483 Bridged IP LLC 1483 Bridged IP VC Mux Static IP Address 1483 Bridged IP LLC 1483 Bridged IP VC Mux 1483 Routed IP LLC IPoA or 1483 Routed IP VC Mux Bridge Mode 1483 Bridged IP LLC or 1483 Bridged IP VC Mux Modulation Type ADSL uses various standardized modulation techniques to transmit data over the...

Страница 15: ...L service provider for the additional connections This setting can be changed in the WAN Settings window of the web management interface VCI Most users will not be required to change this setting The Virtual Channel Identifier VCI used in conjunction with the VPI to identify the data path between your ADSL service provider s network and your computer If you are setting up the Router for multiple v...

Страница 16: ...es ensure to change this password LAN IP Addresses for the DSL 500B This is the IP address you will enter into the Address field of your web browser to access the Router s configu ration graphical user interface GUI using a web browser The default IP address is 192 168 254 254 This may be changed to suit any IP address scheme the user desires This address will be the base IP address used for DHCP ...

Страница 17: ...ss subnet mask and a default gateway address to computers on your LAN The default range of IP addresses the DSL 500B will assign are from 192 168 254 1 to 192 168 254 253 Your computer or computers needs to be configured to obtain an IP address automatically that is they must be configured as DHCP clients It is recommended that you collect and record this information here or in some other secure p...

Страница 18: ...eptacle 12V DC 1A on the rear panel of the Router and plug the other end of the power adapter to a wall outlet or power strip Push the 2 On Off button on the rear panel of the Router to turn the power on The 3 Power LED on the front panel will turn bright green to indicate the device is powered on If the Ethernet port is connected to a working device check the 4 LAN LED indicator to make sure the ...

Страница 19: ... the 2 Power LED to verify Wait for 5 8 seconds and then release the reset button 3 The device settings will be restored to the factory default IP address 4 192 168 254 254 and the subnet mask is 255 255 255 0 The default username and password is admin and admin Note A factory reset will erase the current configuration settings and reset them to the default settings After restarting your DSL 500B ...

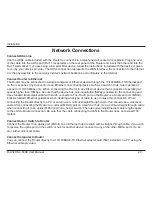
Страница 20: ... that the device has auto negotiation NWay enabled for the connecting port Use standard twisted pair cable with RJ 45 connectors The RJ 45 port on the Router is a crossover port MDI X Follow standard Ethernet guidelines when deciding what type of cable to use to make this connection When connecting the Router directly to a PC or server use a normal straight through cable You should use a crossover...

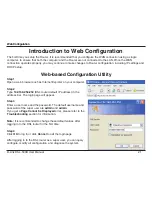
Страница 21: ...xplorer on your computer Step 2 Type 192 168 254 254 DSL router default IP address in the address bar The login page will appear Step 3 Enter a user name and the password The default username and password of the super user are admin and admin If you get a Page Cannot be Displayed error please refer to the Troubleshooting section for information Note It is recommended to change these default values...

Страница 22: ...re connected to the Internet Your physical WAN device can be Ethernet DSL or both For example your ISP should inform you whether you are connected to the Internet by using a static or dynamic IP address or the protocols such as PPPOA or PPPoE which you use to communicate over the Internet Quick Setup enables fast and accurate configuration of your Internet connection and other important parameters...

Страница 23: ... two points in an ATM network The valid value range is from 0 to 255 VCI Virtual Channel Identifier Virtual channel between two points in an ATM network The valid value range is from 32 to 65535 1 to 31 are reserved for known protocols Enable Quality of Service Enabling QoS for a PVC improves performance for selected classes of applications However since QoS also consumes system resources the numb...

Страница 24: ...on Mode VC MUX LLC ENCAPSULATION PPP over Ethernet PPPoE PPPoE Encapsulation Mode LLC SNAP BRIDGING VC MUX MAC Encapsulation Routing MER MER Encapsulation Mode LLC SNAP BRIDGING VC MUX IP over ATM IPoA IPoA Encapsulation Mode LLC SNAP ROUTING VC MUX Bridging Bridging Encapsulation Mode LLC SNAP BRIDGING VC MUX For example change the connection type of PVC 0 35 to Bridging Select Bridging and set E...

Страница 25: ...Encapsulation Mode from the drop down box and click Next to continue Step 3 The PPP Username and Password page will appear Update the following fields and click Next to continue Your ISP should provide you with the following information PPP Username PPP Password Authentication Method You can also select another service function as follows Dial on demand with idle timeout timer PPP IP extension Use...

Страница 26: ...e default MTU value setting unless your ISP advises you to change it Click Next to continue Step 5 Enter the IP Address and Subnet Mask for the LAN interface In addition you can either enable or disable the DHCP server To enable the DHCP server enter a start and end IP address and the Subnet Mask of the Router You may also choose to change the default value of the lease time Click Next to continue...

Страница 27: ...7 D Link DSL 500B User Manual Web Configuration PPPoA Summary This summary window allows you to confirm your PPPoA settings Click Save Reboot to save your new PPP over ATM settings and restart the Router ...

Страница 28: ... the drop down box and click Next to continue Step 3 The PPP Username and Password page will appear Update the following fields and click Next to continue Your ISP should provide you with the following information PPP Username PPP Password Authentication Method You can also select another service function as follows Dial on demand with idle timeout timer PPP IP extension Use Static IP Address Retr...

Страница 29: ...e default MTU value setting unless your ISP advises you to change it Click Next to continue Step 5 Enter the IP Address and Subnet Mask for the LAN interface In addition you can either enable or disable the DHCP server To enable the DHCP server enter a start and end IP address and the Subnet Mask of the Router You may also choose to change the default value of the lease time Click Next to continue...

Страница 30: ...30 D Link DSL 500B User Manual Web Configuration PPPoE Summary This summary window allows you to confirm your PPPoE settings Click Save Reboot to save your new PPPoE settings and restart the Router ...

Страница 31: ... to continue Step 3 The WAN IP configuration page will appear Select the service function as follows Obtain an IP address automatically use DHCP to obtain WAN IP Use the following IP address use static WAN IP Obtain default gateway automatically use DHCP to obtain gateway IP Use the following default gateway use static gateway IP Obtain DNS server addresses automatically use DHCP to obtain DNS ser...

Страница 32: ...ollowing functions Enable NAT Enable Firewall Click Next to continue Step 5 Enter the IP Address and Subnet Mask for the LAN interface In addition you can either enable or disable the DHCP server To enable the DHCP server enter a start and end IP address and the Subnet Mask You may also choose to change the default value of the lease time Click Next to continue ...

Страница 33: ...33 D Link DSL 500B User Manual Web Configuration MER Summary This summary window allows you to confirm your MER settings Click Save Reboot to save your new MER settings and restart the Router ...

Страница 34: ...e set the Connection Type to IP over ATM IPoA and select the Encapsulation Mode from the drop down box Click Next to continue Step 3 The WAN IP configuration page will appear You can select the following service functions Use the following IP address Static WAN IP Use the following default gateway Static gateway IP Use the following DNS server addresses Static DNS server IP IP over ATM IPoA ...

Страница 35: ...In the IPoA mode you can configure the following functions Enable NAT Enable Firewall Click Next to continue Step 5 Enter the IP Address and Subnet Mask for the LAN interface In addition you can either enable or disable the DHCP server To enable the DHCP server enter a start and end IP address and the Subnet Mask You may also choose to change the default value of the lease time Click Next to conti...

Страница 36: ...36 D Link DSL 500B User Manual Web Configuration IPoA Summary This summary window allows you to confirm your IPoA settings Click Save Reboot to save your new IPoA settings and restart the Router ...

Страница 37: ...and encapsulation type page set the Connection Type to Bridging and select the Encapsulation Mode Click Next to continue Step 3 The Bridging service configuration page will appear Select the Enable Bridge Service check box and then enter the Service Name Click Next to continue Step 4 Enter the Router s IP Address and Subnet Mask for your LAN and then click Next to continue ...

Страница 38: ...8 D Link DSL 500B User Manual Web Configuration Bridging Summary This summary window allows you to confirm your Bridge settings Click Save Reboot to save your new Bridging settings and restart the Router ...

Страница 39: ...software version LAN IP address and DNS server address LAN IP Address This is the management IP address Default Gateway In the bridging mode there is no gateway address In other modes it is the address of the uplink equipment for example PPPoE PPPoA DNS Servers In the PPPoE and PPPoA mode the Primary and Secondary DNS Server addresses are obtained from the uplink equipment In the Bridging mode the...

Страница 40: ...cs LAN page will appear This page displays the Router s LAN statistics Click Reset Statistics to refresh these statistics Statistics WAN Select Device Info Statistics WAN The Statistics WAN page will appear This page displays the Router s WAN statistics Click Reset Statistics to refresh these statistics Statistics ATM Select Device Info Statistics ATM The Statistics ATM page will appear This page ...

Страница 41: ... Bit Error Rate Test window ADSL BER Test The ADSL Bit Error Rate BER test determines the quality of the ADSL connection The test is done by transferring idle cells containing a known pattern and comparing the received data with this known pattern to check for any errors Click ADSL BER Test to perform a bit error rate BER test on the DSL line The tested time in seconds can be 1 5 10 20 60 120 180 ...

Страница 42: ...e Information Select Device Info Route The Device Route page will appear if the system is in the default configuration ARP Table Information Select Device Info ARP This page displays information on the Address Resolution Protocol ARP DHCP Information Select Device Info DHCP This page displays the DHCP lease information ...

Страница 43: ...e to configure your WAN interface Click Save Reboot to save the modification and reboot the modem to make the modification effective If you are setting up the WAN interface for the first time click Add and the ATM PVC Configuration page will appear Advanced Setup This chapter includes advanced features used for network management and security as well as administrative tools to manage the Router vi...

Страница 44: ...out PCR UBR With PCR CBR Non Realtime VBR Realtime VBR Enable Quality Of Service Enable or disable QoS After the modifications click Next and the Connection Type page will appear This page allows you to select the appropriate connection type The choices include PPP over ATM PPPoA PPP over Ethernet PPPoE MAC Encapsulation Routing MER IP over ATM IPoA and Bridging default Select the desired Encapsul...

Страница 45: ...ay to manage your network is to use the default settings along with the DHCP services In order to use the Router for DHCP settings the IP address used for DHCP must be compatible with the IP address of the Router The IP addresses available in the DHCP IP address pool will change automatically if you change the IP address of the Router When you are finished click either Save to save the LAN configu...

Страница 46: ...ll without any problems For example if you request Internet pages or send and receive e mails the request for data from the Internet comes from a PC in the local network and so the router allows the data to pass through The router opens one specific port for the application A port in this context is an internal PC address via which the data is exchanged between the Internet and a client on a PC in...

Страница 47: ...the assigned public ports and notes the IP address of the PC that sent the data If data comes back from the Internet via one of these public ports the router allows it to pass through and directs it to the appropriate PC A trigger event always comes from a PC within the local network If a trigger port is addressed from outside the router simply ignores it Note An application that is configured for...

Страница 48: ...you would simply select FTP from the list and enter the local IP address or host name of the designated computer All FTP related data arriving at DSL router from the Internet henceforth is forwarded to the specific computer Similarly you can grant Internet users access to servers inside your home network by identifying each service and the PC that provide it This is useful for example if you want ...

Страница 49: ...s not used by another application which may stop functioning A common example is when using SIP signaling in Voice over IP the port used by the gateway VoIP application 5060 is the same port on which port forwarding is set for LAN SIP agents Note Some applications such as FTP TFTP PPTP and H323 require the support of special specific application level gateway ALG modules in order to work inside th...

Страница 50: ...rver IP Address Step 4 Enter the server IP address of the computer that provides the service the server in the local host field Note that unless an additional external IP address is added only one LAN computer can be assigned to provide a specific service or application Step 5 Set External Port Start and External Port End Step 6 Select a Protocol from the drop down box Step 7 Set Internal Port Sta...

Страница 51: ...on port 8080 However the requests from websites enter the Web server via port 80 standard value If you add the PC to the forwarding table and define port 80 as the public port and port 8080 as an internal port all requests from the Internet are diverted to the service with port 80 on the Web server of the PC you have defined with port 8080 Deleting Port Forwarding Step 1 Select the Remove check bo...

Страница 52: ...eld Step 3 Trigger Port Start and Trigger Port End Enter the port that is to be monitored for outgoing data traffic Trigger Protocol Select the protocol that is to be monitored for outgoing data traffic Open Protocol Select the protocol that is to be allowed for incoming data traffic Open Port Start and Open Port End Enter the port that is to be opened for incoming traffic Step 4 Click Save Apply ...

Страница 53: ... at risk Hence when designating a DMZ host you must consider the security impli cations and take the appropriate precautions You can set up a client in your local network as a DMZ host Your device then forwards all incoming data traffic from the Internet to this client You can for example operate your own Web server on one of the clients in your local network and make it accessible to Internet use...

Страница 54: ...up a PC as a DMZ host select Advanced Setup NAT DMZ Host Step 2 Enter the local IP address of the PC that is to be enabled as an exposed host Step 3 Click Save Apply to apply the settings Remove DMZ host Step 1 Clear the DMZ Host Address Step 2 Click Save Apply to apply the settings ...

Страница 55: ...e Outgoing IP Filtering Setup page will appear By default the firewall is enabled The firewall is used to block data transmissions between the Internet and your PC It serves as a security gate and permits only authorized traffic to be sent to the LAN Click Add to create an IP Filter Rule Security ...

Страница 56: ...iltering Incoming The Incoming IP Filtering Setup page will appear By default all incoming IP traffic from the WAN is blocked when the firewall is enabled However some IP traffic can be accepted by setting up filters Click Add and the Add IP Filter Incoming page will appear In this page you can create a filter rule to identify incoming IP traffic by specifying a new filter name and at least one co...

Страница 57: ...s that all MAC layer frames are forwarded except those matching with any of the specified rules in the following table BLOCKED means that all MAC layer frames are blocked except those matching with any of the specified rules in the following table Click Change Policy to change the MAC Filtering Global Policy from FORWARDED to BLOCKED Click YES to change the MAC filtering global policy from FORWARD...

Страница 58: ...figuration For example to forbid the PC whose MAC address is 00 13 20 9E 0F 10 through PPPoE dial up begin with the following page Click Add to configure the interface as follows Click Save Apply and the MAC Filtering Setup page will appear ...

Страница 59: ...dress and enter the MAC address of the another LAN device Also select the day and the start and end blocking time for the restriction URL Filter Select Advanced Setup Parental Control and then click URL Filter There are two types of URL list Exclude and Include If you selected Exclude LAN devices will not be able to access the URL addresses in the list And if you select Include LAN devices will be...

Страница 60: ... QoS is an industry wide set of standards and mechanisms for ensuring high quality performance for critical applications By using QoS mechanisms network administrators can use existing resources efficiently and ensure the required level of service without reactively expanding or over provisioning their networks Quality of Service Enabling QoS Select Advanced Setup Quality of Service In this page y...

Страница 61: ...oS Queue Configuration can allocate four queues Each of the queues can be configured for a precedence value Lower integer values for precedence imply higher priority for this queue relative to others The queue entry configured is used by the classifier to place ingress packets appropriately Note Lower integer values for precedence imply higher priority for this queue relative to others For example...

Страница 62: ...a network interface the specific network interface selected automatically allocates to the queue Queue Precedence Select an integer value for queue precedence After you select an integer value the queue entry appropriately places to ingress packets Lower integer values for precedence imply higher priority for this queue relative to others Click Save Apply to save and activate the filter After the ...

Страница 63: ...raffic class rule to classify the upstream traffic Assign queue which defines the precedence and the interface and optionally overwrite the IP header DSCP byte After QoS classification QoS divides capacity between different applications and provides undelayed continuous data transfer where data packet with higher priority is given preference The follow figure shows QoS classification ...

Страница 64: ...sification Queue Select a classification queue Assign Differentiated Service Code Point DSCP Mark Select a mark service that modifies the original packet IP header if all rules defined within the classification class are matched CS Mark IP Precedence AF Assured Forwarding EF Expedited Forwarding Mark 802 1p if 802 1q is Enabled Select an 802 1p priority number that serves as the 802 1p value There...

Страница 65: ... mask UPD TCP Source Port Destination IP Address Destination Subnet Mask UPD TCP destination port or a range of ports Source Mac Address Source Mac Mask Destination Mac Address Destination Mac Mask Set 2 rules contain the following 802 1p Priority the 802 1p header includes a 3 bit prioritization field which allows packets to be grouped into eight levels of priority 0 7 where level 7 is the highes...

Страница 66: ...llocation or by choosing dedicated routes for specific traffic flows As displayed in following diagram the IPV4 packet has a TOS filed Diffserv defines TOS field in IP packet headers referred to as DSCP Hosts or routes that pass traffic to a Diffserv enabled network typically mark each trans mitted packet with an appropriate DSCP The DSCP markings are used by Diffserv network routers to appropriat...

Страница 67: ...n For example mark each transmitted ICMP packet which passes traffic to 0 35class with an appropriate DSCP CS1 After proper modifications click Save Apply and the following page will appear Click Save Apply This configuration takes effective at once ...

Страница 68: ... traffic at the data link Mac sub layer 802 1p traffic is simply classified and sent to the destination with no bandwidth reservations established The follow diagram shows the structure of 802 1Q Frame The 802 1Q header includes a 3 bit prioritization field which allows packets to be grouped to be grouped into eight levels of priority 0 7 where level 7 is the highest one In addition DSL maps these...

Страница 69: ...ned Default Gateway this router can accept the first received default gateway assignment from one of the PPPoA PPPoE or MER DHCP enabled PVC s If the check box is not selected you must enter the static default gateway and or a WAN interface Then click Save Apply Note If the Automatic Assigned Default Gateway check box is changed from deselected to selected you must reboot the router to obtain the ...

Страница 70: ...ute infor mation Click Add and the following page will appear Enter the destination network address subnet mask gateway AND OR available WAN interface then click Save Apply to add the entry to the routing table Destination The IP address to which packets are transmitted Subnet Mask The subnet mask of the destination IP address Gateway The gateway that the packets pass by during trans mission Inter...

Страница 71: ... during the connection If the checkbox is not selected enter the primary and secondary DNS server IP addresses Click Save to save the new configuration Note You must reboot the router to make the new configuration effective DNS In this interface you can modify the Dynamic DNS settings The Dynamic DNS service allows you to alias a dynamic IP address to a static hostname in any of the many domains a...

Страница 72: ...er pair Outer pair Bitswap SRA The Router can negotiate the modulation mode with the DSLAM Click Advanced Settings to select the DSL test mode In the DSL Advanced Settings page select the desired DSL test mode and then click Apply Click Tone Selection to modify the upstream and downstream tones Select the appropriate upstream and downstream tones for your ADSL connection and then click Apply ...

Страница 73: ...outer configuration Click Backup Settings to save your Router configuration to a file on your computer Click Diagnostics to show the interface Your modem is capable of testing your DSL connection The individual tests are listed below If a test displays a fail status click Rerun Diagnostic Tests at the bottom of this page to make sure the fail status is consistent If the test continues to fail clic...

Страница 74: ...age will appear System Log Here you can enable or disable the system log and select the Log Level Display Level and Mode Click Save Apply to save your changes Both the log level and display level have eight choices The default log level is Debugging and the default display level is Error The mode options are Local Remote and Both The default option is Local If you select Remote or Both all events ...

Страница 75: ...re above the set level If you intend to record all information you must set the levels as Debugging Click Refresh to refresh the system event logs or click Close to exit from this interface System Agent Select Management SNMP Agent The SNMP Configuration page will appear Simple Network Management Protocol SNMP allows a management application to retrieve statistics and status from the SNMP agent in...

Страница 76: ...ired values and click Save Apply to configure the TR 069 Client options Internet Time Select Management Internet Time and the Time Settings page will appear Note When the PVC is PPPoE connection the Internet Time option will appear in the Management directory This window allows you to set the Router s time configuration Click Save Apply to save your changes ...

Страница 77: ...Select Management Access Control IP Address The Access Control IP Address page will appear If you enable Access Control Mode the Router permits access to local management services from IP addresses contained in the Access Control List If you disable Access Control Mode the system does not validate IP addresses for incoming packets The services are the system applications listed in the Service Cont...

Страница 78: ...lick Update Firmware to update Note Do not turn off your Router during firmware updates When the update is finished the Router reboots automatically Do not turn off your modem either before the reboot is over It is strictly forbidden to use other software for updates After updating the software it is suggested to restore the Router to factory defaults and configure it again Save Reboot Select Mana...

Страница 79: ...sword is admin If you have changed the password and cannot remember it you will need to reset the Router to the factory default setting see question 2 This default password is admin Note If you cannot see the login window please refer to the next section Network Basics to check your PC s IP configuration 2 How do I reset my Router to the factory default settings Ensure that the Router is powered o...

Страница 80: ...are firmly connected at both ends Check the LEDs on the front of the Router The Power indicator DSL and LAN indicators should be illuminated Please ensure that the settings in the Web based configuration manager e g ISP username and password are the same as the settings provided by your ISP 4 Why can t I connect to the Internet For ADSL subscribers please contact your ISP to make sure the ADSL ser...

Страница 81: ...correctly Ensure that only one network interface card on your PC is activated Disable Windows Firewall In Windows XP go to Start Control Panel and then double click Security Center Disable the Windows Firewall setting and click OK Note There might be a potential security issue if you disable the Firewall setting on your PC Please remember to turn it back on once you have finished the installation ...

Страница 82: ... please follow the steps below Click Start Run In the run box type cmd and click OK At the prompt type ipconfig and press Enter This will display the IP address subnet mask and the default gateway of your adapter If the address is 0 0 0 0 check your adapter installation security settings and the settings on your router Some firewall software programs may block a DHCP request on newly installed ada...

Страница 83: ...ick Properties Step 4 Click on Use the following IP address and enter an IP address that is on the same subnet as your network or the LAN IP address on your router Statically Assign An IP Address Example If the router s LAN IP address is 192 168 254 254 make your IP address 192 168 254 X where X is a number between 2 and 254 Make sure that the number you choose is not in use on the network Set Def...

Страница 84: ... rate downstream up to 12 Mbps upstream up to 12Mbps ADSL full rate downstream up to 24 Mbps upstream up to 1Mbps Protocols IEEE 802 1d Spanning Tree TCP UDP ARP RARP ICMP RFC1058 RIP v1 RFC1213 SNMP v1 v2c RFC1334 PAP RFC1389 RIP v2 RFC1577 Classical IP over ATM RFC1483 2684 Multiprotocol Encapsulation over ATM Adaptation Layer 5 AAL5 RFC1661 Point to Point Protocol RFC1994 CHAP RFC2131 DHCP Clie...

Отзывы: