background image


3


222-914-0009-EN5 

REGULATORY COMPLIANCE STATEMENTS 


FCC Regulatory Compliance 

This device complies with Part 15 of the FCC Rules. Operation is subject to the following two conditions: (1) this device does not cause harmful 

interference, and (2) this device must accept any interference received, including interference that may cause undesired operation. 


Note: This equipment has been tested and found to comply with the limits for a Class B digital device, pursuant to Part 15 of the FCC Rules. 

These limits are designed to provide reasonable protection against harmful interference in a residential installation. This equipment generates, 
uses and can radiate radio frequency energy and, if not installed and used in accordance with the instructions, may cause harmful interference to 

radio communications. However, there is no guarantee that interference will not occur in a particular installation. 


If this equipment does cause harmful interference to radio or television reception, which can be determined by turning the equipment off and 

on, the user is encouraged to try correcting the interference by one or more of the following measures: 


Reorient or relocate the VIBE chair. 


Increase the separation between the equipment and receiver. 


Connect the equipment into an outlet on a different circuit from that to which the receiver is connected. 


Consult the dealer or an experienced radio/TV technician for help. 


Warning: any changes or modifications not expre

ssly approved by the party responsible for compliance could void the user’s authority 

to operate the equipment. 

RF Exposure Compliance 

This equipment complies with FCC radiation exposure limits set forth for an uncontrolled environment. This equipment should be installed and 

operated with a minimum distance of 20 cm between the radiator and your body. This transmitter must not be co-located or operating in 

conjunction with any other antenna or transmitter. 


Supplier's Declaration of Conformity 

47 CFR § 2.1077 Compliance Information 
Unique Identifier Trade Name: D-BOX Technologies Inc., Model No.: H300 

Responsible Party 

 U.S. Contact Information 

D-BOX Technologies Inc.  

2172 Rue de la Province, Longueuil, Quebec J4G 1R7 Canada 

1-450-442-3003 


FCC Compliance Statement 

This device complies with Part 15 of the FCC Rules. Operation is subject to the following two conditions: (1) This device does not cause harmful 

interference, and (2) this device must accept any interference received, including interference that may cause undesired operation. 


ISED Regulatory Compliance 

This device contains licence-exempt transmitter(s)/receiver(s) that comply wi

th Innovation, Science and Economic Development Canada’s 

licence-exempt RSS(s).  Operation is subject to the following two conditions:  

1.


This device may not cause interference.  

2.


This device must accept any interference, including interference that may cause undesired operation of the device 

This equipment complies with IC RSS-102 radiation exposure limits set forth for an uncontrolled environment. This transmitter must not be co-

located or operating in conjunction with any other antenna or transmitter. This equipment should be installed and operated with minimum 

distance 20cm between the radiator and your body. 


CAN ICES-3 (B)/NMB-3(B)


Содержание Vibe

Страница 1: ...1 222 914 0009 EN5 222 914 0009 EN5 August 2023...

Страница 2: ...3 D BOX HaptiSync App Installation 13 6 4 HaptiSync Recognition Technology 14 7 TEST YOUR SYSTEM 14 8 CALIBRATE YOUR SYSTEM 15 9 PLAY 15 9 1 Content synchronization using the audio sensor Basic Setup...

Страница 3: ...void the user s authority to operate the equipment RF Exposure Compliance This equipment complies with FCC radiation exposure limits set forth for an uncontrolled environment This equipment should be...

Страница 4: ...the elderly or those with other pre existing medical conditions All such persons should consult their physicians before using this D BOX Haptic System Use of this D BOX Haptic System is not recommende...

Страница 5: ...tegrated sound sensor capable of synchronizing your favourite movies series music and more experiential content using your room s ambient sound With haptic codes available for more than 2 500 titles a...

Страница 6: ...Hz 1 1A MAXIMUM LIFTING CAPACITY 250 lbs 122 kg MAX ANGULAR DISPLACEMENT FOR PITCH 5 MAXIMUM VELOCITY 100 mm s MAXIMUM ACCELERATION 1 g force FREQUENCY RANGE 0 100 Hz OPERATING TEMPERATURE RANGE 0 C 4...

Страница 7: ...npack the product from the box Visually inspect the product for damage If any part appears to be broken contact the D BOX Support Team 3 CHAIR ASSEMBLY Your new D BOX VIBE chair comes preassembled Ple...

Страница 8: ...e backrest to its upright position STEP 4 Secure the backrest by tighten both screws located at the rear bottom of the seat using a 13mm wrench 4 CHAIR COMPONENTS D BOX HaptiSync Processor Seat Contro...

Страница 9: ...rk reset while blinking twice per second 8 to 11 seconds then release Factory reset while blinking 4 times per second 12 seconds Nothing cancels all operations Power Operation Button Used to turn the...

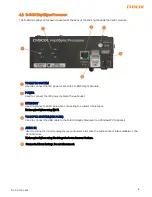
Страница 10: ...able to the wall outlet ETHERNET Used to connect a LAN cable when connecting to a wired LAN network Not required when using Wi Fi TO HAPTIC SYSTEM USB PORT Used to connect the USB cable to the D BOX H...

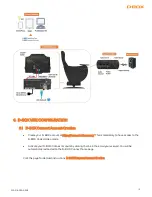
Страница 11: ...ule and HaptiSync Processor as follow IEC Power Cable IEC Male to IEC Female power Cable USB A to USB B Cable POWER Used to connect the IEC power cable to the D BOX HaptiSync Processor USB INPUT Used...

Страница 12: ...https connect d box com This is mandatory to have access to the D BOX Coded Video mode Activate your D BOX Connect account by clicking the link in the email you received You will be automatically redi...

Страница 13: ...on Core software suite Connect the Haptic Processor to your network To use a wireless Wi Fi network a Open the HaptiSync App b Press the Add button to add your D BOX VIBE chair c Follow the on screen...

Страница 14: ...just the audio recognition tolerance parameters in the HaptiSync App Audio recognition tolerance can be set between 0 and 100 seconds If a recognition failure occurs during the specified delay foreign...

Страница 15: ...enjoy the ultimate viewing experience start playing a D BOX compatible title from your favourite source disc streaming video on demand etc and make sure that the sound level is comfortable d Using it...

Страница 16: ...cessor This option is suitable if you get synchronization errors when using the integrated audio sensor because the sound level is too low When you use the AUDIO IN port you can also connect wired hea...

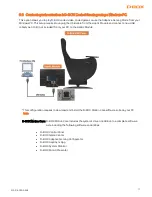
Страница 17: ...ect a new USB cable type A to B not included from your PC to the Haptic Module This configuration requires to download and install the D BOX Motion Core software suite on your PC here D BOX Motion Cor...

Страница 18: ...level Motion Vibration Balance and latency There is also a test button to verify that your system is working properly Default Mode Park Haptic Module will go to its lower position when there are no ha...

Страница 19: ...g mode if your title is not in the list D BOX Coded Video Premium haptic experiences for D BOX coded movies TV shows using audio synchronization Visit this page for detailed instructions https support...

Страница 20: ...lows you to build modify and activate your Adaptive Gaming profiles You can also share your favorite profiles with other D BOX users 9 3 4 D BOX HaptiSync App This application allows you to setup and...

Страница 21: ...ys live health and operational data on your D BOX VIBE chair This is useful to troubleshoot your system 9 3 6 D BOX Stimuli Presenter The D BOX Stimuli Presenter is a keyboard controlled application t...

Страница 22: ...stem OK as follow If the status indicates No Seat Detected try the following steps STEP 1 Verify that all cables are firmly plugged in to the corresponding ports see section 5 STEP 2 Make sure your D...

Страница 23: ...tem try the following steps STEP 1 Do a visual inspection of your setup to make sure nothing prevents the Haptic Module from moving properly STEP 2 Press the heart icon to access the HAPTIC SYSTEM STA...

Страница 24: ...nsion cable use a 3 wire cable with properly grounded plugs Voltage from the wall outlet is too high for the haptic system Make sure you are not connected to a GFCI breaker High Voltage Rail Undervolt...

Страница 25: ...laying a D BOX encoded title you should see the name of the title and its corresponding timeline as follow In case of issue please follow the steps below Step 1 Make sure the HaptiSync Mode is set to...

Страница 26: ...n some cases you may experience haptic interruptions while watching a movie This could be verified from the HaptiSync app If it switches from Audio Source Detected to Silence Detected continuously the...

Страница 27: ...etween the cover and the seat controller moulding and gently rotate the screwdriver to separate the cover Do not lift the cover from the intensity switch Step 2 Remove the microphone from its socket U...

Страница 28: ...the new board then proceed with the reassembly steps 3 to 1 11 2 How to replace the HaptiSync Processor Step 1 Disconnect the audio cable and board connector see section 11 1 Step 2 Disconnect the US...

Страница 29: ...rough the armrest hole Screw the four 4 screws to attach the Haptic Processor using a 10mm socket Connect the USB microphone cable Reconnect the seat controller PCB connectors and put back the cover s...

Страница 30: ...sing a 15 mm socket Step 3 Using the D BOX disassembly tool turn counterclockwise the red handle to reach its maximum Step 4 Install the tool in the same holes that keep the seat cushion in place then...

Страница 31: ...from the Haptic Module Step 6 Hold the circular base with the foot then rotate the Haptic Module until reaching the stopper Continue to rotate the module than pull it to remove it Step 7 Insert the n...

Страница 32: ...X disassembly tool from the seat frame Insert the seat frame on top of the new Haptic Module then tighten the bolt washer using a 15mm socket Step 9 Install the seat cushion on top of the seat frame t...

Отзывы: