Cyrus i9-XR Скачать руководство пользователя страница 20

Cyrus i9-XR

User Instructions

18

Learning TV and Satellite commands

In addition to controlling Cyrus components, the remote 

control can learn the commands from two other remote 

control handsets. These will normally be a TV and a 

Satellite or terrestrial TV set-top box, programmed to 

the TV and SAT buttons, but could also be other audio 

components including a Cyrus tuner or DVD player etc.
All keys may be programmed with the exception of the 

groups marked CONTROL and SOURCE and the SETUP key.

Preparation for learning

Check the following points before attempting to learn any 

commands -
•  Check that both remote controls have fresh batteries.
•  Choose a location on a tabletop that is not brightly lit. 

Subdued light is better, away from bright natural or 

indoor lighting.

•  Check that you have enough time to spare to complete 

the learning process for all the keys you want to use.

Learning commands

In this example, the Cyrus remote control will be learning 

commands from a ‘reference’ Satellite receiver remote 

control. 
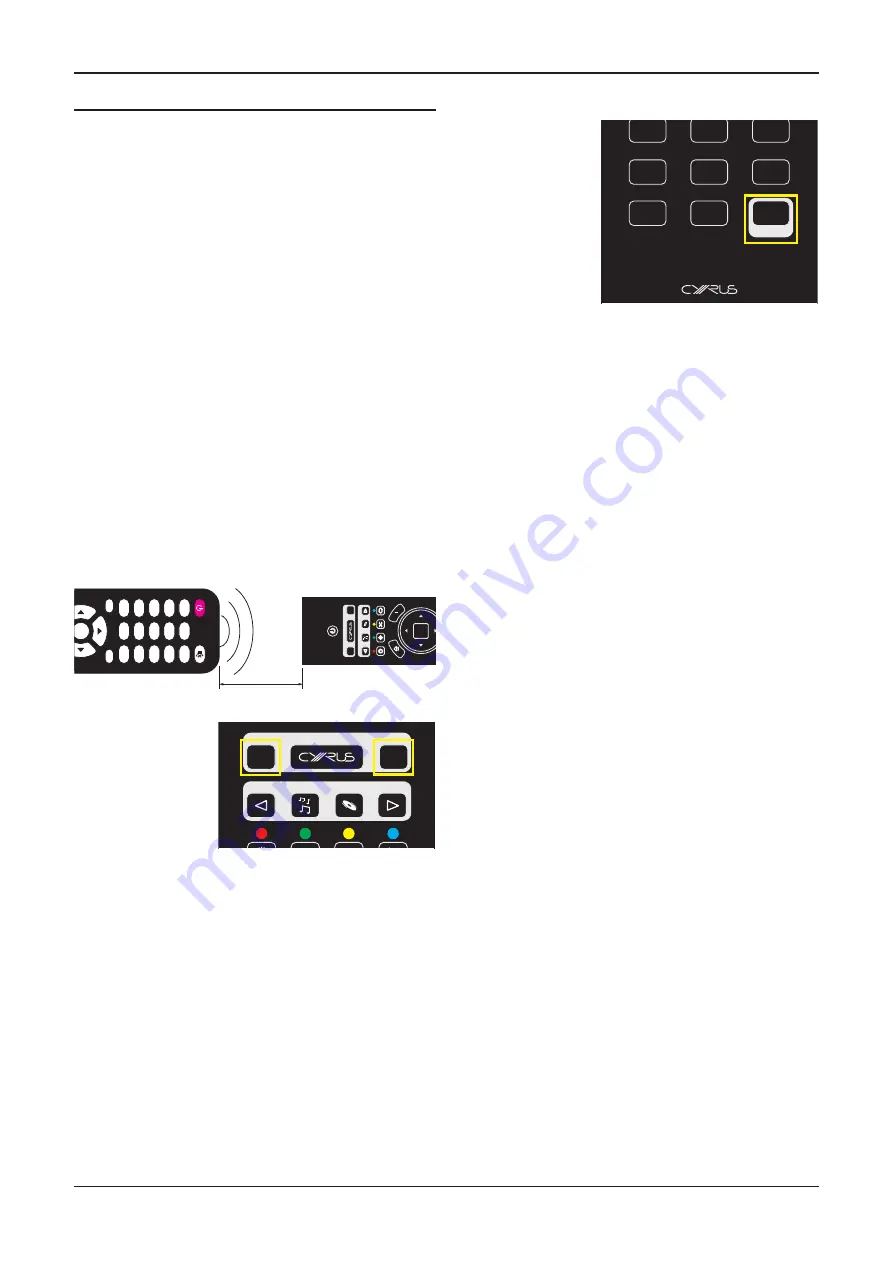
1.  Set the two remote controls up facing each other, 

spaced by about 5cm.

1

2

3

4

5

7

9

6

8

0/10

SAT

TV

STORE

MENU

ENTER

SELECT

LIST

CH

SETUP

abc

def

ghi

jkl

mno

pqrs

tuv

wxyz

GUIDE

INF

O

TEXT

TV/AV

CONTROL

SOURCE

1

2

3

4

5

7

9

6

8

0/10

SAT

TV

STORE

MENU

ENTER

SELECT

LIST

CH

SETUP

abc

def

ghi

jkl

mno

pqrs

tuv

wxyz

GUIDE

INF

O

TEXT

TV/AV

CONTROL

SOURCE

The keypad will light and the key you selected will be red.

2.  Press the TV or 

SAT key to select 

the mode that 

you want to 

program.

3.  Press and hold the 

SETUP key.

The  mode  key  will  change  to  white.  After  about  three 

seconds, the mode key will light red again. This indicates 

that the remote control is ready to learn codes.

4.  Release the SETUP key.

The remote control is now waiting to learn commands. 

The keypad will light continually and the mode key will 

light pale red.

5.  On the reference remote control, press and hold the 

first key you want to learn (for example, volume up) 

until the mode key flashes red.

This indicates that the command has been received.

6.  Release the key on the reference remote control.
7.  Press a key on the Cyrus remote control (volume up 

in this example) to select where you want to save that 

command.

The mode key will stop flashing. This indicates that the 

command has been saved successfully.
If the learning process was successful, the remote control 

will be ready to learn the next command.

8.  Repeat steps 5 to 7 for each command you want to 

learn.

When you have completed learning all commands -
•  Press the SETUP key.

The mode key will change to white. After a few seconds 

the backlight will switch off.

12

3

4

5

79

6

8

0/10

SA

T

TV

ST

OR

E

MENU

ENTER

SELECT

LIST

CH

SETU

P

abc

def

ghi

jkl

mn

o

pqrs

tuv

wxyz

G

U

ID

E

IN

F

O

TEXT

TV/

AV

CONTRO

L

SOURC

E

1

23

6

5

4

7

89

0

AUDI

O

SUB

TTX

GUIDE

FA
V

INFO

TV/

R

OK

LIST

EXI

T

AD

ZOOM

MENU

VOL

CH

5cm

Содержание i9-XR

Страница 1: ...Cyrus i9 XR User guide for firmware version V1 0 1 An updated user guide may be available from www cyrusaudio com for newer firmware revisions...

Страница 2: ...put 11 Input Source Type Cyrus AV or AV 11 Playing DSD audio from a computer 12 Volume level 12 Volume 12 Headphone volume 12 Safe volume levels after standby 12 Balance 12 Mute 12 Headphones 12 Filte...

Страница 3: ...the product Any mounting of the product should follow the manufacturer s instructions and should use a mounting accessory recommended by the manufacturer POWER SOURCES This product should be operated...

Страница 4: ...ts have fallen into the product If the product has been exposed to rain or water If the product has been dropped or damaged in any way If the product does not operate normally by following the operati...

Страница 5: ...rusaudio com support and click the Register your product link Please read these instructions carefully before commencing installation They provide full guidance to help you install your amplifier safe...

Страница 6: ...2 Installation 1 Right speaker output 2 MC BUS system connection 3 Pre Amplifier output 4 Fixed output 5 Phono MM input 6 Phono ground terminal 7 Analogue input 1 Key to the rear panel drawing 8 Anal...

Страница 7: ...n fasten the ground wire where fitted under the terminal Digital Audio Inputs Using a suitable Toslink optical or Digital phono interconnect connect each digital audio source to one of the inputs DIG1...

Страница 8: ...the amplifier must be connected to the corresponding and terminals of the speakers Most cables have polarity indicators usually a stripe or a rib on one conductor as shown in the examples below The r...

Страница 9: ...UND AN 1 L UPGRADE HEADPHONES Amplifier Right speaker Treble Bass Left speaker Treble Bass Connection of a bi wired system Connecting Loudspeakers Bi Wiring Dual speaker connections are provided and e...

Страница 10: ...details STEREO OPERATION Set mono stereo switch to stereo Connect inputs to L Connect speakers to speaker for left to for right PRECISION ELECTRONIC INSTRUMENT MADE IN ENGLAND OUT IN MC BUS M M M MONO...

Страница 11: ...connected through your stereo amplifier to share the main front speakers of your system In this case connect a stereo phono interconnect from the front channel outputs of the surround decoder to one...

Страница 12: ...h components from the mains Plug the multi pin interconnect from the PSU XR into the PSU XR socket on the back panel CAUTION Use only the interconnect supplied with the PSU XR Other interconnects may...

Страница 13: ...rgy Standby will set automatically 20 minutes after music last played Selecting an Input Inputs may be selected from the front panel touchpads Touch INPUT or INPUT The input names will step through on...

Страница 14: ...without disturbing the existing volume setting When muted the volume level display will show that the sound is muted Touch MUTE again to restore the original volume setting Headphones Connect your hea...

Страница 15: ...ROL SOURCE Switching on Cyrus source components 1 2 3 4 5 7 9 6 8 0 10 SAT TV STORE MENU ENTER SELECT LIST CH SETUP abc def ghi jkl mno pqrs tuv wxyz GUIDE INFO TEXT TV AV CONTROL SOURCE 1 2 3 4 5 7 9...

Страница 16: ...u options 12 Open menu Select menu option 13 Amplifier mute 14 Step to the next amplifier input 15 Step to the previous amplifier input 16 Open menu Select menu option 17 No command for an amplifier 1...

Страница 17: ...ase Changes in phase are subtle and are best established from the listening position When the phase setting is changed the display text area will show the message Phase Normal or Phase Invert The perf...

Страница 18: ...for an audio streamer 13 Amplifier mute 14 No command for an audio streamer 15 No command for an audio streamer 16 No command for an audio streamer 17 Audio streamer stop 18 No command for an audio st...

Страница 19: ...TER SELECT This page lists commands that will control the Phono Signature Press the CYRUS key to set the remote control to Cyrus mode You can now control both a Cyrus amplifier and the Phono Signature...

Страница 20: ...light and the key you selected will be red 2 Press the TV or SAT key to select the mode that you want to program 3 Press and hold the SETUP key The mode key will change to white After about three sec...

Страница 21: ...r learning If the test works then continue to program the rest of the commands you need If you still have problems check carefully that the mode light is flashing correctly as you send a command to le...

Страница 22: ...an option Navigating the menu from the front panel Touch to open the settings menu Turn the rotary control to step through the available options Press the rotary control to select an option Touch to s...

Страница 23: ...ccess FILTER touchpad on the front panel Refer to the Filter section for more detail Input Select an input to configure Source Type Change the Source Type of the selected input Setting this option wil...

Страница 24: ...tting is Level 5 System See the previous page for General menu options See the previous page for Input menu options Input Aesthetic Language Factory reset Select an language from the list This option...

Страница 25: ...ew features and to fix operational issues New firmware versions will be available from the Support pages of the Cyrus website www cyrusaudio com If new firmware is available this will be packaged with...

Страница 26: ...eplace the batteries Error indication Your amplifier has a unique error indication system to help you to diagnose problems If an error is detected in use the display will show Error with indication of...

Страница 27: ...l purchaser and is not transferable Please retain the sales receipt as proof of purchase Warranty claims must wherever possible be made through the retailer from whom the equipment was purchased This...

Страница 28: ...Cyrus Audio Ltd Ermine Business Park Huntingdon PE29 6XY U K...

Отзывы: