


Cyrus i9-XR
User Instructions
10
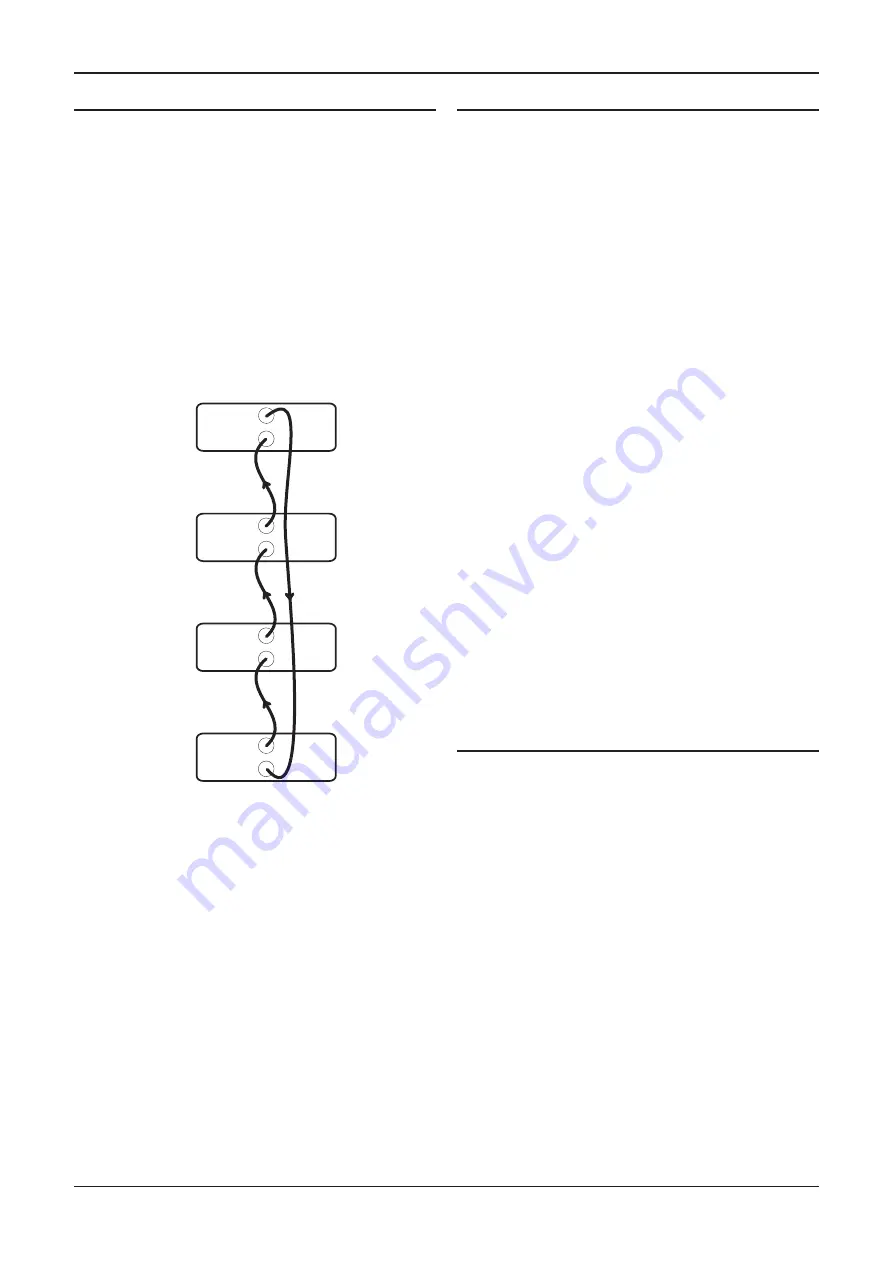
MC-BUS System
Connecting the MC-BUS sockets between components in a
Cyrus audio system provides unified system control.
• Connect single phono cables from the MC-BUS output
of one unit to the MC-BUS input of another in a daisy-
chain as shown in the diagram below.
• Complete the loop by returning the MC-BUS output of
the final component to the MC-BUS input of the first.
With MC-BUS connection established you can control the
power function of the entire system from the front panel
or remote control.
In the system below, selecting ‘CD’ will switch on the
amplifier, the Cyrus power amplifier and a Cyrus CD
player. When the amplifier is set to Standby, the entire
system will switch off.
Cyrus Tuner
Cyrus Power Amplifier
Cyrus CD player
Cyrus amplifier
MC-BUS out
MC-BUS out
MC-BUS out
MC-BUS out
MC-BUS in
MC-BUS in
MC-BUS in
MC-BUS in
When a Cyrus Surround Processor is included in the MC-
BUS loop, setting of the volume calibration level will take
place automatically when the ‘Cyrus AV’ input is set as
‘Source Type’. Refer to the handbook for the Surround
Processor for further details.
External Power Supply - PSU-XR
The PSU-XR is a unique DC power supply that will upgrade
the sonic performance of compatible products in the Cyrus
range.
• To connect a PSU-XR, disconnect both components
from the mains.
• Plug the multi-pin interconnect from the PSU-XR into
the PSU-XR socket on the back panel.
CAUTION: Use only the interconnect supplied with the
PSU-XR. Other interconnects may damage the PSU-XR
and the amplifier.
• Connect a mains supply to both units.
NOTE: Connection of a PSU-XR is detected automatically, so
no internal adjustments are required.
How it works
The PSU-XR contains five separate power supplies. When
a PSU-XR is connected to a Cyrus product, the power from
the PSU-XR is applied to specific parts of the connected
product.
The twin main power supply of the versatile PSU-XR can
be configured to increase the power reserve available for
power amplification and servo circuitry or provide ultra-
smooth, low noise power for sensitive circuits such as
analogue preamplifiers.
Three additional regulated power supplies can be
simultaneously applied to other sensitive preamplifier or
control circuits as required.
Connection of a PSU-XR will also bring a secondary benefit
by significantly reducing the load placed on internal
power supplies and therefore reducing any power supply
related noise artefacts that may appear within the internal
circuitry.
Connecting to the AC Mains Supply
Connect the socket on the AC Power cable to the Power
inlet on the rear panel of the amplifier. Now connect the
cable to a suitable AC power point.
NOTE: The means to disconnect this product from the
mains supply is the mains plug. Ensure that the mains plug
is accessible at all times.


