Cyrus i9-XR Скачать руководство пользователя страница 13

Cyrus i9-XR

User Instructions

11

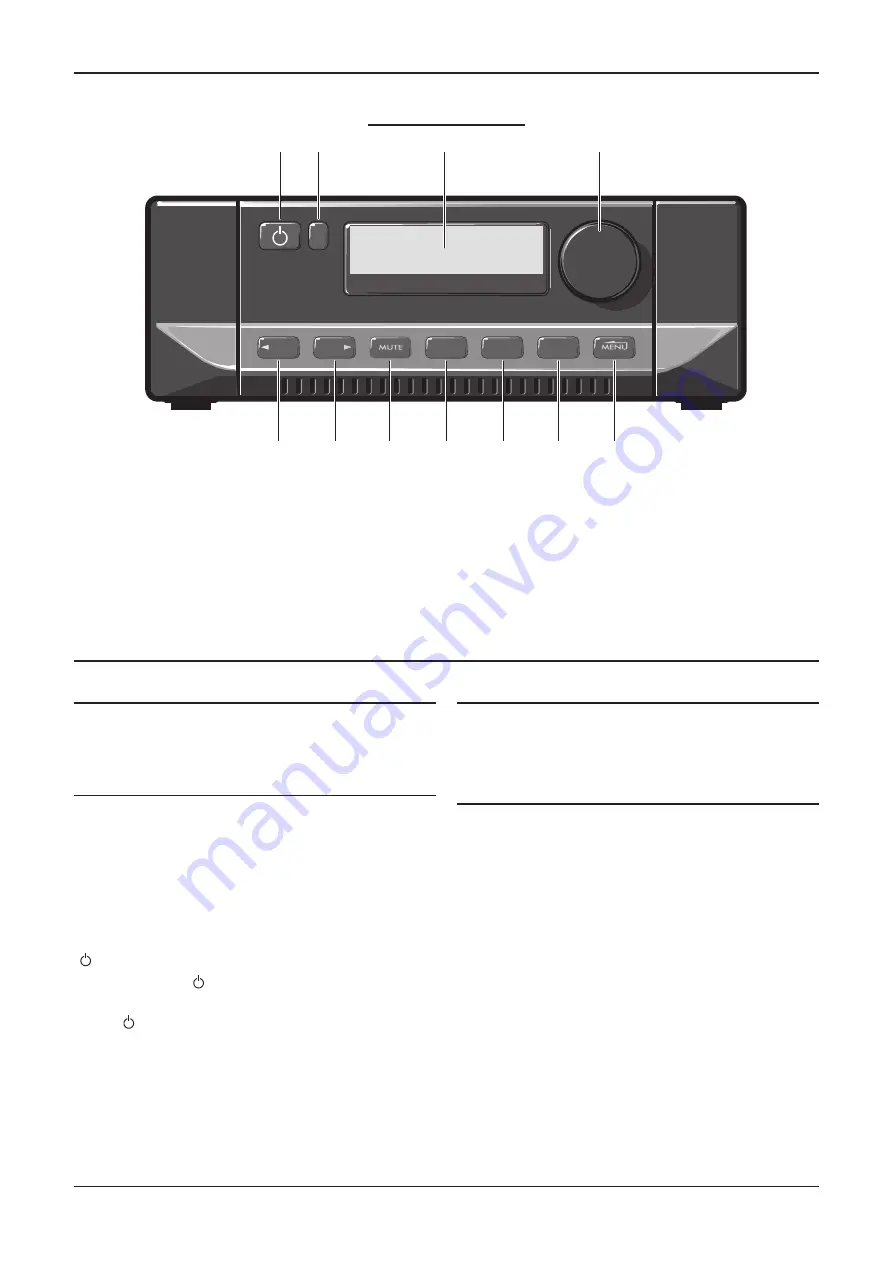
1.  Standby and indicator
2.  Remote eye
3.  Display window
4.  Level control and setup adjust
5.  Menu
6.  Filter

Operation

7.  Balance
8.  Headphones
9.  Mute
10. Next input
11. Previous input

Touch pad controls

The front panel controls are touch sensitive. There is no 

need to press the controls, just lightly touch or hold a 

finger on the touchpad to select a function.

Power

Mains power

In regular use mains power can be left connected 

permanently. 
When unattended for a long period (holidays etc) mains 

power should be disconnected. 

Standby

When mains power is connected, the Standby touchpad 


( ) is used for power control. 
•  Touch and hold   briefly to switch the unit on or set to 

Standby.

The   touchpad will be red when in Standby and white 

when the amplifier is operating.

When set to Standby, all settings in use are retained.

Auto-standby

To save energy Standby will set automatically 20 minutes 

after music last played.

Selecting an Input

Inputs may be selected from the front panel touchpads.
•  Touch INPUT

 or 

INPUT.

•  The input names will step through on the display. 

Input Source Type ‘Cyrus AV’ or ‘AV’

Inputs may have been set as Source Type ‘Cyrus AV’ or 

‘AV’. These Source Types are for use with surround-sound 

decoders. When one of these inputs is selected, the 

amplifier is configured as a power amplifier with fixed gain 

for the selected input. This enables the surround decoder 

to share the front left and right speaker channels of a Cyrus 

stereo system.

The volume control on the amplifier will be locked at -6dB 

and mute will be disabled.

When in one of these AV modes the surround decoder 

input select and volume controls are used to select a multi-

channel source and set the volume level for the system.
To unlock the volume control and return to playing a stereo 

source, select the input you want to play at the amplifier.

Key to the front panel drawing

i -XR

9

FILTER

BAL

PHONES

INPUT

INPUT

a

b

c

d

e

f

g

h

i

1)

1!

Содержание i9-XR

Страница 1: ...Cyrus i9 XR User guide for firmware version V1 0 1 An updated user guide may be available from www cyrusaudio com for newer firmware revisions...

Страница 2: ...put 11 Input Source Type Cyrus AV or AV 11 Playing DSD audio from a computer 12 Volume level 12 Volume 12 Headphone volume 12 Safe volume levels after standby 12 Balance 12 Mute 12 Headphones 12 Filte...

Страница 3: ...the product Any mounting of the product should follow the manufacturer s instructions and should use a mounting accessory recommended by the manufacturer POWER SOURCES This product should be operated...

Страница 4: ...ts have fallen into the product If the product has been exposed to rain or water If the product has been dropped or damaged in any way If the product does not operate normally by following the operati...

Страница 5: ...rusaudio com support and click the Register your product link Please read these instructions carefully before commencing installation They provide full guidance to help you install your amplifier safe...

Страница 6: ...2 Installation 1 Right speaker output 2 MC BUS system connection 3 Pre Amplifier output 4 Fixed output 5 Phono MM input 6 Phono ground terminal 7 Analogue input 1 Key to the rear panel drawing 8 Anal...

Страница 7: ...n fasten the ground wire where fitted under the terminal Digital Audio Inputs Using a suitable Toslink optical or Digital phono interconnect connect each digital audio source to one of the inputs DIG1...

Страница 8: ...the amplifier must be connected to the corresponding and terminals of the speakers Most cables have polarity indicators usually a stripe or a rib on one conductor as shown in the examples below The r...

Страница 9: ...UND AN 1 L UPGRADE HEADPHONES Amplifier Right speaker Treble Bass Left speaker Treble Bass Connection of a bi wired system Connecting Loudspeakers Bi Wiring Dual speaker connections are provided and e...

Страница 10: ...details STEREO OPERATION Set mono stereo switch to stereo Connect inputs to L Connect speakers to speaker for left to for right PRECISION ELECTRONIC INSTRUMENT MADE IN ENGLAND OUT IN MC BUS M M M MONO...

Страница 11: ...connected through your stereo amplifier to share the main front speakers of your system In this case connect a stereo phono interconnect from the front channel outputs of the surround decoder to one...

Страница 12: ...h components from the mains Plug the multi pin interconnect from the PSU XR into the PSU XR socket on the back panel CAUTION Use only the interconnect supplied with the PSU XR Other interconnects may...

Страница 13: ...rgy Standby will set automatically 20 minutes after music last played Selecting an Input Inputs may be selected from the front panel touchpads Touch INPUT or INPUT The input names will step through on...

Страница 14: ...without disturbing the existing volume setting When muted the volume level display will show that the sound is muted Touch MUTE again to restore the original volume setting Headphones Connect your hea...

Страница 15: ...ROL SOURCE Switching on Cyrus source components 1 2 3 4 5 7 9 6 8 0 10 SAT TV STORE MENU ENTER SELECT LIST CH SETUP abc def ghi jkl mno pqrs tuv wxyz GUIDE INFO TEXT TV AV CONTROL SOURCE 1 2 3 4 5 7 9...

Страница 16: ...u options 12 Open menu Select menu option 13 Amplifier mute 14 Step to the next amplifier input 15 Step to the previous amplifier input 16 Open menu Select menu option 17 No command for an amplifier 1...

Страница 17: ...ase Changes in phase are subtle and are best established from the listening position When the phase setting is changed the display text area will show the message Phase Normal or Phase Invert The perf...

Страница 18: ...for an audio streamer 13 Amplifier mute 14 No command for an audio streamer 15 No command for an audio streamer 16 No command for an audio streamer 17 Audio streamer stop 18 No command for an audio st...

Страница 19: ...TER SELECT This page lists commands that will control the Phono Signature Press the CYRUS key to set the remote control to Cyrus mode You can now control both a Cyrus amplifier and the Phono Signature...

Страница 20: ...light and the key you selected will be red 2 Press the TV or SAT key to select the mode that you want to program 3 Press and hold the SETUP key The mode key will change to white After about three sec...

Страница 21: ...r learning If the test works then continue to program the rest of the commands you need If you still have problems check carefully that the mode light is flashing correctly as you send a command to le...

Страница 22: ...an option Navigating the menu from the front panel Touch to open the settings menu Turn the rotary control to step through the available options Press the rotary control to select an option Touch to s...

Страница 23: ...ccess FILTER touchpad on the front panel Refer to the Filter section for more detail Input Select an input to configure Source Type Change the Source Type of the selected input Setting this option wil...

Страница 24: ...tting is Level 5 System See the previous page for General menu options See the previous page for Input menu options Input Aesthetic Language Factory reset Select an language from the list This option...

Страница 25: ...ew features and to fix operational issues New firmware versions will be available from the Support pages of the Cyrus website www cyrusaudio com If new firmware is available this will be packaged with...

Страница 26: ...eplace the batteries Error indication Your amplifier has a unique error indication system to help you to diagnose problems If an error is detected in use the display will show Error with indication of...

Страница 27: ...l purchaser and is not transferable Please retain the sales receipt as proof of purchase Warranty claims must wherever possible be made through the retailer from whom the equipment was purchased This...

Страница 28: ...Cyrus Audio Ltd Ermine Business Park Huntingdon PE29 6XY U K...

Отзывы: