background image

28

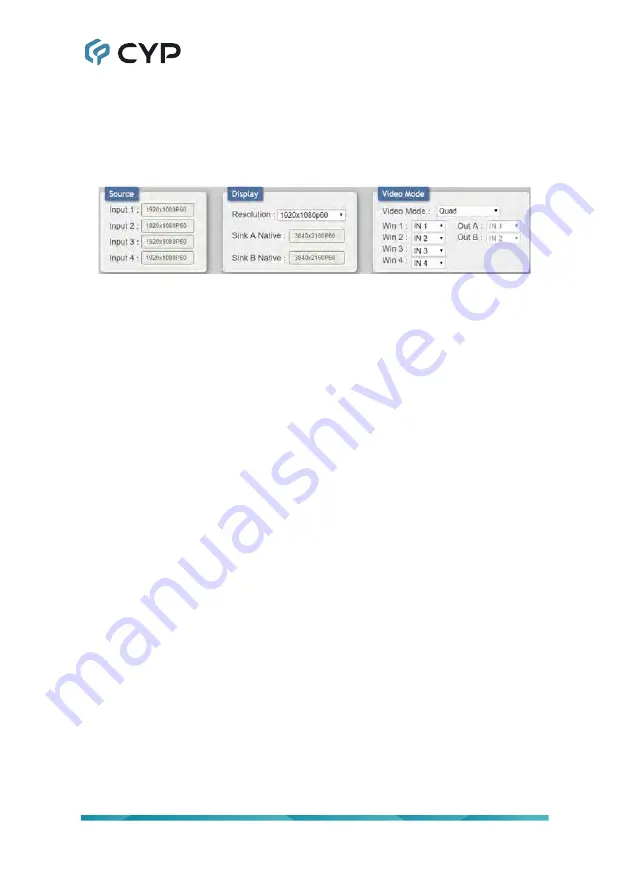
6.5.1 Upper Tab Windows

This upper section of the web interface is visible on every tab and provides 
control over the unit’s operational mode, source selection, and output 
resolution as well as containing basic information about the currently 
connected source and display devices.

1) Source: 

This section displays the currently detected resolution for the 

sources connected to each input.

2) Display:


„

Resolution:

 Use the dropdown to select the preferred output 

resolution for the unit.


Note: Both outputs will always share the same output resolution, even 
in Matrix mode.


„

Sink A/B Native:

 Displays the native resolution of both connected 

displays as reported by their respective EDIDs.

3)  Video Mode:


„

Video Mode: 

Use the dropdown to select the unit’s operational mode. 

Available options are: Matrix, PiP, PoP, Quad, and Presets 1~4.


Note: Switching between video modes will cause the output to briefly 
go to black, but audio output will not be affected if the selected audio 

source is the same in both modes.


„

Win 1~4:

 Select the video source to use in each window of a multi-

window mode (PiP/PoP/Quad/Preset).


Note: Only available when a multi-window mode is active.


„

Out A~B: 

Select the video source for each output in Matrix mode.


Note: Only available when Matrix mode is active.

Содержание MED-VPR-3420

Страница 1: ...Operation Manual Operation Manual Multiviewer with Streaming Solution for Video Conferencing MED VPR 3420 ...

Страница 2: ... registered trademarks of HDMI licensing Administrator Inc ...

Страница 3: ...Technology reserves the right to make improvements to this document and or product at any time and without notice COPYRIGHT NOTICE No part of this document may be reproduced transmitted transcribed stored in a retrieval system or any of its part translated into any language or computer file in any form or by any means electronic mechanical magnetic optical chemical manual or otherwise without expr...

Страница 4: ...d into this product through any openings or empty slots in the unit as you may damage parts inside the unit Do not attach the power supply cabling to building surfaces Use only the supplied power supply unit PSU Do not use the PSU if it is damaged Do not allow anything to rest on the power cabling or allow any weight to be placed upon it or any person walk on it To protect the unit from overheatin...

Страница 5: ...nu Multiviewer 9 6 5 WebGUI Control Multiviewer 26 6 5 1 Upper Tab Windows 28 6 5 2 Window Layout Tab 29 6 5 3 Picture Tab 31 6 5 4 Audio Tab 32 6 5 5 Input EDID Tab 33 6 5 6 HDCP Mode Status Tab 34 6 5 7 OSD Settings Tab 35 6 5 8 Logo Settings Tab 36 6 5 9 Ethernet Tab 37 6 5 10 Setup Tab 38 6 5 11 Information Tab 39 6 6 Video Capture Control Configuration 40 6 6 1 USB Video Capture Configuration...

Страница 6: ...tion Diagram 61 8 Specifications 62 8 1 Technical Specifications 62 8 2 Video Specifications 63 8 3 Audio Specifications 65 8 3 1 Digital Audio 65 8 3 2 Analog Audio 66 8 4 Cable Specifications 66 9 Acronyms 67 ...

Страница 7: ... output and the video capture component s input above it the unit is transformed into a flexible video streaming distribution and recording powerhouse In this configuration all HDMI ports support resolutions up to 18Gbps 4K UHD via the bypass path while simultaneously streaming the audio and video signal at 1080p to a USB connected PC for capture or re broadcast USB capture is accomplished using t...

Страница 8: ...s Public commercial displays 3 PACKAGE CONTENTS 1 Multiviewer with Streaming Solution for Video Conferencing 1 24V 2 7A DC Power Adapter 1 USB 3 0 Type A to Type B Cable 1 Operation Manual 4 SYSTEM REQUIREMENTS HDMI source equipment such as media players video game consoles or set top boxes HDMI receiving equipment such as HDTVs monitors or audio amplifiers Personal computer Windows 10 or macOS wi...

Страница 9: ... Supports the ability to store a multi window arrangement as a preset that can be recalled later Independent audio source selection and routing in all modes Inputs 1 2 support pass through of many audio formats including 8 channel LPCM Bitstream and HD Bitstream Inputs 3 4 are limited to 2 channel LPCM only Each window can have a border with a selectable color Uploadable and freely positionable gr...

Страница 10: ...nd stable USB capture stream Capturing over USB 3 0 allows uncompressed video and audio data capture up to 1080p LPCM 2 0 Capturing over USB 2 0 requires the application of minimal MJPEG compression to the video and audio data up to 1080p LPCM 2 0 Supports capturing 2 channel digital audio from either HDMI LPCM 2 0 or the 3 5mm analog audio input selectable via configuration software Compliance wi...

Страница 11: ...r component s operational mode between Matrix PiP PoP and Quad 4 OUT A B IN 1 4 LED Array In Matrix mode these LED s indicate the currently selected sources IN 1 4 routed to each of the two outputs OUT A B When the multiviewer component is in a multi windowing mode PiP PoP Quad Preset all LEDs will be illuminated simultaneously Note When source selection is active the associated output s LED s wil...

Страница 12: ...hen source selection is active pressing this button will either select input 2 Matrix mode or sequentially switch through all 4 inputs for window 2 PiP PoP Quad Preset modes 8 IN 3 PLUS Button When not in source selection mode press to move up or adjust selections within OSD menus When source selection is active pressing this button will either select input 3 Matrix mode or sequentially switch thr...

Страница 13: ...nput for the video capture component of the unit To capture video from the multiviewer component of the unit connect this port to the HDMI OUT B port located directly below it Note Capturing video sources containing HDCP protection is not supported Only the bypass CAPTURE OUT port will be active with HDCP sources 4 AUDIO IN Port Connect to the stereo analog output of a device such as an audio play...

Страница 14: ... other serial control device with a 3 5mm adapter cable to send RS 232 commands to control the multiviewer component of the unit 10 DC 24V Port Plug the 24V DC power adapter into this port and connect it to an AC wall outlet to power the multiviewer component of the unit Note The video capture component of the unit receives power only from the USB 3 0 connection Both must be connected to fully pow...

Страница 15: ...buttons to navigate the OSD menu Press the MENU button to back out from any menu item and then press it again to close the menu MAIN MENU Video Mode Window Layout Picture Audio Input EDID HDCP Mode Output Resolution OSD Settings Logo Settings Ethernet Preset Setup Information The individual functions of the OSD will be introduced in the following section Items marked in BOLD are the factory defaul...

Страница 16: ... In 3 WIN 4 Source In 1 4 In 4 Matrix Mode OUT A Source In 1 4 In 1 OUT B Source In 1 4 In 2 1 Video Mode Select the preferred operation mode of the unit Note Selecting some modes will limit available features 2 WIN 1 2 3 4 Source Select the source for the specified window in multi windowing modes PiP PoP Quad 3 OUT A B Source Select the source for the specified HDMI output when in Matrix mode ...

Страница 17: ...Input Select In 1 4 In 1 Aspect Ratio FULL 16 9 16 10 4 3 Best Fit Mirror NO Yes Border On Off On OFF Border Color Black Red GREEN Blue Yellow Magenta Cyan White Dark Red Dark Green Dark Blue Dark Yellow Dark Magenta Dark Cyan Gray Window Reset NO Yes ...

Страница 18: ...ip the currently selected input horizontally 4 Border On Off Enables or disable the color border around the currently selected input 5 Border Color Select the color to use for the border of the currently selected input 6 Window Reset Reset the current input to its default settings WINDOW LAYOUT PiP PoP Quad Preset Modes 2ND LEVEL 3RD LEVEL Window Select Win 1 4 Win 1 Window On Off ON Off Position ...

Страница 19: ...urrently selected window 3 Position X Y Set the X and Y coordinate position of the upper left corner of the currently selected window 4 Size Width Height Set the horizontal and vertical size of the currently selected window 5 Priority Select the layer priority of the currently selected window Priority 1 is at the front and priority 4 is at the back 6 Aspect Ratio Select a fixed aspect ratio for th...

Страница 20: ... the currently selected mode PICTURE 2ND LEVEL 3RD LEVEL Input Select IN 1 In 2 In 3 In 4 Contrast 0 100 75 Brightness 0 100 50 Saturation 0 100 50 Hue 0 100 50 Sharpness H 0 10 10 Sharpness V 0 10 10 Reset NO Yes 1 Input Select Select the input to modify 2 Contrast Set the overall contrast of the currently selected input 3 Brightness Set the overall brightness of the currently selected input 4 Sa...

Страница 21: ...F OUT B Source WINDOW In 1 In 2 In 3 In 4 OUT B Mute On OFF 1 OUT A Source Select the audio source to pair with video output A 2 OUT A Mute Enable or disable muting audio output A 3 OUT B Source Select the audio source to pair with video output B 4 OUT B Mute Enable or disable muting audio output B ...

Страница 22: ...e On OFF OUT B Source WIN 1 Win 2 Win 3 Win 4 In 1 In 2 In 3 In 4 OUT B Mute On OFF 1 OUT A Source Select the audio source to pair with video output A 2 OUT A Mute Enable or disable muting audio output A 3 OUT B Source Select the audio source to pair with video output B 4 OUT B Mute Enable or disable muting audio output B ...

Страница 23: ...s All EDID IN 4 EDID Same as All EDID User 1 Update NO Yes User 2 Update NO Yes User 3 Update NO Yes User 4 Update NO Yes 1 EDID Mode Select how to assign EDIDs to the unit s inputs Selecting Appoint allows for a different EDID to be assigned to each input selecting All allows for a single EDID to be assigned to all inputs 2 All EDID Select the EDID to assign to all inputs Note Only available in t...

Страница 24: ...patible and properly named EDID_User_ BIN EDID file HDCP MODE 2ND LEVEL 3RD LEVEL In 1 4 HDCP Support Off REFER TO SOURCE Refer to Display OUT A Current HDCP status display OUT B Win 1 Win 2 Win 3 Win 4 1 In 1 4 Select the HDCP behavior for each input HDCP Support Off Completely disables support for HDCP on that input Refer to Source Makes the input port support the same HDCP version as required b...

Страница 25: ...60p30 1280 768p60 4K p24 DCI 1280 800p60 4K p25 DCI 1280 960p60 4K p30 DCI 1280 1024p60 4K p50 DCI 1360 768p60 4K p59 DCI 1366 768p60 4K p60 DCI 1400 1050p60 3840 2160p50 1440 900p60 3840 2160p59 1600 900p60RB 3840 2160p60 1600 1200p60 Native OUT A 1680 1050p60 Native OUT B 1920 1080p24 1 Output Resolution Select the preferred video output resolution Note Both outputs always share the same resolut...

Страница 26: ...et the length of time in seconds that the OSD menu will continue to be displayed if there is no user input or disable the timeout completely 3 Info Timeout Set the length of time in seconds that the informational OSD will be displayed after a signal or source change or disable the timeout completely 4 Info Display Enable or disable the informational OSD 5 Transparency Set the transparency level of...

Страница 27: ...ecting yes will reset the logo and install a default test image Note The reset process can take a few moments Progress information will be displayed on the OSD while the default logo is being installed The unit will automatically reboot when it is finished 4 Logo Update To upload a graphic logo via USB select Yes and then insert a USB stick containing the new logo graphic file 8 bit BMP format 960...

Страница 28: ...ess Current Network Info Subnet Mask Gateway MAC Addr Unit s MAC Address 1 IP Mode Set the unit s IP address mode to Static or DHCP 2 Static IP Config When the unit is in Static IP mode the IP address netmask and gateway addresses may be manually set here Changes will occur immediately Note Only editable in Static IP mode 3 Link Status Displays the unit s current IP configuration and the unit s MA...

Страница 29: ...d then press the ENTER button to store the unit s current video window configuration to the currently selected preset 2 Recall Preset 1 4 Select a preset and then press the ENTER button to activate the currently selected preset SETUP 2ND LEVEL 3RD LEVEL Auto Sync Off ALWAYS ON 5 sec 10 sec 15 sec 30 sec 1 min 1 5 min 2 min 2 5 min 3 min 5 min 10 min ...

Страница 30: ...utput sync 2 Firmware Update To update the firmware via USB select Yes and then insert a USB stick containing the new firmware into the Service port The upload will occur immediately Note The USB stick must contain in the root directory a compatible and properly named BIN firmware file 3 User EDID Reset Select Yes to reset the unit s User EDIDs to their factory default states 4 Factory Reset Selec...

Страница 31: ...o Mode Current Mode Sink A Native Native resolutions as reported by EDID Sink B Native Firmware Current Firmware Versions RX3 RX4 Firmware 1 Information Shows the currently detected details for all inputs and both outputs as well as listing the status of a few critical system settings and relevant firmware versions ...

Страница 32: ...ult IP address is 192 168 1 50 By clicking on one of the listed devices you will be presented with the network details of that particular device 1 IP Mode If you choose you can alter the static IP network settings for the device or switch the unit into DHCP mode to automatically obtain proper network settings from a local DHCP server To switch to DHCP mode please select DHCP from the IP mode drop ...

Страница 33: ... left side of the browser you will see the following menu tabs where all primary functions of the unit are controllable via the built in WebGUI The individual functions will be introduced in the following sections Clicking the red Logout tab will automatically log the currently connected user out of the WebGUI and return to login page Clicking on the Power button will toggle the unit s current pow...

Страница 34: ...e output resolution even in Matrix mode Sink A B Native Displays the native resolution of both connected displays as reported by their respective EDIDs 3 Video Mode Video Mode Use the dropdown to select the unit s operational mode Available options are Matrix PiP PoP Quad and Presets 1 4 Note Switching between video modes will cause the output to briefly go to black but audio output will not be af...

Страница 35: ...he dropdown to select the window to modify In Matrix mode select the input to modify Note Changes made while a Preset video mode is selected will automatically be applied and saved to that preset 2 Display Enable or disable the currently selected window Note Not available in Matrix mode 3 Position X Y Set the X and Y coordinate position of the upper left corner of the currently selected window Cli...

Страница 36: ...ntally 8 Border This switch enables or disables the color border around the currently selected window or input 9 Border Color Use the dropdown to select the color to use for the border of the currently selected window input Available colors are Black red green blue yellow magenta cyan white dark red dark green dark blue dark yellow dark magenta dark cyan gray 10 Reset Reset the current window inpu...

Страница 37: ...tly selected source video 4 Brightness This slider provides control over the overall brightness of the currently selected source video 5 Saturation This slider provides control over the overall saturation of the currently selected source video 6 Hue This slider provides control over the hue shift of the currently selected source video 7 Sharpness H V These sliders provide control over the amount o...

Страница 38: ...ays use the audio from the specified input WIN 1 4 Always use audio from the source currently displayed in the specified window Note WIN 2 4 is not available as a source in Matrix mode 2 OUT B Source Use the dropdown to choose the audio source to pair with video output A IN 1 4 Always use the audio from the specified input WIN 1 4 Always use audio from the source currently displayed in the specifi...

Страница 39: ...be assigned to each input selecting All allows for a single EDID to be assigned to all inputs 2 All EDID Select the EDID to assign to all inputs Click on the Save button to activate the selected EDID across all inputs Note Only available in All EDID Mode 3 IN 1 4 EDID Select the EDID to assign to the specified input Click on the associated Save button to activate the selected EDID Note Only availa...

Страница 40: ...o one of the 3 default EDIDs for maximum compatibility 6 5 6 HDCP Mode Status Tab This tab provides control over the HDCP settings for all inputs and displays the current status for all inputs and outputs 1 HDCP Mode Input 1 4 Use the dropdown to select the HDCP behavior for each input HDCP Support Off Completely disables support for HDCP on that input Refer to Source Makes the input port support ...

Страница 41: ...ntinue to be displayed if there is no user input or disable the timeout completely 3 Info Timeout Set the length of time in seconds that the informational OSD will be displayed after a signal or source change or disable the timeout completely 4 Info Display Enable or disable the informational OSD 5 Menu Transparency Set the transparency level of the background of the OSD menu with a range from Off...

Страница 42: ...t will automatically reboot when it is finished 3 Position X Y Sets the position of the logo s upper left corner within the output The position values are a relative percentage of the available output resolution 4 Logo Update To upload a graphic logo please click the Choose File button to open the file selection window and then select the graphic logo file 8 bit bmp format 960 540 max resolution l...

Страница 43: ... access will also change accordingly 1 IP Mode Click this button to toggle between the Static IP and DHCP modes In DHCP mode the unit will attempt to automatically obtain its IP configuration details from a local DHCP server In Static mode the unit will use the manually assigned IP configuration information 2 Static IP Config When the unit is in Static IP mode the IP address netmask and gateway ad...

Страница 44: ...are no live sources and no operations have been executed on the unit Setting this to Always On forces the unit to always output sync 4 Firmware Update To update the unit s firmware click the Choose File button to open the file selection window and then select the firmware update file bin format located on your local PC After selecting the file click the Upgrade button to begin the firmware update ...

Страница 45: ...ength of time to wait in minutes before logging out a user due to inactivity Setting this to 0 disables the timeout 6 5 11 Information Tab This tab displays the unit s serial number as well as the current firmware versions ...

Страница 46: ...r authorized dealer and save it in a directory where you can easily find it Both Windows and macOS versions are available To use the software connect the unit to your PC via the provided USB 3 0 cable and then execute the control application A configuration window similar to the screenshot below will appear All changes made to the video capture signal via this app will take effect immediately 1 Au...

Страница 47: ...and audio settings when video capture is active Note Changes to these settings have no impact on the HDMI bypass output signal Brightness Provides control over the overall brightness of the captured video Contrast Provides control over the overall contrast of the captured video Hue Provides control over the hue shift of the captured video Saturation Provides control over the color saturation level...

Страница 48: ...n Broadcaster Software streaming software among many other choices Availability and access to the controllable features of the unit such as capture resolution recording storage format etc depends on which features the specific capture software package chooses to expose Note Many source devices such as most major video game consoles force HDCP output by default even when it is not required by the c...

Страница 49: ...he unit we wish to control and commands may now be entered directly Note 1 If the IP address of the unit is changed then the IP address required for Telnet access will also change accordingly Note 2 The default IP address is 192 168 1 50 and the default communication port is 23 6 8 Serial and Telnet Commands Multiviewer COMMAND Description and Parameters help Show the full command list help N1 Sho...

Страница 50: ...console command feedback broadcast state set ip mode N1 Set the IP address assignment mode Available values for N1 STATIC Static IP mode DHCP DHCP mode get ip mode Show the current IP address assignment mode get ipconfig Show the unit s current IP configuration information get ipaddr Show the unit s current IP address get netmask Show the unit s current netmask get gateway Show the unit s current ...

Страница 51: ...ddress get static gateway Show the unit s static gateway address set webgui username N1 Set the WebGUI login username N1 Username 16 characters max get webgui username Show the current WebGUI login username set webgui password N1 Set the WebGUI login password N1 Password 16 characters max get webgui password Show the current WebGUI login password set webgui login timeout N1 Set the WebGUI inactivi...

Страница 52: ...ername N1 Username 16 characters max get telnet username Show the current Telnet login username set telnet password N1 Set the Telnet login password N1 Password 16 characters max get telnet password Show the unit s Telnet access port set window layout mode N1 Set the window layout mode Available values for N1 0 Matrix mode 1 PiP mode 2 PoP mode 3 Quad mode 4 Preset 1 5 Preset 2 6 Preset 3 7 Preset...

Страница 53: ...number Note Valid in multi windowing modes only set out N1 route N2 Route the specified input to the specified output N1 A B Output port N2 1 4 Input port Note Valid in matrix mode only get out N1 route Show the current input routed to the specified output N1 A B Output port Note Valid in matrix mode only set window N1 display N2 Enable or disable the specified window N1 1 4 Window number Availabl...

Страница 54: ...ent horizontal position of the specified window N1 1 4 Window number Note Valid in multi windowing modes only set window N1 vposition N2 Set the vertical position of the specified window N1 1 4 Window number N2 0 Max res Vertical size Note Valid in multi windowing modes only get window N1 vposition Show the current vertical position of the specified window N1 1 4 Window number Note Valid in multi ...

Страница 55: ... res Vertical size Note Valid in multi windowing modes only get window N1 vsize Show the current vertical size of the specified window N1 1 4 Window number Note Valid in multi windowing modes only set window N1 priority N2 Set the priority of the specified window N1 1 4 Window number N2 1 4 Priority Note Valid in multi windowing modes only get window N1 priority Show the current priority of the sp...

Страница 56: ...ow number set window N1 mirror N2 Set the mirror mode of the specified window N1 1 4 Window number Available values for N2 ON Enabled OFF Disabled get window N1 mirror Show the current mirror mode of the specified window N1 1 4 Window number set window N1 border N2 Set the border mode of the specified window N1 1 4 Window number Available values for N2 ON Enabled OFF Disabled get window N1 border ...

Страница 57: ... Dark Blue 12 Dark Yellow 13 Dark Magenta 14 Dark Cyan 15 Gray get window N1 border color Show the current border color of the specified window N1 1 4 Window number set window N1 reset Reset the settings of the specified window N1 1 4 Window number set in N1 contrast N2 Set the contrast level of the specified input N1 1 4 Input port N2 0 100 Contrast level get in N1 contrast Show the current contr...

Страница 58: ...ration level of the specified input N1 1 4 Input port N2 0 100 Saturation level get in N1 saturation Show the current saturation level of the specified input N1 1 4 Input port set in N1 hue N2 Set the hue value of the specified input N1 1 4 Input port N2 0 100 Hue value get in N1 hue Show the current hue value of the specified input N1 1 4 Input port set in N1 sharpness h N2 Set the horizontal sha...

Страница 59: ...t N2 0 20 Vertical sharpness level get in N1 sharpness v Show the current vertical sharpness level of the specified input N1 1 4 Input port set in N1 picture reset Set the picture settings reset N1 1 4 Input port set audio out N1 mute N2 Enable or disable muting the specified audio output N1 A B Output port Available values for N2 ON Mute OFF Unmute get audio out N1 mute Show the current mute stat...

Страница 60: ...audio source routed to the specified audio output N1 A B Output port set all in edid mode N1 Select the EDID management mode to use All or Appoint for all inputs Available values for N1 1 All mode 2 Appoint mode get all in edid mode Show the current EDID management mode used by all inputs set all in edid N1 Set the EDID to use when the All EDID mode is active Available values for N1 1 FHD 2 Channe...

Страница 61: ...ser 3 10 User 4 15 Sink A 16 Sink B get in N1 edid Show the EDID currently being used on the specified input N1 1 4 Input port set user edid N1 update Upload a new EDID for use as the specified User EDID N1 1 4 User EDID number set in N1 hdcp mode N2 Set the HDCP behavior of the specified input N1 1 4 Input port Available values for N2 0 HDCP off 1 Refer to Source 2 Refer to Display get in N1 hdcp...

Страница 62: ...60 8 1280x768p60 9 1280x800P60 10 1280x960p60 11 1280x1024p60 12 1360x768P60 13 1366x768p60 14 1400x1050p60 15 1440x900p60 16 1600x900p60rb 17 1600x1200p60 18 1680x1050p60 19 1920x1080p24 20 1920x1080p25 21 1920x1080p30 22 1920x1080p50 23 1920x1080p60 24 1920x1200rb 25 3840x2160p24 26 3840x2160p25 27 3840x2160p30 28 4K p24 DCI 29 4K p25 DCI 30 4K p30 DCI 31 4K p50 DCI 32 4K p59 DCI 33 4K p60 DCI 3...

Страница 63: ...t 2 Bottom Right 3 Bottom Left get out A osd position Show the current OSD menu location set out A osd timeout N1 Set the OSD menu s timeout value in seconds Available values for N1 OFF Disabled 5 60 Timeout in seconds get out A osd timeout Show the current OSD menu s timeout value set out A osd info display N1 Enable or disable the info OSD Available values for N1 ON Enabled OFF Disabled get out ...

Страница 64: ... background color N1 Set the color of the background of the OSD banner Available values for N1 0 Black 1 Gray 2 Blue get out A osd background color Show the current color of the background of the OSD banner on the specified output set out A osd logo display N1 Enable or disable the graphical logo overlay Available values for N1 ON Enabled OFF Disabled get out A osd logo display Show the current st...

Страница 65: ... logo default Resets the logo and installs a default test image set osd logo update Initiates the logo update process via USB set save preset N1 Saves the current unit s settings to the specified preset N1 1 4 Preset number set auto sync off N1 Enable or disable the Auto Sync Off function and set the timeout length Available values for N1 0 Always on 1 5 seconds 2 10 seconds 3 15 seconds 4 30 seco...

Страница 66: ... unit s User EDIDs to their factory default settings set factory ipconfig default Reset the unit s network settings to the factory defaults set factory default Restore the unit s settings except for User EDIDs to their factory default settings Note Commands will not be executed unless followed by a carriage return Commands are not case sensitive ...

Страница 67: ...N HDMI IN 1 2 3 4 HDMI OUT A CAPTURE CONTROL RS 232 DC 24V Conference PC Vital Sign Endoscope Ultrasound Microphone Environment Camera UHD TV HDMI TV Display PC laptop HDMI Output HDMI Output Stereo Input USB HDMI Input HDMI Input HDMI Input HDMI Input ...

Страница 68: ...V 2 7A DC US EU standards CE FCC UL certified Power Supply Vid Capture Powered via USB 3 0 0 9A minimum ESD Protection HBM 8kV Air Discharge 4kV Contact Discharge Dimensions W H D 213 5mm 43mm 158mm Case Only 231 5mm 44mm 161mm All Inclusive Weight 1 135g Chassis Material Metal Steel Chassis Color White Operating Temperature 0 C 40 C 32 F 104 F Storage Temperature 20 C 60 C 4 F 140 F Relative Humi...

Страница 69: ... 720 480p 60 720 576i 50 720 576p 50 800 600p 56 60 72 75 85 60Hz 848 480p 60 1024 768p 60 70 75 85 60Hz 1152 864p 75 1280 720p 50 60 1280 768p 60 75 85 60Hz 1280 800p 60 75 85 60Hz 1280 960p 60 85 60Hz 1280 1024p 60 75 85 60Hz 1360 768p 60 1366 768p 60 1400 1050p 60 1440 900p 60 75 60Hz 1600 900p 60RB 1600 1200p 60 1680 1050p 60 1920 1080i 50 60 1920 1080p 24 25 30 1920 1080p 50 60 ...

Страница 70: ...ut 1920 1200p 60RB 2560 1440p 60RB 2560 1600p 60RB 2048 1080p 24 25 30 2048 1080p 50 60 3840 2160p 24 25 30 3840 2160p 50 60 4 2 0 3840 2160p 24 HDR10 3840 2160p 50 60 4 2 0 HDR10 3840 2160p 50 60 4096 2160p 24 25 30 4096 2160p 50 60 4 2 0 4096 2160p 24 HDR10 4096 2160p 50 60 4 2 0 HDR10 4096 2160p 50 60 ...

Страница 71: ...nition Multiviewer HDMI Inputs 3 4 LPCM Max Channels 2 Channels Sampling Rate kHz 48 Bitstream Supported Formats None Video Capture HDMI Input Output LPCM Max Channels 8 Channels Sampling Rate kHz 32 44 1 48 88 2 96 176 4 192 Bitstream Supported Formats Standard High Definition Video Capture USB Output LPCM Max Channels 2 Channels Sampling Rate kHz 32 44 1 48 88 2 96 176 4 192 Bitstream Supported ...

Страница 72: ...MI Input 15m 10m 5m 3m HDMI Output 15m 10m 5m 3m Bandwidth Category Examples 1080p FHD Video Up to 1080p 60Hz 12 bit color Data rates lower than 5 3Gbps or below 225MHz TMDS clock 4K30 4K UHD Video 4K 24 25 30Hz 4K 50 60Hz 4 2 0 8 bit color Data rates higher than 5 3Gbps or above 225MHz TMDS clock but below 10 2Gbps 4K60 4K UHD Video 4K 50 60Hz 4 4 4 8 bit 4K 50 60Hz 4 2 0 10 bit HDR Data rates hi...

Страница 73: ...Digital Visual Interface EDID Extended Display Identification Data Gbps Gigabits per second GUI Graphical User Interface HDCP High bandwidth Digital Content Protection HDMI High Definition Multimedia Interface HDR High Dynamic Range HDTV High Definition Television IP Internet Protocol kHz Kilohertz LAN Local Area Network LED Light Emitting Diode LPCM Linear Pulse Code Modulation MAC Media Access C...

Страница 74: ...rential Signaling UAC USB Audio Class 4K UHD 4K Ultra High Definition 10 2Gbps max 4K UHD 4K Ultra High Definition 18Gbps max UHDTV Ultra High Definition Television USB Universal Serial Bus UVC USB Video Class VGA Video Graphics Array WUXGA RB Widescreen Ultra Extended Graphics Array Reduced Blanking XGA Extended Graphics Array Ω Ohm ...

Страница 75: ......

Страница 76: ...CYPRESS TECHNOLOGY CO LTD www cypress com tw ...

Отзывы: