background image

After Video and Audio Cables are Connected and Power is Applied

Once the DVD Player is properly connected to your TV and possibly your receiver also, turn on your TV and make 
sure it’s set to the correct input channel. The video input is usually configured as channel 0 or 1 on most TVs, but 
may be referred to as “Input 1” or “Aux In” or similar names. These procedures assume you are using a NTSC-
compatible TV - standard for North and South America. If you are using a PAL-type, you will need to change the TV 
Type first. In this case, see 

Adjusting Audio and Video Settings

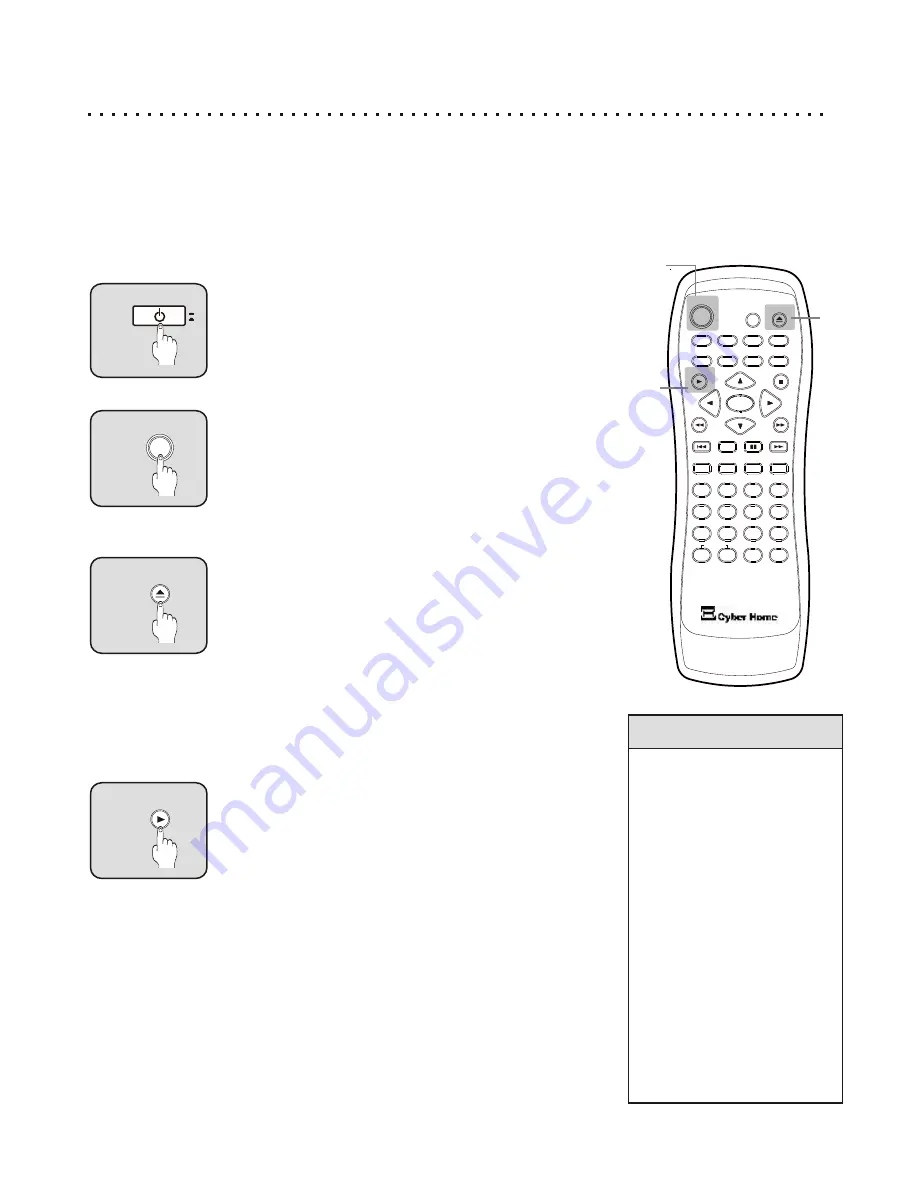
Power on the DVD Player

Push the Power button firmly to turn on the player. You 
should see the message “ON” in the DVD Display. Then, the 
player will attempt to read a disc. With no disc in the unit, the 
message INSERT DISC will be displayed. 

5

4

6

C

+10

2

1

3

8

7

9

0

ZOOM

EFFECT

1/ALL

REPEAT

RETURN

SLOW

SUBTITLE

AUDIO

ANGLE

POWER

GOTO

PBC

SETUP

OPEN/CLOSE

TITLE

DISPLAY

PROG

MENU

A-B

BOOKMARK

INTRO

PAUSE

ENTER

PLAY

STOP

MUTE

POWER

1

OFF

ON

Quick Tips

About Standby Mode

Ÿ

Your DVD Player is 
equipped with a power-
saving feature called 
STANDBY MODE. When 
you press POWER on the 
Remote to turn off the 
unit, it will enter standby 
mode, indicated by a 
glowing LED to the left of 
the disc try, where it can 
be quickly awakened by 
pressing POWER again.

Ÿ

When the unit has not 
been used for a length of 
time - about 25 minutes - 
the unit will automatically 
enter standby mode to 
save power. 

2

POWER

3

OPEN/CLOSE

Powering on from the Remote

Once the power button is pushed in, the unit can be turned 
off and on by the remote. When the unit is turned off by the 
remote, it will go into STANDBY MODE. This allows the unit 
to be quickly “awakened” by pressing the POWER key on 
the remote again. When the unit is in standby mode, the 
standby LED, located to the left of the disc tray, will glow. 

Opening the Disc Tray

Press the OPEN/CLOSE button on the remote or on the 
player (to the right of the disc tray) to insert a disc. There are 
two grooves in the disc tray - 12cm and 8cm. Make sure the 
disc is properly set into the tray. Small 8cm discs must be 
positioned exactly in the middle groove. Press the 
OPEN/CLOSE button again to close the disc tray. You will 
see the message READ on the display. Once the disc is 
read, you should see the menu screen for DVD discs, or 
hear sound for an Audio CD. If a menu is present on the 
disc, you will see the word ROOT displayed. This lets you 
know you are at the beginning menu of the disc. 

4

PLAY

2

3

4

The Play Button

Most DVDs will automatically display a “root” (first layer) 
menu when inserted. However, some discs will require you 
to press the PLAY button. Also, the PLAY button can usually 
be used to quickly start a DVD movie when pressed with the 
root menu displayed. This function varies with discs. 

Getting Started - Powering On & Playing a Disc

15

Содержание CH-DVD 402/S

Страница 1: ...ed to provide a great Home Theater experience with super crisp Video and thundering Digital Sound Please retain this User Manual for future reference Remember to read the manual carefully before conne...

Страница 2: ...ther objects inside Use only with the cart stand tripod bracket or table specified by the Touching internal parts of this unit is dangerous and may cause manufacturer or sold with the apparatus When a...

Страница 3: ...ayback Functions Fast Forward Reverse Slow Motion Scanning 18 Skip Forward and Skip Back 18 Jumping to a Specific Chapter Track or Time Position 19 Previewing Titles Chapters or Tracks Before Playback...

Страница 4: ...most convenient way Parental Control allows you to block discs with a Direct track selection function MP3 and CD password depending on the rating Number buttons can be used for quick selection Standb...

Страница 5: ...ducts or solutions which contain benzene thinner or any other vaporizing substances as they may damage the disc surface Never add labels or adhesive tapes on the discs and be careful not to scratch or...

Страница 6: ...If the unit will not be used for an extended length of time it s wise to remove the batteries before storage The life of the batteries depends on the amount of usage With typical use a battery life o...

Страница 7: ...on TITLE Used to enter the Title Menu supported on some VCD and DVD discs MENU Press to enter the menu of a DVD or VCD disc Also used to enable or disable PBC mode for VCDs that support this feature...

Страница 8: ...udio CDs EFFECT Enables Reverb effects for Audio CDs and MP3 Discs and equalization presets with DVD discs Press repeatedly to cycle through available effects ZOOM Press to zoom in or out during playb...

Страница 9: ...ck Fast Reverse Multi Speed Fast Reverse search during playback Stop Press to stop play but hold resume location Press again to completely stop play and reset playback to beginning of disc Play Pause...

Страница 10: ...ul information Some functions require specific disc formats or features DVD Display Functions 10 Dimming the Front VFD Display Adjusting the Brightness of the Front Display With NO DISC in the unit an...

Страница 11: ...ONENT VIDEO VIDEO OUT Component Video Connectors Y Cr Cb connectors for use with TVs compatible with Component Video AC Power Inlet Insert the power cord here first Then plug other end to AC Outlet 12...

Страница 12: ...ECEIVER DIGITAL AUDIO IN STEREO AUDIO IN R RED L WHITE 2 BETTER S VIDEO IN Page 13 TV S Video Stereo Audio COAXIAL CoAxial Digital Audio 4 Page 14 Television Connections One Required In order to use y...

Страница 13: ...may be called Input 1 or Aux In You should now see the DVD Player s splash screen on your TV 1 Connecting to a TV with S Video In and Stereo Audio In If your TV has an S Video Input it s recommended...

Страница 14: ...Connecting to a TV with Component Video Inputs In order to enjoy the highest Video Quality available from your DVD Player you must use a TV equipped with Component Video Inputs If your TV supports Com...

Страница 15: ...When the unit has not been used for a length of time about 25 minutes the unit will automatically enter standby mode to save power 2 POWER 3 OPEN CLOSE Powering on from the Remote Once the power butt...

Страница 16: ...USE ENTER PLAY STOP MUTE 1 2 2 Pausing Disc Play With DVDs and VCDs you can pause playback on a still frame with the PAUSE button Pressing the PAUSE button again resumes normal playback Sound is muted...

Страница 17: ...described above will be displayed Used with Video CDs pressing this button will Enable Disable the PBC Play Back Control menu system With PBC enabled the disc menu will be shown The disc will simply...

Страница 18: ...and Video CDs you can slow the speed of playback to a mere fraction of the normal speed VCDs support only forward Slow Motion scanning While the video is playing press the SLOW button The playback spe...

Страница 19: ...sing GOTO again will allow you to enter the time Hours Minutes and Seconds of the position on the disc you wish to begin playback For VCDs and Audio CDs pressing GOTO once while play is stopped will a...

Страница 20: ...VDs and VCDs you ll be given a choice of preview options on screen These options will depend on the type of disc and whether or not playback mode is active In Stop Mode using a DVD disc you can choose...

Страница 21: ...R BOOKMARK 1 Pause Disc Playback You ll probably want to Pause playback at the point where you wish to add a Bookmark before accessing the Bookmark Menu although this is not required You may also want...

Страница 22: ...epeat Play simply press the REPEAT A ALL button until the Screen no longer displays a repeat option icon REPEAT 11 ALL A B REPEAT 11 ALL A B If you would like to repeat only a segment of an Audio Trac...

Страница 23: ...r buttons along with the C Clear and 10 keys to enter the Track or Chapter you want to play in each position If you wish to clear an entry press the C button repeatedly to backspace through the digits...

Страница 24: ...ollowing choices by pressing the REPEAT 1 ALL Button Normal Simply plays the files normally with no Repeat functions active Single Play only one file Plays the current track and Stops Repeat One Repea...

Страница 25: ...You can also use the PROG button to select a different Program Mode which determines how the files are organized and displayed This functionality is the same as with MP3 files and is covered on pg 24...

Страница 26: ...Zoom Out to 1 3 or 1 4 size Zoom works on a still frame as well as during Video Play 1 Pause Disc Playback Optional Zoom is most effective if you Pause the video on a single frame to examine However...

Страница 27: ...ed on the disc including DTS Dolby Digital 5 1 and Stereo Audio Video and Audio CDs offer fewer audio options including Mono Left Right Mix Mono and Stereo ANGLE 4 Multi Angle Support ANGLE BUTTON Som...

Страница 28: ...must completely stop disc play Press the STOP button twice to stop play of the disc With Audio CDs VCDs and DVDs after the STOP button is pressed once the message HOLD will be displayed on front of th...

Страница 29: ...the rating you specify When the parental control is set DVD discs that support Parental Control will play only after the correct password has been entered Non supporting discs however will be immune t...

Страница 30: ...d to use the Downmix feature when watching these movies with only a Stereo TV or Receiver There are two Downmix options LT RT and STEREO The STEREO setting should be used for most Televisions and Ster...

Страница 31: ...keys to adjust the Brightness and Contrast Setup Enter VIDEO SETUP PAGE TV DISPLAY SHARPNESS BRIGHTNESS MAIN PAGE MULTI TV TYPE PAL NTSC CONTRAST To Reset to NTSC STOP SETUP DOWN ARROW DOWNARROW ENTER...

Страница 32: ...een Display menus This will make it easier to change other options with the Setup Menu AUDIO SUBTITLE DISC MENUS ENGLISH FRENCH ETC You can set the player to use a preferred language for DVDAudio Trac...

Страница 33: ...ake sure the disc is not in upside down The region code of the disc may not match that of the player In this case the disc cannot be used The Disc Doesn t Eject If the player is in Standby Mode with t...

Страница 34: ...than 0 015 Wow and Flutter Less than 0 001 W PEAK Connections Component Video Out Y 1 0Vpp 75 Ohm Negative Sync Pb Pr 7 Vpp 75 Ohm S Video Out Mini DIN 4 Pin 75 Ohm Video Out One Pin Jack 1Vpp 75 Ohm...

Страница 35: ...al Theater System Another digital surround sound system with 5 1 channels DTS is supported on some newer DVD discs Dual Layer DVD A DVD disc that has two layers on each side A single sided dual layere...

Страница 36: ...onnection your TV must have an S Video input VCD Digital Video Disc Adigital video disc format particularly popular in Asia Uses MPEG 1 video compression The picture quality is roughly that of VHS tap...

Страница 37: ...reset connections 11 12 14 TV Type 31 SETUP Factory Defaults 29 discs 4 5 return button 8 display button 7 reverse button 7 display panel 10 safety precautions 2 effect button 8 screen saver 16 effec...

Отзывы: