

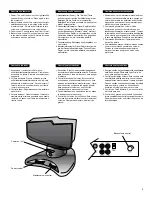
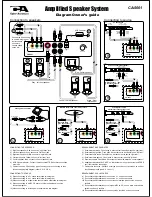

CONECTANDO LOS PARLANTES
1) Parlante derecho frontal -. Rojo, conéctelo al receptáculo "right front"
(derecho-frontal).
2) Parlante izquierdo-frontal. Gris, conéctelo al receptáculo "left front"
(izquierdo-frontal).
3) Parlante derecho-trasero. Blanco, conéctelo al receptáculo "right rear"
(derecho-trasero).
4) Parlante izquierdo-trasero. Amarillo, conéctelo al receptáculo "left rear"
(izquierdo-trasero)
5) Parlante central. Azul, conéctelo al receptáculo "center speaker" (parlante
central)
6) Adaptador de potencia CA/CC. Conectarlo a la toma en la pared
después de hacer todas las demás conexiones.
7) Cables a la fuente. Revise a que tipo de fuente los esta conectando y
luego siga el diagrama apropiado. (sea 8,9,10, ú 11).
Conectando a la fuente
8) Cuando los está conectando a una tarjeta de sonido 5.1 siga este diagrama.
9) Cuando los está conectando a una tarjeta de sonido 4.1 siga este diagrama.
10) Cuando los esta conectando a una tarjeta de sonido normal con dos
canales siga este diagrama.
11) Cuando los esta conectando a un Reproductor MP3, de CD u otra fuente
de sonido portátil use este Diagrama
12) Cuando los esta conectando a una consola de video juegos siga este
diagrama.
COLLEGAMENTO DEGLI ALTOPARLANTI:
1) Altoparlante anteriore destro. Rosso, collegarlo al jack "right front (anteriore destro)"
2) Altoparlante anteriore sinistro. Grigio, collegarlo al jack "left front (anteriore sinistro)"
3) Altoparlante posteriore destro. Bianco, collegarlo al jack "right rear (posteriore
destro)"
4) Altoparlante posteriore sinistro. Giallo, collegarlo al jack "left rear (posteriore sinistro)"
5) Altoparlante centrale. Blu, collegarlo al jack "center speaker (altoparlante centrale)"
6) Adattatore di alimentazione CA/CC. Collegarlo alla presa a muro DOPO aver
terminato tutti gli altri collegamenti.
7) Cavi alla fonte: verificare a quale tipo di fonte si stia effettuando il collegamento,
quindi attenersi a quanto riportato sul relativo schema ( 8, 9 O 11).
COLLEGAMENTO ALLA FONTE:
8) Per il collegamento alla scheda audio 5.1, seguire questo schema.
9) Per il collegamento alla scheda audio 4.1, seguire questo schema.
10) Per il collegamento ad una scheda audio standard a due canali, seguire questo
schema.
11) Per il collegamento ai lettori MP3, CD o ad altra fonte audio portatile, seguire
questo schema.
12) Per il collegamento alla consolle di un videogioco, seguire questo schema.
ANSCHLUSS DER LAUTSPRECHER:
1) Lautsprecher vorne rechts. Rot, anschließen an "right front" Buchse.
2) Lautsprecher vorne links. Grau, anschließen an "left front" Buchse.
3) Lautsprecher hinten rechts. Weiß, anschließen an "right rear" Buchse.
4) Lautsprecher hinten links. Gelb, anschließen an "left rear" Buchse.
5) Center Lautsprecher. Blau, anschließen an "Center speaker" Buchse.
6) AC/DC Netzstecker. In die Steckdose einstecken, NACHDEM alle
Verbindungen hergestellt wurden.
7) Kabel zur Quelle: Überprüfen Sie, welche Quelle Sie anschließen und
befolgen Sie die entsprechende Abbildung (entweder 8, 9, 10 oder 11).
ANSCHLUSS AN DIE QUELLE:
8) Für den Anschluss an eine 5.1 Soundkarte befolgen Sie bitte diese Abbildung
9) Für den Anschluss an eine 4.1 Soundkarte befolgen Sie bitte diese Abbildung
10) Für den Anschluss an eine normale Zweikanal-Soundkarte befolgen Sie
bitte diese Abbildung
11) Für den Anschluss an einen MP3, CD-Player bzw. eine andere tragbare
Audioquelle befolgen Sie bitte diese Abbildung
12) Für den Anschluss an eine Videospiel-Konsole befolgen Sie bitte dieses
Diagramm.
FAZER AS LIGAÇÕES DAS COLUNAS:
1) Coluna frontal direita. Vermelho, ligue à tomada "right front".
2) Coluna frontal esquerda. Cinzento, ligue à tomada "left front".
3) Coluna traseira direita. Branco, ligue à tomada "right rear".
4) Coluna traseira esquerda. Amarelo, ligue à tomada "left rear".
5) Coluna central. Azul, ligue à tomada "center speaker".
6) Adaptador de corrente AC/DC. Ligue à tomada da parede DEPOIS de todas
as ligações terem sido feitas.
7) Cabos para fonte: verifique que tipo de fonte é que está a ligar e siga o
diagrama adequado (ou 8, 9, 10, OU 11).
LIGAR À FONTE:
8) Quando ligar a uma placa de som 5.1 siga as indicações deste diagrama.
9) Quando ligar a uma placa de som 4.1, siga as indicações deste diagrama.
10) Quando ligar a uma placa de som normal de dois canais, siga as indicações
deste diagrama.
11) Quando ligar a um leitor de CD, MP3 ou qualquer outro tipo de áudio portátil,
siga as indicações deste diagrama.
12) Quando ligar a uma consola de jogos, siga as indicações deste diagrama.
Содержание CA-5001
Страница 2: ......


