background image

BRANCHEMENT DES ENCEINTES
1)  Enceinte avant droite. Fiche rouge, à brancher sur la douille marquée "right front".
2)  Enceinte avant gauche. Fiche grise, à brancher sur la douille marquée "left front".
3)  Enceinte arrière droite. Fiche blanche, à brancher sur la douille "right rear".
4)  Enceinte arrière gauche. Fiche jaune, à brancher sur la douille "left rear".
5)  Enceinte centrale. Fiche bleue, à brancher sur la douille marquée "center speaker".
6)  Adaptateur d'alimentation CA/CC, ne le brancher sur une prise secteur qu'APRES

avoir fait toutes les connexions.

7)  Câbles vers la source : Vérifier à quel type de source vous raccordez, en suivant

le schéma approprié (soit 8, 9 10 ou 11).

BRANCHEMENT SUR LA SOURCE :
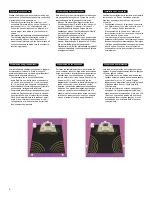
8)  En connectant l'installation sur une source 5.1, suivez ce schéma. :
9)  En connectant l'installation sur une source 4.1, suivez ce schéma. :
10) En connectant l'installation sur une carte son classique à deux voies, suivez ce

schéma :

11) En connectant l'installation sur un lecteur MP3 ou CD, ou une autre source audio

portable, suivez ce schéma :

12) En connectant l'installation sur une console de jeu vidéo, suivez ce schéma :

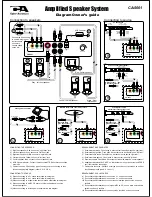
CONNECTING THE SPEAKERS:
1) Right front speaker. Red, connect to "right front" jack
2) Left front speaker. Grey, connect to "left front" jack
3) Right rear speaker. White, connect to "right rear" jack.
4) Left rear speaker. Yellow, connect to "left rear" jack.
5) Center speaker. Blue, connect to "center speaker" jack.
6) AC/DC power adapter. Connect to wall socket AFTER all other connections

are made.

7) Cables to source: Check which type of source you are connecting to then

follow the appropriate diagram (either 8, 9 10 OR 11).

CONNECTING TO SOURCE:
8) When connecting to a 5.1 sound card follow this diagram
9) When connecting to a 4.1 sound card follow this diagram
10) When connecting to a regular two channel sound card follow this diagram
11) When connecting to a MP3, CD player or other portable audio source

follow this diagram.

12) When connecting to a video game console follow this diagram.
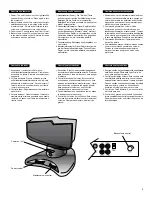
INPUT

Center

Front

Rear

Sub V/C

DC 15V

To Right

Speaker

Center Right Rear

Left Front Left Rear

CA-5001

Connecting to source

Connecting to speakers

Consult the “connecting

to source” diagram for

instructions to

connect to

various sound

cards, etc.

AC/DC adapter

Gray - Left front speaker

Red - Right front speaker

Blue - Center speaker

Yellow - Left rear speaker

White - Right

rear speaker

8

9

10

11

12

INPUT

Center

Front

Rear

CA-5001

Black

Plug

(rear)

Green

Plug

(front)

4.1 Sound card (3D positional)

Orange cable

Do not connect

front

speakers

rear

speakers

INPUT

Center

Front

Rear

CA-5001

Orange

Plug

(center)

Black

Plug

(rear)

Green

Plug

(front)

5.1 Sound card

center

speakers

front

speakers

rear

speakers

CA-5001

Diagram Owner’s guide

Amplified Speaker System

INPUT

Center

Front

Rear

CA-5001

Green plug to

Y adapter

Video game connection

Red

White

Green

Plug

2.1 Computer source

Standard two channel sound source

line out

Green

Plug

MP3/CD Players and other music source

Orange cable

Do not connect

Black cable

Do not connect

Orange cable

Do not connect

Black cable

Do not connect

INPUT

Center

Front

Rear

CA-5001

INPUT

Center

Front

Rear

CA-5001

Содержание CA-5001

Страница 1: ...piece 5 1 system Power output 80 watts Bass reflex wooden subwoofer cabinet Convenient desktop volume control fader control and on off control CA 5001 6 piece speaker system CA 5001 6 piece speaker system ...

Страница 2: ......

Страница 3: ...Introduction Welcome to the Cyber Acoustics CA 5001 speaker system This 6 piece system is designed to deliver superior performance in devices such as computers video game consoles iPod s MP 3 players DVD players CD players and various other sources High efficient long excursion drivers combined with a low distortion high power amplifier provide deep bass with clarify and greater dynamic range Einf...

Страница 4: ...ct to Please read the diagram instructions carefully Note It is very important to identify how many channels of sound your sound source puts out This is a 5 1 digital ready speaker system It can be used on 2 channel 4 1 or 5 1 sound cards Follow the connecting to source instructions on the diagram page Anschließen der Lautsprecher Dieses Lautsprechersystem kann an vielen verschiedenen Geräten ange...

Страница 5: ...ue vous ayez terminé toutes les connexions et vérifié que le système fonctionne normalement Preparazione degli altoparlanti Prima di effettuare qualsiasi collegamento leggere accuratamente il manuale Prima di eseguire qualsiasi collegamento o di attivare gli altoparlanti attenersi alla seguente procedura Familiarizzare con le uscite sulla scheda audio Stabilire se si tratta di una scheda audio a 2...

Страница 6: ...rnez la commande pour augmenter ou diminuer le niveau des graves selon votre préférence Comandi e funzioni 1 Accensione Il pulsante On Off si trova sull altoparlante satellitare destro Premerlo per accendere il sistema Premere nuovamente per spegnerlo 2 Volume principale Questo comando si trova sull altoparlante satellitare destro ed è indicato dalle parole master volume Per aumentare il volume ru...

Страница 7: ...llen Sie sicher dass das System mit der Audio Ausgangsbuchse Ihrer Computer Soundkarte verbunden ist Diese ist oft mit grüner Farbe markiert Stellen Sie zudem sicher dass der CD DVD Spieler funktioniert dass die Lautstärke für das Ausgangssignal hoch genug eingestellt ist und dass das Gerät nicht stummgeschaltet wurde Falls eine Störung weiterhin besteht dann trennen Sie das Lautsprechersystem von...

Страница 8: ...ue los altavoces no funcionan cuando de hecho están teniendo problemas con la fuente de sonido El problema más común al conectarse a una tarjeta de sonido de ordenador es que las conexiones se han hecho mal Asegúrese de que están conectadas al enchufe de salida de audio de la tarjeta de sonido del ordenador Con frecuencia es de color verde Además asegúrese de que su equipo de CD DVD está tocando y...

Страница 9: ...other connections are made 7 Cables to source Check which type of source you are connecting to then follow the appropriate diagram either 8 9 10 OR 11 CONNECTING TO SOURCE 8 When connecting to a 5 1 sound card follow this diagram 9 When connecting to a 4 1 sound card follow this diagram 10 When connecting to a regular two channel sound card follow this diagram 11 When connecting to a MP3 CD player...

Страница 10: ...o ad una scheda audio standard a due canali seguire questo schema 11 Per il collegamento ai lettori MP3 CD o ad altra fonte audio portatile seguire questo schema 12 Per il collegamento alla consolle di un videogioco seguire questo schema ANSCHLUSS DER LAUTSPRECHER 1 Lautsprecher vorne rechts Rot anschließen an right front Buchse 2 Lautsprecher vorne links Grau anschließen an left front Buchse 3 La...

Отзывы: