background image

Last Revised   05/09/2013

57

MODE  < EACHDAY / WORKDAY / WEEKEND / MON ~ SUN

Select when the program is to be scheduled.

START TIME SETUP  < HOUR MINUTE SECOND>

Enter the start time on 24 hour clock when program should run.

END TIME SETUP  < HOUR MINUTE SECOND>

Enter the end time on 24 hour clock when program should end.

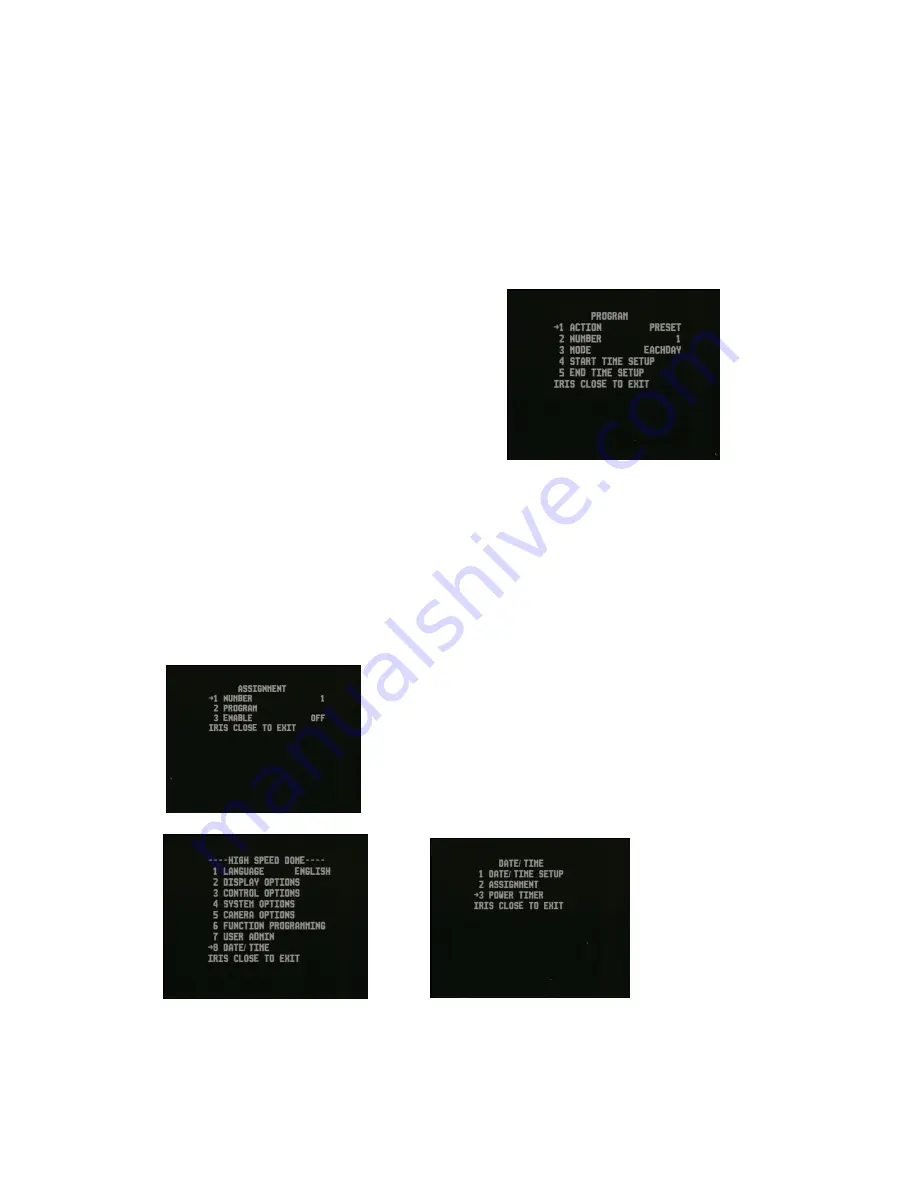
POWER TIMER

This option allows you automatically power down the PTZ camera at a pre-
determined date/time.

ASSIGNMENT

This option allows up to 8 assignments to
be automatically executed at a
programmed time. If a task is terminated
by manual operation it will restart
automatically as long as another manual
operation is not performed within a ten
second period.

NUMBER  1 ~ 8

This is the assignment
priority level. 1 is the
highest and 8 is the lowest.

PROGRAM   PRESET / VECTOR /
                        PATTERN / AUTO SCAN /
                        TOUR

Select the required program from the list
above. These have to be setup in advance.

NUMBER  < number of program >

This is the number of the preset, vectorscan,
pattern, auto scan or tour.

ENABLE   OFF / ON

This switches the assignment program off
and on.

Содержание PTZ640

Страница 1: ...Installation and Operation Manual PTZ640 For Internal or External Use Version 1 0 Last Revised 05 09 2013 ...

Страница 2: ... Keypad or DVR to the Dome 14 Connecting the video out of the dome 15 If you are using more than one dome on a site 18 Setting up a unique address in the dome 18 Entering the address or baud rate in the menu 18 Setup of the Protocol 19 Using the PTZ730 keypad with the PTZ series 20 PTZ640 Functionality 21 Presets 22 PRESETS How to set up a preset using a keyboard 22 Vector Scans 23 Patterns 25 Pat...

Страница 3: ...l 45 OSD Setup 46 Save Exit 47 Function Programming 48 Program Pattern 48 Program Vectorscan 49 Program Alarms 50 Mask Zone This option not available Temperature Program 53 User Admin 53 Date Time 56 Date Time Setup 56 Assignment 56 Power Timer 57 Short Cut Operations 59 Alarm Connections 59 Technical Specification 60 Troubleshooting 61 ...

Страница 4: ...cables and especially fluorescent lights Using an anti surge protection device is recommended to prevent damage to the domes from lightning and mains surges Damage to domes by lightning or mains voltage surges is not covered under the dome warranty 5 Do not operate in areas exceeding the stipulated limitations concerning temperature humidity and power supply 6 Do not aim the camera directly toward...

Страница 5: ... with unlimited positions with a manual adjustable pan speed range of 0 1 240 per second and manual tilt speed range of 0 1 120 per second vertically The tilt action also has a 2 90 viewing adjustment b The dome can run at low speed low noise and does not show any picture shake c The maximum running speed when a preset is called can reach 400 per second d This dome is a high precision unit and mai...

Страница 6: ...ns provides the same results with additional options f Proportional pan function The dome travel speed will depend upon the extent of the zoom coverage In telephoto zoom mode the pan and tilt speeds will be slower for a given amount of joystick movement than that in wide zoom mode This keeps the image from moving too fast on the monitor when there is a large amount of zoom coverage g Display Camer...

Страница 7: ...ected it to There is nothing worse than installing something and then having to take it down to see how to get it working Do the learning curve in the comfort of your own premises SPECIAL NOTE THIS PTZ HAS NO DIPSWITCHES AND IF YOU NEED TO INSTALL MORE THAN ONE UNIT CONTROLLED BY A KEYPAD OR DVR YOU MUST CHANGE THE ID NUMBER IN THE MENU AS ALL PTZ UNITS WILL HAVE IDENTICAL ADDRESSES OF 001 EACH UN...

Страница 8: ...o of the three cables into one You may choose to power the dome locally to it so you may only need to get the video signal back from the dome and the RS485 control signals to it If this is the case you may choose to use a pair of BALUNS By using baluns you can send the video signal and control signal down the same CAT5 cable just using different cores for each signal The control signal RS485 is ne...

Страница 9: ...ne about how to do it Remember this is a GUIDE and is not an instruction what to fit Many installation companies can get the power and video signal correct but struggle with the control of the dome using the keypad or DVR using the RS485 data The key to successfully installing the data cabling to the dome is to get the basics right Use a quality data cable such as CAT5 never use just a standard un...

Страница 10: ...t that is to be controlled This means that the control cable is looped out of the one dome to the next dome and so on The last dome in the line is then fitted with what is known as a termination resistor This has a value of 120 The resistor is not built into this PTZ dome so must be fitted across the RS485 connections in the PTZ terminal connector on the last or longest run The keyboard itself gen...

Страница 11: ...only practical solution So how do you do this in practice The termination resistors must be connected to the two domes that are farthest away from each other such as domes 3 and 5 in the following Star diagram Note that all the other domes do not have the 120ohm resistor connected To fit them connect them across the two connections in the PTZ camera terminal connector As the star configuration is ...

Страница 12: ... the domes and put up to 4 domes on each spur Just like the Daisy chain method the end dome on each spur needs to have the 120ohm resistor enabled Although the RS485 distributor is a small additional expense it takes some of the guess work out of the installation design and gives a more flexible approach to cabling which itself can save time and money on the installation Not forgetting you get mor...

Страница 13: ... some of these options Figure 1 Powering the domes All the domes will need power For this dome it is a 24v AC power supply The power supply must be capable of delivering at least 2 Amps per dome You can either power each dome with its own PSU locally to it or have the PSU s remotely situated perhaps near the keyboard or DVR BALUN PTZ DOME 24V AC LOCAL PSU 240V CAT 5 CAT5 Carries Video Control Data...

Страница 14: ...r the DVR The next section of the instructions gives more detail on how to connect the RS485 data Please also read the RS485 WIRING METHODS TIPS section towards the beginning of these instructions RS485 connection Connecting the Keypad or DVR to the Dome The dome is controlled by an RS485 data signal that is given by either a KEYPAD or a suitable DVR This data signal tells the dome to pan tilt zoo...

Страница 15: ... through baluns If you use cores from two different pairs in the CAT5 cable you will not get the benefit of the shielding effect of the cable twists and the dome will function erratically You must always use a core from a PAIR not two cores from two different pairs Connecting the video out of the dome Rear of PTZ730 The PTZ730 and PTZ700 are just two of the keypads that can be used with the PTZ640...

Страница 16: ...ttings and using the keyboard You can use a keyboard or a suitable DVR to control the dome A suitable DVR would be one with PTZ functionality built into it and preferably Pelco D protocol If your DVR has a list of protocols it s always best to try Pelco D first In the DVR with Pelco D set you must also make sure you set up the baud rate to 2400 A typical site installation would look like the follo...

Страница 17: ...Last Revised 05 09 2013 17 12V DC INPUT RS485 A ORANGE RS485 B YELLOW RS485 INPUT ON DVR PSU CAT5 Data cable RG59 Video Cable Power Cable 24vAC C ...

Страница 18: ...ne of these units you will need to setup the address in each additional unit As the PTZ cameras are set with address 001 which is not a unique number to change the address it is also necessary to enter the unique camera serial number Entering the address and or baud rate in the menu To enter the main menu CALL preset 95 using the keypad or DVR with PTZ control The HIGH SPEED DOME menu is then disp...

Страница 19: ...ank field to allow a new change to be made if required Setup of the Protocol There are no dipswitches in this PTZ allowing protocol changes The protocol is self detected and is automatically selected from either PELCO D or PELCO P You need to re enter this unique serial number in order for the ID and or Baud Rate change to take effect Move down to INPUT SN and press the IRIS or OPEN key to enter t...

Страница 20: ...t is recommended to use a POW802 or equivalent for this purpose Now press the keypad ON button Select a PTZ camera by pressing CAM button followed by camera address and Enter The LCD display will indicate the camera channel selected CAM 01 indicates that the keyboard is ready to talk to camera with address 1 if you have another dome set at camera address 2 press CAM button followed by 02 and Enter...

Страница 21: ... powerful control options 255 x Presets setup using keyboard or DVR keyboard only if over 127 6 x Vector Scans setup using PTZ menu options CALL 83 88 3 x Patterns setup using PTZ menu options CALL 80 82 1 x Tour setup using PTZ menu option CALL 65 In addition the PTZ dome can manually run 1 x Auto Scan setup using keyboard or DVR Start Point PRESET 52 End Point PRESET 53 CALL 52 to run 255 x Pres...

Страница 22: ...et the correct scene and let the camera auto focus Now press the following keys on the keypad PRESET xx Enter where xx is the preset number you wish to store For example PRESET 01 Enter would store PRESET 01 and the camera would always go to this location when 01 is CALLED To test if the preset is stored correctly use the joystick to move the camera to point in a new location Now press CALL 01 Ent...

Страница 23: ...Z option in the DVR For this example we are using an Alien DVR Using the mouse click on the left mouse button to display the following Now click on PTZ and go to Presets and call preset 95 by clicking on it to display menu If you left click mouse when pointer is in the PTZ control box you can drag it to avoid it overlaying menu Now move down using down arrow key to Program A Vectorscan 2 and then ...

Страница 24: ...an Run using a command from the keyboard or DVR or run through the PTZ menu Using the Keyboard Enter CALL nn Enter where nn 83 88 Note up to 6 Vector Scans can be setup e g Vector Scan 1 CALL 83 Vector Scan 2 CALL 84 Vector Scan 6 CALL 88 Using the PTZ640 menu To enter the menu enter CALL 95 Enter or 95 CALL on the keyboard or via the PTZ option in the DVR For this example we are using an Alien DV...

Страница 25: ...be other functions that can be initiated before or after the pattern RECORD PATTERN What is the difference between a pattern the patrol tour There is only one patrol tour and this uses presets and when initiated the dome will move to the first 16 preset positions using a dwell time of 2 seconds The speed of dome movement between any two presets is a constant speed and not a variable speed Only one...

Страница 26: ...ng the mouse click on the left mouse button to display the following Now click on PTZ and go to Presets and call preset 95 by clicking on it to display menu If you left click mouse when pointer is in the PTZ control box you can drag it to avoid it overlaying menu Now select Pattern 1 and then enter using IRIS or Open button This will now open the Pattern menu Move down using down arrow key to Func...

Страница 27: ... display menu If you left click mouse when pointer is in the PTZ control box you can drag it to avoid it overlaying menu Now press IRIS or Open button after moving up arrow on screen to character required then continue same procedure under name completed and then press IRIS or Close button to save Then move down with down arrow key to PROGRAM A TOUR Press the IRIS or Open button to enter this opti...

Страница 28: ...useful for both outside and internal PTZ s For a shop they could be used to cover key areas like clothes rails tills and changing rooms in a sequence To set up a patrol you need to set up the individual stop points where the camera will pause These are called presets On this PTZ camera only one Patrol can be setup by using a keypad or DVR There is no menu option for tours but a Vector Scan does an...

Страница 29: ...T xx Enter Obviously if you wish to overwrite a preset with a new location simply aim the camera at the new location and store the preset as normal this will simply overwrite the old preset Setting the presets using the PTZ640 menu To enter the menu enter CALL 95 Enter or 95 CALL on the keyboard or via the PTZ option in the DVR For this example we are using an Alien DVR Using the mouse click on th...

Страница 30: ...ans between two points These are not presets as per the patrol tour facility but auto scan selection points You may program only one Auto Scan and this is only possible via a keyboard or DVR Select the required camera by pressing the CAM button and then entering camera address on the keypad Move the camera to the start position and press PRESET 52 Enter on the keypad Move the camera to the end pos...

Страница 31: ...ese can be configured using the OSD To bring up the camera menu press CALL 95 Enter varies with keyboard type The OSD is then displayed on the screen You can navigate between the various options using the Joystick control up to increase and down to decrease right pan to enter You can also use the IRIS or OPEN button to enter and the IRIS or CLOSE button to save and exit ...

Страница 32: ... a selection and the IRIS CLOSE button to exit To leave the main menu press IRIS CLOSE in Main Menu DESCRIPTION OF MENU OPTIONS 1 LANGUAGE English Chinese Russian Spanish 2 DISPLAY OPTIONS Presets Sector setup Coordinates Crosshairs Start Up Screen Message OSD Style Dome Name setup 3 CONTROL OPTIONS Set Pan Tilt reverse Find Home position Set Default function Speed Limit Auto Flip Auto Focus Auto ...

Страница 33: ...SPLAY OPTIONS This menu covers the setup of the following options Presets Sector setup Coordinates Crosshairs Start Up Screen Message OSD Style Dome Name setup 1 PRESET SETUP This menu allows the setting of up to 255 presets Presets can be set in the menu using a keyboard or via a DVR menu If using the menu you will need to first move the camera to the required preset position and then enter the m...

Страница 34: ... Clicking on the Iris or Open button or the right direction key will display the question ARE YOU SURE TO DO THIS IRIS OPEN TO CONFIRM IRIS CLOSE TO CANCEL Press Iris or Open to confirm delete or Iris or Close to cancel delete 5 6 NAME NAME DISPLAY Press Iris to select second line of numbers Move to digit that you wish to change using direction key Move to digit required using direction keys Press...

Страница 35: ...sector 6 TILT END POS If you move the up or down arrows this sets the vertical end position of the sector 7 NAME DISPLAY OFF ON Switch this to ON to display the sector that is being accessed 3 COORDINATES OFF ON This option will display position coordinates on screen when switched to ON 4 CROSSHAIRS OFF ON Setting this option allows you to overlay the display window with a crosshair display centre...

Страница 36: ...numeric value 1 255 The number of the preset vectorscan pattern auto scan or tour 3 DELAY time delay in seconds 1 999 The time in seconds before the function is actioned 4 OPERATION OFF ON Activates default function 3 SPEED LIMIT OFF ON This switches operational speed limit on or off 4 AUTO FLIP OFF ON The auto flip option flips the camera over when reaching limit 1 PAN REVERSE OFF ON Switch to on...

Страница 37: ...nger and more narrow IR beam NEAR is used to manually select a closer wider angle IR illumination and F N is to manually select all IRs If you select CLOSE this will completely stop IRs from switching on 2 IR BRIGHTNESS 1 30 This sets the brightness level of the IRs 3 SENSITIVITY 1 30 This option sets the sensitivity for the IRs to switch on and off 4 STANDBY MODE ON OFF If you do not operate the ...

Страница 38: ...store Default Settings Colour System Reset Dome Dome Information Comm Settings and Camera Memory The authority to use the System Options is only limited to the administrator with correct password 1 CLEAR MEMORY This option clears the memory in the PTZ camera 2 RESTORE DEFAULT SETTINGS This options restores the manufacturer s default settings 3 COLOR SYSTEM This allows you to change colour system f...

Страница 39: ...ll be changed you will see that in the COMMS SETTINGS menu there is a blank field to the right of INPUT SN and underneath this a unique camera serial number to the right of SN Move to the digit you wish to change using the right direction key and press the IRIS or OPEN key and a second arrow will appear under the numeric number list Use the right direction key to select the new ID digit and then p...

Страница 40: ...072 camera module Use IRIS or Open or right arrow to enter change menu value ZOOM END x144 Digital zoom range Altering this will limit zoom end ZOOM TRK MODE Auto Manual Off ZOOM SPEED Quick Slow Normal LENS INITIAL Off One Push Auto This option will automatically initialise the lens The option if set allows a period of 1 7 days to be set INITIAL SET Clicking this option defaults the FOCUS menu se...

Страница 41: ...y using the A FLK option In manual mode you have a choice in selecting the shutter speed from the following 1 160 x2 x3 x4 x5 x6 x8 x10 x12 x14 x16 x24 x32 x64 x128 1 90000 1 50000 1 30000 1 10000 1 7000 1 5000 1 2500 1 1600 1 1000 1 700 1 500 1 250 AGC MIDDLE HIGH LOW This option is for setting automatic video gain SENSE UP This option is the NiteDevil feature and this holds the shutter open at n...

Страница 42: ...T EXT CDS This menu allows you to set either colour during the day and black and white at night or colour all the time or black and white all the time or using an external light or CDS sensor D N LEVEL 0 10 Default 5 This sets the level of light for switching from Day to Night D N DELAY 5 60 seconds 5 10 15 30 60 When switching from day to night to overcome erroneous switching backwards and forwar...

Страница 43: ... ECL ECLIPSE The Eclipse menu is the equivalent to HSBLC High Sensitivity Backlight Compensation or Shield options It is for equalising a very bright light source so that the picture does not white out You need to select a box around the area where the bright light source occurs and set a mask colour The ALLAREA SET option will change all the OFFs to ON The MASK COLOR can be GRAY D GRAY or BLACK T...

Страница 44: ...nce the brightness seen by the camera to that of the monitor 3D DNR Digital Noise Reduction OFF ON This option is generally used in conjunction with the Sense Up option to reduce digital noise and the effects of ghosting IMAGE ADJUST This option allows picture rotation image freeze sharpness and switching colour on or off D EFFECT OFF V FLIP MIRROR ROTATE Default OFF Use this option to change to v...

Страница 45: ...en using Move X and Y Motion Zoom allows you to zoom in when the motion is detected The Motion Detect Alarm Out is not provided on this camera ZONE NUMBER 1 4 Select up to four zone areas ZONE STATE OFF ON Switch the relevant zone area on for motion detection WIDTH HEIGHT MOVE X MOVE Y Set the zone area and then the zone area position MOTION ZOOM OFF ON This option will zoom in to TARGET ZOOM sett...

Страница 46: ...r this feature is not available in this PTZ camera STABILIZER OFF ON Leave this option switched off L L SYNC INT Leave this option set to INT FACTORY INITIAL This will reset camera module back to factory settings REBOOT This will reboot camera module PREVIOUS Returns to previous menu using Iris or Open OSD SETUP This menu allows you to name a Zone switch on various functions and change language ...

Страница 47: ...RIS or Open to save CAMERA ID OFF ON This allow you to position the camera ID at a different position across bottom of screen using the left and right arrows on the screen display and the down arrow to end ZOOM MAG OFF ON This option switches zooming on and off MOTION DET OFF ON This option switches motion detection on and off FUNCTION OFF ON This switches the motion function off and on LANGUAGE E...

Страница 48: ...R Tour refers to pattern This runs the pattern number selected DELETE A TOUR Tour refers to pattern This deletes the pattern number selected A display asks ARE YOU SURE TO DO THIS IRIS OPEN TO CONFIRM IRIS CLOSE TO CANCEL NAME DISPLAY OFF ON Displays the pattern named in NAME if option set to on NUMBER 1 3 Sets the pattern number NAME Sets the pattern name PROGRAM A TOUR Tour refers to pattern Rec...

Страница 49: ...e through PRE preset VECT Vectorscan PATT Pattern TOUR Tour or blank NOTE Presets must have been created as detailed in how to setup a preset Use the right arrow key to move to the Preset NUMber column Press the IRIS or Open button to display the numeric sequence screen Now use the right arrow key to move to the Velocity column This is the speed of the PTZ moving to the preset point Again use the ...

Страница 50: ...MMING There are two options in the alarm programming menu Alarm In and Alarm Out ALARM IN PROGRAMMING This menu allows you to select an alarm channel between 1 and 4 and detail the required action when the alarm is triggered CHANNEL NUMBER 1 4 Select required input alarm number between 1 and 4 RUN A VECTORSCAN Press the IRIS or Open button This will now trigger the Vector Scan Enter a manual movem...

Страница 51: ...ery day Monday to Friday the weekend or a day of the week and date and time MODE EACHDAY WORKDAY WEEKEND MON SUN Set when you want to make the alarm operational either for every day Monday to Friday the weekend or day of the week ENABLE TIME SETUP HOUR 0 23 Sets hour on 24 hour clock MINUTE 0 59 Set minutes SECOND 0 59 Set seconds DISABLE TIME SETUP The Disable Time Setup allows you to zeroise the...

Страница 52: ...L DISPLAY OFF ON Allows the label display to be switched on and off ACTION SETUP PRESET VECTOR PATTERN AUTO SCAN TOUR This option allows you to select the alarm action when the alarm is triggered NUMBER relates to the number of the action selected above For example 1 255 for presets 1 8 for Vector Scans 1 6 for patterns etc PRIORITY 1 4 This applies a priority level to this alarm Priority 1 is the...

Страница 53: ...SPLAY OFF ON This displays the temperature setting on the monitor screen POWER OFF TEMP 0 99 Note you will not be able to set a level higher than 85 USER ADMIN This menu is for setting controls so that specific users are given certain priviledges for using functions on the PTZ camera MASTER SETUP This allows setting of a new Master password Use the Iris to enter character field arrow buttons to se...

Страница 54: ... to the Master password above OPERATION LOCK OFF ON If the operation lockup function is enable and no control command is received within the specified waiting time the PTZ will lock the operation until a successful re login is initiated Note that operational lockup of all level users only applies to its own level WAIT 1 999 Default 120 This can be set between 1 and 999 seconds The default is 2 min...

Страница 55: ...n to set a pattern RUN PATTERN ON OFF Enable or disable the authorization to run a pattern PROGRAM VECTORSCAN ON OFF Enable or disable the authorization to program a Vector Scan RUN VECTORSCAN ON OFF Enable or disable the authorization to run a Vector Scan PROGRAM DATE TIME OFF ON Enable or disable the authorization to program date and time PROGRAM ALARM OFF ON Enable or disable the authorization ...

Страница 56: ...f the date display on and off and the date display format You also have the facility to modify the date and time CLOCK DISPLAY ON OFF This switches on or off time display DATE DISPLAY ON OFF This switches on or off date display DISPLAY MODE D M Y Y M D Select date format either Day Month Year or Year Month Day DATE TIME MODIFY This option allows you to change the date and time settings ...

Страница 57: ...T This option allows up to 8 assignments to be automatically executed at a programmed time If a task is terminated by manual operation it will restart automatically as long as another manual operation is not performed within a ten second period NUMBER 1 8 This is the assignment priority level 1 is the highest and 8 is the lowest PROGRAM PRESET VECTOR PATTERN AUTO SCAN TOUR Select the required prog...

Страница 58: ... shutdown status 4 The priority of Assignment is higher than the Power Timer That means that the Assignment will be executed first whether or not the Power Times status is in Startup or Shutdown status and the Power Timer can only be entered after the Assignment has been completed However other non Assignment functions would be automatically discontinued or quitted before the Power Timer is execut...

Страница 59: ... 83 Vector Scan 1 start 84 Vector Scan 2 start 85 Vector Scan 3 start 86 Vector Scan 4 start 87 Vector Scan 5 start 88 Vector Scan 6 start 92 Password Entry for Administrator Logon Default 000000 93 Password Entry for Operator Logon Default 111111 95 Menu ALARM CONNECTIONS ALARM INPUT 1 Red White ALARM INPUT 2 Yellow White ALARM INPUT 3 Brown White ALARM INPUT 4 Blue White ALARM INPUT COMMON Black...

Страница 60: ...on BNC socket Protocol PELCO D PELCO P Operating Temperature Outdoor 20 o 60o C Optical Zoom 12x Digital Zoom 12x Alarm Inputs Outputs 4 x Alarm Inputs 2 x Alarm Outputs Dome Address 0 255 Pan Rotate Range 360 o continuous rotation Tilt Rotate Range 0 90 o continuous rotation Pan Manual Speed 0 300 o per second Tilt Manual Speed 0 120 o per second Call Preset Position 400 o per second Accuracy 0 1...

Страница 61: ...ly to be a faulty PTZ unit Note that video loss can occur on a long cable run or loss of signal strength resulting in no video poor quality video or even video in black and white mode 3 If video is okay but the telemetry is not working then check the software settings in the dome agree with the settings in the control unit i e keypad or DVR The software sets the protocol baud rate and PTZ address ...

Отзывы: