


7
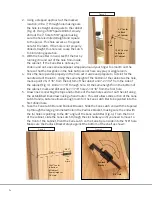
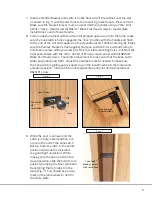
4. Inspect the hole from the top of the shelf and drill from the opposite side to
straighten out the hole more using the cloth again to protect the back of the shelf.
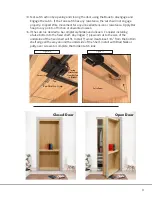
5. Under the fixed shelf, on the back panel draw a line down from the through hole a ¼”
and punch with an Awl to install the other Eyescrew. Hand screw into place making
sure not to go deeper than the ½” material as shown in Fig. 9. This will happen
before you run out of visible thread.
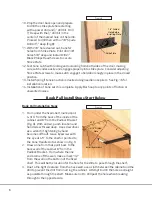
6. Take the provided Dummy Book and place the Butt Hinge folded and against the
Binding as shown in Fig. 10. Mark holes for hinge location on book bottom. Drill (2)
5/32” holes through bottom of book (Fig. 10). Place Book with Hinge in place on
shelf with back of book centered over through hole (Fig.11).
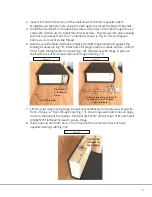
7. Lift book up trying leaving hinge in exact spot established in the previous step with
front of hinge ~4” from through hole (Fig. 11). Open hinge and mark holes on hinge
closer to the back of the cabinet. Pilot drill with 3/32” drill bit down 3/8” and install
(2) #6x5/8” Flat Head Screws to secure Hinge.
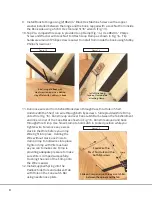
8. Take book and drill 5/32” hole 2” from book bottom centered in back of book
opposite binding side (Fig. 12).
Figure 10
Figure 11
5/8”
Hole
5.5” Center
to Back
of Cabinet
29.43” Center
to Bottom
of Cabinet
5/8” Hole
Padlock
Bracket
Handle Bracket
Knob
Fully Engaged
in Lock Position
11/16”
Slot
Width
29.43” Center
to Bottom
of Cabinet
(Same Height as
5/8” Hole)
7.84”
Cane Latch Install
1
2
3
4
5
6
Hinge Side
Side of Cabinet
to locate for start
of installation
2.81”
Cane Latch
Orientation
Cane Latch
Making Contact
with Jamb Face
Strike Plate
7/8” Drilled
Hole Before
Installing Plate
Book Pull Install
Install Eyescrews
3/16” Drilled
Hole
Install one side of Hinge to Shelf
Centered in line with drilled
pass-thru hole
4”
CL
Transfer and
Drill Holes for
Hinge
Transfer and
Drill Hole for
Loop Clamp
2”
7
8
9
10
11
12
8”
4.75”
.25”
3/16” Thru Hole
Install Hinge to Book with
Hex Screws and washers behind
Hinge Plate with Cap Nuts in Book
Install Wire Loop
to Loop Clamp before
attaching Clamp
Feed Wire thru
Pass-Thru Hole and thru
both Eyescrews
Slide on Crimp and run Wire over Latch Bar
between the corner and the Tab
Crimp
Run Wire thru Crimp
Spring
Attachment
from Bar Tab
to Bracket
13
14
15
16
False Panel
Cleats
17
Tab
Corner
5/8”
Hole
5.5” Center
to Back
of Cabinet
29.43” Center
to Bottom
of Cabinet
5/8” Hole
Padlock
Bracket
Handle Bracket
Knob
Fully Engaged
in Lock Position
11/16”
Slot
Width
29.43” Center
to Bottom
of Cabinet
(Same Height as
5/8” Hole)
7.84”
Cane Latch Install
1
2
3
4
5
6
Hinge Side
Side of Cabinet
to locate for start
of installation
2.81”
Cane Latch
Orientation
Cane Latch
Making Contact
with Jamb Face
Strike Plate
7/8” Drilled
Hole Before
Installing Plate
Book Pull Install
Install Eyescrews
3/16” Drilled
Hole
Install one side of Hinge to Shelf
Centered in line with drilled
pass-thru hole
4”
CL
Transfer and
Drill Holes for
Hinge
Transfer and
Drill Hole for
Loop Clamp
2”
7
8
9
10
11
12
8”
4.75”
.25”
3/16” Thru Hole
Install Hinge to Book with
Hex Screws and washers behind
Hinge Plate with Cap Nuts in Book
Install Wire Loop
to Loop Clamp before
attaching Clamp
Feed Wire thru
Pass-Thru Hole and thru
both Eyescrews
Slide on Crimp and run Wire over Latch Bar
between the corner and the Tab
Crimp
Run Wire thru Crimp
Spring
Attachment
from Bar Tab
to Bracket
13
14
15
16
False Panel
Cleats
17
Tab
Corner
Figure 12
5/8”
Hole
5.5” Center
to Back
of Cabinet
29.43” Center
to Bottom
of Cabinet
5/8” Hole
Padlock
Bracket
Handle Bracket
Knob
Fully Engaged
in Lock Position
11/16”
Slot
Width
29.43” Center
to Bottom
of Cabinet
(Same Height as
5/8” Hole)
7.84”
Cane Latch Install
1
2
3
4
5
6
Hinge Side
Side of Cabinet
to locate for start
of installation
2.81”
Cane Latch
Orientation
Cane Latch
Making Contact
with Jamb Face
Strike Plate
7/8” Drilled
Hole Before
Installing Plate
Book Pull Install
Install Eyescrews
3/16” Drilled
Hole
Install one side of Hinge to Shelf
Centered in line with drilled
pass-thru hole
4”
CL
Transfer and
Drill Holes for
Hinge
Transfer and
Drill Hole for
Loop Clamp
2”
7
8
9
10
11
12
8”
4.75”
.25”
3/16” Thru Hole
Install Hinge to Book with
Hex Screws and washers behind
Hinge Plate with Cap Nuts in Book
Install Wire Loop
to Loop Clamp before
attaching Clamp
Feed Wire thru
Pass-Thru Hole and thru
both Eyescrews
Slide on Crimp and run Wire over Latch Bar
between the corner and the Tab
Crimp
Run Wire thru Crimp
Spring
Attachment
from Bar Tab
to Bracket
13
14
15
16
False Panel
Cleats
17
Tab
Corner
Cane Latch
Making Contact
with Jamb Face
Strike Plate
7/8” Drilled
Hole Before
Installing Plate
Book Pull Install
Install Eyescrews
3/16” Drilled
Hole
Install one side of Hinge to Shelf
Centered in line with drilled
pass-thru hole
4”
CL
Transfer and
Drill Holes for
Hinge
Transfer and
Drill Hole for
Loop Clamp
2”
7
8
9
10
11
12
8”
4.75”
.25”
3/16” Thru Hole
Install Hinge to Book with
Hex Screws and washers behind
Hinge Plate with Cap Nuts in Book
Install Wire Loop
to Loop Clamp before
attaching Clamp
Feed Wire thru
Pass-Thru Hole and thru
both Eyescrews
Slide on Crimp and run Wire over Latch Bar
between the corner and the Tab
Crimp
Run Wire thru Crimp
Spring
Attachment
from Bar Tab
to Bracket
13
14
15
16
False Panel
Cleats
17
Tab
Corner
Содержание ID.LATCH-BOOK.08
Страница 1: ...INSTRUCTION MANUAL for Installing CANE LATCH TO INVISIDOOR ID LATCH BOOK 08 and ID LATCH CANE 08...
Страница 10: ...10 Invisidoor Application Images...
Страница 11: ...11 NOTES...


