


4
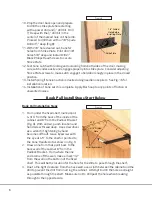
slide in and out, use some sandpaper wrapped around your finger to smooth out the
hole so that the bar glides in the hole but does not have any play or wiggle room.
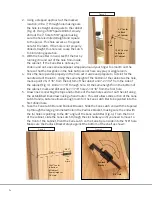
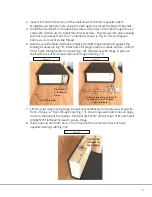
4. Once the bar operates properly in the hole, set it aside and prepare to cut slot for the
handle side of the latch. Using the same height of the bottom of the cabinet as the hole,
mark a point 29-7/16” from the bottom of the cabinet and 7-27/32” from the side of
the cabinet (Fig. 3). Drill a 11/16” through hole. At the same height from the bottom of
the cabinet, mark and drill another 11/16” hole 2-13/16” from the first hole.
5. Draw lines connecting the tops and bottoms of the two holes and cut out the slot along
the established lines drawn using a hand router. This slot allows slide action of the Cane
Latch Handle, but also allows enough room for the Cane Latch Bar to be pivoted into the
first drilled hole.
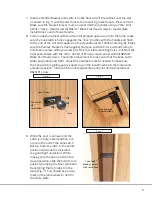
6. Take the Cane Latch Bar and Padlock Bracket. Slide the Cane Latch end with the tapered
tip through the large grommeted hole in the Padlock bracket, making sure the end with
the (4) holes is pointing to the 90° angle of the Cane Latch Bar (Fig. 4). From the front
of the cabinet, slide the Cane Latch through the slot halfway until you need to move to
the front of the Cabinet. Pivot the Cane Latch so the Cane tip can slide into the 5/8” hole.
Make sure the Padlock Bracket stays against the bottom of the shelf as shown.
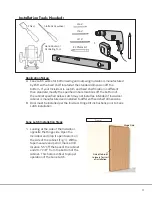
2. Using a stepped approach, at the marked
location, drill a ¼” through hole making sure
the hole is straight and square to the cabinet
(Fig. 2). Using a 5/8” Spade Drill bit, slowly
drill out the ¼” hole to 5/8”, again making
sure the hole is drilled straight and square
to the panel. This hole serves as the guide
hole for the latch. If the hole is not properly
drilled straight, this hole can cause the Latch
to bind during operation.
3. With the Cane Bar in hand, test fit the bar by
running it in and out of the hole from inside
the cabinet. If the Cane Bar is not easy to
Figure 3
Figure 4
Figure 2
5/8”
Hole
5.5” Center
to Back
of Cabinet
29.43” Center
to Bottom
of Cabinet
5/8” Hole
Padlock
Bracket
Handle Bracket
Knob
Fully Engaged
in Lock Position
11/16”
Slot
Width
29.43” Center
to Bottom
of Cabinet
(Same Height as
5/8” Hole)
7.84”
Cane Latch Install
1
2
3
4
5
6
Hinge Side
Side of Cabinet
to locate for start
of installation
2.81”
Cane Latch
Orientation
Cane Latch
Making Contact
with Jamb Face
Strike Plate
7/8” Drilled
Hole Before
Installing Plate
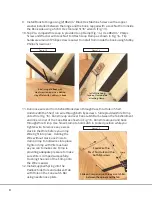
Book Pull Install
Install Eyescrews
3/16” Drilled
Hole
Install one side of Hinge to Shelf
Centered in line with drilled
pass-thru hole
4”
CL
Transfer and
Drill Holes for
Hinge
Transfer and
Drill Hole for
Loop Clamp
2”
7
8
9
10
11
12
8”
4.75”
.25”
3/16” Thru Hole
Cane Latch
Making Contact
with Jamb Face
Strike Plate
7/8” Drilled
Hole Before
Installing Plate
Book Pull Install
Install Eyescrews
3/16” Drilled
Hole
Install one side of Hinge to Shelf
Centered in line with drilled
pass-thru hole
4”
CL
Transfer and
Drill Holes for
Hinge
Transfer and
Drill Hole for
Loop Clamp
2”
7
8
9
10
11
12
8”
4.75”
.25”
3/16” Thru Hole
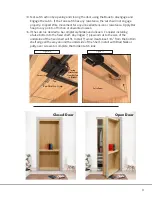
Install Hinge to Book with
Hex Screws and washers behind
Hinge Plate with Cap Nuts in Book
Install Wire Loop
to Loop Clamp before
attaching Clamp
Feed Wire thru
Pass-Thru Hole and thru
both Eyescrews
Slide on Crimp and run Wire over Latch Bar
between the corner and the Tab
Crimp
Run Wire thru Crimp
Spring
Attachment
from Bar Tab
to Bracket
13
14
15
16
False Panel
Cleats
17
Tab
Corner
5/8”
Hole
5.5” Center
to Back
of Cabinet
29.43” Center
to Bottom
of Cabinet
5/8” Hole
Padlock
Bracket
Handle Bracket
Knob
Fully Engaged
in Lock Position
11/16”
Slot
Width
29.43” Center
to Bottom
of Cabinet
(Same Height as
5/8” Hole)
7.84”
Cane Latch Install
1
2
3
4
5
6
Hinge Side
Side of Cabinet
to locate for start
of installation
2.81”
Cane Latch
Orientation
Cane Latch
Making Contact
with Jamb Face
Strike Plate
7/8” Drilled
Hole Before
Installing Plate
Book Pull Install
Install Eyescrews
3/16” Drilled
Hole
Install one side of Hinge to Shelf
Centered in line with drilled
pass-thru hole
4”
CL
Transfer and
Drill Holes for
Hinge
Transfer and
Drill Hole for
Loop Clamp
2”
7
8
9
10
11
12
8”
4.75”
.25”
3/16” Thru Hole
Install Hinge to Book with
Hex Screws and washers behind
Hinge Plate with Cap Nuts in Book
Install Wire Loop
to Loop Clamp before
attaching Clamp
Feed Wire thru
Pass-Thru Hole and thru
both Eyescrews
Slide on Crimp and run Wire over Latch Bar
between the corner and the Tab
Crimp
Run Wire thru Crimp
Spring
Attachment
from Bar Tab
to Bracket
13
14
15
16
False Panel
Cleats
17
Tab
Corner
5/8”
Hole
5.5” Center
to Back
of Cabinet
29.43” Center
to Bottom
of Cabinet
5/8” Hole
Padlock
Bracket
Handle Bracket
Knob
Fully Engaged
in Lock Position
11/16”
Slot
Width
29.43” Center
to Bottom
of Cabinet
(Same Height as
5/8” Hole)
7.84”
Cane Latch Install
1
2
3
4
5
6
Hinge Side
Side of Cabinet
to locate for start
of installation
2.81”
Cane Latch
Orientation
5/8”
Hole
5.5” Center
to Back
of Cabinet
29.43” Center
to Bottom
of Cabinet
5/8” Hole
Padlock
Bracket
Handle Bracket
Knob
Fully Engaged
in Lock Position
11/16”
Slot
Width
29.43” Center
to Bottom
of Cabinet
(Same Height as
5/8” Hole)
7.84”
Cane Latch Install
1
2
3
4
5
6
Hinge Side
Side of Cabinet
to locate for start
of installation
2.81”
Cane Latch
Orientation
5/8”
Hole
5.5” Center
to Back
of Cabinet
29.43” Center
to Bottom
of Cabinet
5/8” Hole
Padlock
Bracket
Handle Bracket
Knob
Fully Engaged
in Lock Position
11/16”
Slot
Width
29.43” Center
to Bottom
of Cabinet
(Same Height as
5/8” Hole)
7.84”
Cane Latch Install
1
2
3
4
5
6
Hinge Side
Side of Cabinet
to locate for start
of installation
2.81”
Cane Latch
Orientation
Cane Latch
Making Contact
with Jamb Face
Strike Plate
7/8” Drilled
Hole Before
Installing Plate
Book Pull Install
Install Eyescrews
3/16” Drilled
Hole
Install one side of Hinge to Shelf
Centered in line with drilled
pass-thru hole
4”
CL
Transfer and
Drill Holes for
Hinge
Transfer and
Drill Hole for
Loop Clamp
2”
7
8
9
10
11
12
8”
4.75”
.25”
3/16” Thru Hole
Install Hinge to Book with
Hex Screws and washers behind
Hinge Plate with Cap Nuts in Book
Install Wire Loop
to Loop Clamp before
attaching Clamp
Feed Wire thru
Pass-Thru Hole and thru
both Eyescrews
Slide on Crimp and run Wire over Latch Bar
between the corner and the Tab
Crimp
Run Wire thru Crimp
Spring
Attachment
from Bar Tab
to Bracket
13
14
15
16
False Panel
Cleats
17
Tab
Corner
Содержание ID.LATCH-BOOK.08
Страница 1: ...INSTRUCTION MANUAL for Installing CANE LATCH TO INVISIDOOR ID LATCH BOOK 08 and ID LATCH CANE 08...
Страница 10: ...10 Invisidoor Application Images...
Страница 11: ...11 NOTES...


