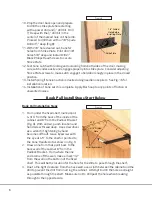


6
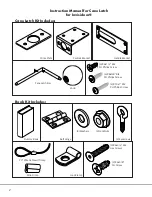
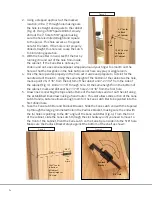
shelf. This will be the location for the hole for the Wire to pass through the shelf.
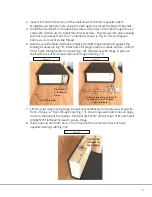
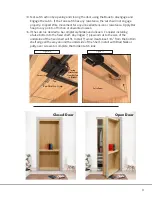
3. Due to the tight clearance from the back wall, use a cloth between the cabinet and the
drill to prevent the drill from marring the cabinet. Attempt to drill the hole as straight
as possible through the shelf. Make sure not to drill past the hole when breaking
through to the opposite side.
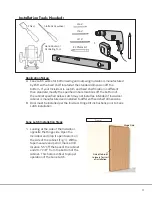
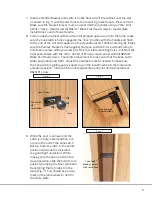
10. Prop the door back open and prepare
to drill the strike plate hole starting
with a power drill and ¼” drill bit. Drill
¾” Deep with the ¼” drill bit in the
center of the marked hole on the Jamb.
Proceed to drill then with a 7/8” Spade
Drill bit ¾” deep (Fig.8).
11. With 7/8” hole cleared out, transfer
holes from Strike Plate. Pilot drill 1/8”
holes 5/8” deep and install #10x1”
Black Philips Head Screws to secure
Strike Plate.
Book Pull Installation Steps
1. From under the fixed shelf, mark a spot
4-3/4” from the back of the inside of the
cabinet and 8” from the Padlock Bracket
(Fig. 9). With an Awl, punch location and
hand screw thread deep. Use screwdriver
as a wrench if tightening by hand
becomes difficult. Leave Eyescrew with
the eye at 45° to the shelf or pointed to
the Cane Handle slot as shown in Fig. 9.
2. Draw a line from that point back to the
back wall of the cabinet 8” from the
Padlock Bracket. From where the line
ends come off the wall, make a mark 1/2”
from the wall on the bottom of the fixed
12. Test Cane Latch with locking and unlocking from both sides of the door, making
sure Latch slides easily and engages properly into strike plate. Consider adjusting
Strike Plate screws to make Latch engage to hold door snugly in place in the closed
position.
13. Install Spring if tension action is desired using needle nose pliers. See Fig. 16 for
installation location.
14. Installation of Cane Latch is complete. Apply Bar Soap to any points of friction or
unwanted noises.
Book Pull Install Steps Start Below
Figure 8
Figure 9
5/8”
Hole
5.5” Center
to Back
of Cabinet
29.43” Center
to Bottom
of Cabinet
5/8” Hole
Padlock
Bracket
Handle Bracket
Knob
Fully Engaged
in Lock Position
11/16”
Slot
Width
29.43” Center
to Bottom
of Cabinet
(Same Height as
5/8” Hole)
7.84”
Cane Latch Install
1
2
3
4
5
6
Hinge Side
Side of Cabinet
to locate for start
of installation
2.81”
Cane Latch
Orientation
Cane Latch
Making Contact
with Jamb Face
Strike Plate
7/8” Drilled
Hole Before
Installing Plate
Book Pull Install
Install Eyescrews
3/16” Drilled
Hole
Install one side of Hinge to Shelf
Centered in line with drilled
pass-thru hole
4”
CL
Transfer and
Drill Holes for
Hinge
Transfer and
Drill Hole for
Loop Clamp
2”
7
8
9
10
11
12
8”
4.75”
.25”
3/16” Thru Hole
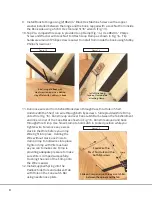
Install Hinge to Book with
Hex Screws and washers behind
Hinge Plate with Cap Nuts in Book
Install Wire Loop
to Loop Clamp before
attaching Clamp
Feed Wire thru
Pass-Thru Hole and thru
both Eyescrews
Slide on Crimp and run Wire over Latch Bar
between the corner and the Tab
Crimp
Run Wire thru Crimp
Spring
Attachment
from Bar Tab
to Bracket
13
14
15
16
False Panel
Cleats
17
Tab
Corner
Cane Latch
Making Contact
with Jamb Face
Strike Plate
7/8” Drilled
Hole Before
Installing Plate
Book Pull Install
Install Eyescrews
3/16” Drilled
Hole
Install one side of Hinge to Shelf
Centered in line with drilled
pass-thru hole
4”
CL
Transfer and
Drill Holes for
Hinge
Transfer and
Drill Hole for
Loop Clamp
2”
7
8
9
10
11
12
8”
4.75”
.25”
3/16” Thru Hole
Install Hinge to Book with
Hex Screws and washers behind
Hinge Plate with Cap Nuts in Book
Install Wire Loop
to Loop Clamp before
attaching Clamp
Feed Wire thru
Pass-Thru Hole and thru
both Eyescrews
Slide on Crimp and run Wire over Latch Bar
between the corner and the Tab
Crimp
Run Wire thru Crimp
Spring
Attachment
from Bar Tab
to Bracket
13
14
15
16
False Panel
Cleats
17
Tab
Corner
5/8”
Hole
5.5” Center
to Back
of Cabinet
29.43” Center
to Bottom
of Cabinet
5/8” Hole
Padlock
Bracket
Handle Bracket
Knob
Fully Engaged
in Lock Position
11/16”
Slot
Width
29.43” Center
to Bottom
of Cabinet
(Same Height as
5/8” Hole)
7.84”
Cane Latch Install
1
2
3
4
5
6
Hinge Side
Side of Cabinet
to locate for start
of installation
2.81”
Cane Latch
Orientation
Cane Latch
Making Contact
with Jamb Face
Strike Plate
7/8” Drilled
Hole Before
Installing Plate
Book Pull Install
Install Eyescrews
3/16” Drilled
Hole
Install one side of Hinge to Shelf
Centered in line with drilled
pass-thru hole
4”
CL
Transfer and
Drill Holes for
Hinge
Transfer and
Drill Hole for
Loop Clamp
2”
7
8
9
10
11
12
8”
4.75”
.25”
3/16” Thru Hole
Install Hinge to Book with
Hex Screws and washers behind
Hinge Plate with Cap Nuts in Book
Install Wire Loop
to Loop Clamp before
attaching Clamp
Feed Wire thru
Pass-Thru Hole and thru
both Eyescrews
Slide on Crimp and run Wire over Latch Bar
between the corner and the Tab
Crimp
Run Wire thru Crimp
Spring
Attachment
from Bar Tab
to Bracket
13
14
15
16
False Panel
Cleats
17
Tab
Corner
Содержание ID.LATCH-BOOK.08
Страница 1: ...INSTRUCTION MANUAL for Installing CANE LATCH TO INVISIDOOR ID LATCH BOOK 08 and ID LATCH CANE 08...
Страница 10: ...10 Invisidoor Application Images...
Страница 11: ...11 NOTES...


