
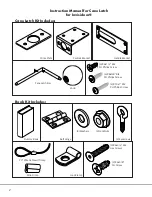


(x4)
M8x90(x4)
(x2)
C
D
E
(x4)
F
G
(x2)
H
(x2)
(x2)
M5x26(x2)
ST4
.
8X50(x8)
ST4
.
2X32(x8)
Ø8X35
(
x8
)
Ø8
Ø3
Ø10
Ø19
Ø10
ST6X25(x16)
(x4)
M5x6(x4)
(x2)
Ø12
(x2)
Ø10X48
(
x4
)
I
(
x4
)
(x4)
M8x90(x4)
(x2)
C
D
E
(x4)
F
G
(x2)
H
(x2)
(x2)
M5x26(x2)
ST4
.
8X50(x8)
ST4
.
2X32(x8)
Ø8X35
(
x8
)
Ø8
Ø3
Ø10
Ø19
Ø10
ST6X25(x16)
(x4)
M5x6(x4)
(x2)
Ø12
(x2)
Ø10X48
(
x4
)
I
(
x4
)
(x4)
M8x90(x4)
(x2)
C
D
E
(x4)
F
G
(x2)
H
(x2)
(x2)
M5x26(x2)
ST4
.
8X50(x8)
ST4
.
2X32(x8)
Ø8X35
(
x8
)
Ø8
Ø3
Ø10
Ø19
Ø10
ST6X25(x16)
(x4)
M5x6(x4)
(x2)
Ø12
(x2)
Ø10X48
(
x4
)
I
(
x4
)
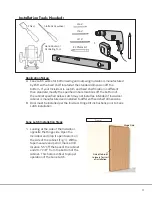
Installation Tools Needed:
3
Application Notes:
A. Cane Latch works for both inswing and outswing Invisidoors manufactured
by CSH with a fixed shelf located at the standard dimension off the
bottom. If your Invisidoor is custom and fixed shelf location is different
than standard, modify the specified in hole locations off the bottom of
the cabinet specified below. Latch may not install as intended if Invisidoor
cabinet is manufactured and installed to different fixed shelf dimensions.
B. Door must be installed per the Inivisoor Hinge Kit instructions prior to Cane
Latch installation.
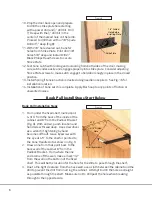
Cane Latch Installation Steps
1. Looking at the side of the Invisidoor
opposite the Hinge side, Open the
Invisidoor and prop it open to work on
the side of the cabinet (Fig. 1). With a
tape measure and pencil, mark a drill
location 5.5” off the back of the cabinet
and 29-7/16”” from the bottom of the
cabinet. This hole is critical to proper
operation of the Cane Latch.
3/64”
7/64”
#2 Philips bit
3/16”
Figure 1
Slotted screwdriver
Hand Router or
Oscillating Tool
Chisel
5/8”
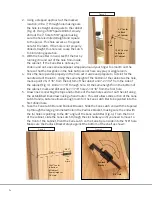
Hole
5.5” Center
to Back
of Cabinet
29.43” Center
to Bottom
of Cabinet
5/8” Hole
Padlock
Bracket
Handle Bracket
Knob
Fully Engaged
in Lock Position
11/16”
Slot
Width
29.43” Center
to Bottom
of Cabinet
(Same Height as
5/8” Hole)
7.84”
Cane Latch Install
1
2
3
4
5
6
Hinge Side
Side of Cabinet
to locate for start
of installation
2.81”
Cane Latch
Orientation
5/8”
Hole
5.5” Center
to Back
of Cabinet
29.43” Center
to Bottom
of Cabinet
5/8” Hole
Padlock
Bracket
Handle Bracket
Knob
Fully Engaged
in Lock Position
11/16”
Slot
Width
29.43” Center
to Bottom
of Cabinet
(Same Height as
5/8” Hole)
7.84”
Cane Latch Install
1
2
3
4
5
6
Hinge Side
Side of Cabinet
to locate for start
of installation
2.81”
Cane Latch
Orientation
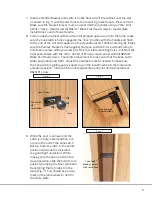
Cane Latch
Making Contact
with Jamb Face
Strike Plate
7/8” Drilled
Hole Before
Installing Plate
Book Pull Install
Install Eyescrews
3/16” Drilled
Hole
Install one side of Hinge to Shelf
Centered in line with drilled
pass-thru hole
4”
CL
Transfer and
Drill Holes for
Hinge
Transfer and
Drill Hole for
Loop Clamp
2”
7
8
9
10
11
12
8”
4.75”
.25”
3/16” Thru Hole
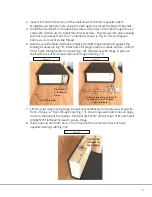
Install Hinge to Book with
Hex Screws and washers behind
Hinge Plate with Cap Nuts in Book
Install Wire Loop
to Loop Clamp before
attaching Clamp
Feed Wire thru
Pass-Thru Hole and thru
both Eyescrews
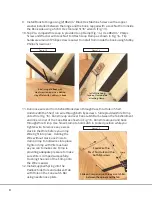
Slide on Crimp and run Wire over Latch Bar
between the corner and the Tab
Crimp
Run Wire thru Crimp
Spring
Attachment
from Bar Tab
to Bracket
13
14
15
16
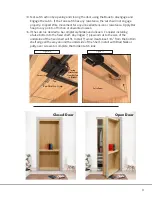
False Panel
Cleats
17
Tab
Corner
Содержание ID.LATCH-BOOK.08
Страница 1: ...INSTRUCTION MANUAL for Installing CANE LATCH TO INVISIDOOR ID LATCH BOOK 08 and ID LATCH CANE 08...
Страница 10: ...10 Invisidoor Application Images...
Страница 11: ...11 NOTES...


