background image

Crystal Vision


Installation


Crystal Vision 


Installation


Inserting and removing power supplies 

In multi-supply frames one of the power supplies at a time can be inserted 

and removed  while the system is powered without damage. However, this 

must be done quickly as  there will be no forced convection air, as the PSU 

fan assembly has to be removed.


To gain access to the Indigo PSUs proceed as follows: 


If possible, power down the frame 


Pull down the front panel using the black knobs or handles at either 

side of the  panel 


Release the two captive screws to the left of the PSU fan 


Remove the fan assembly by applying sideways pressure on the fan 

assembly  outwards and towards the right hand frame side 


Note: 

Take care not to damage the panel ribbon cable when removing the fan assembly. 

Once the fan assembly has been pulled backwards to free the fan connector 

plugs, the  PSU fan will stop and the front panel PSU FAN LED will change 

from green to red. 


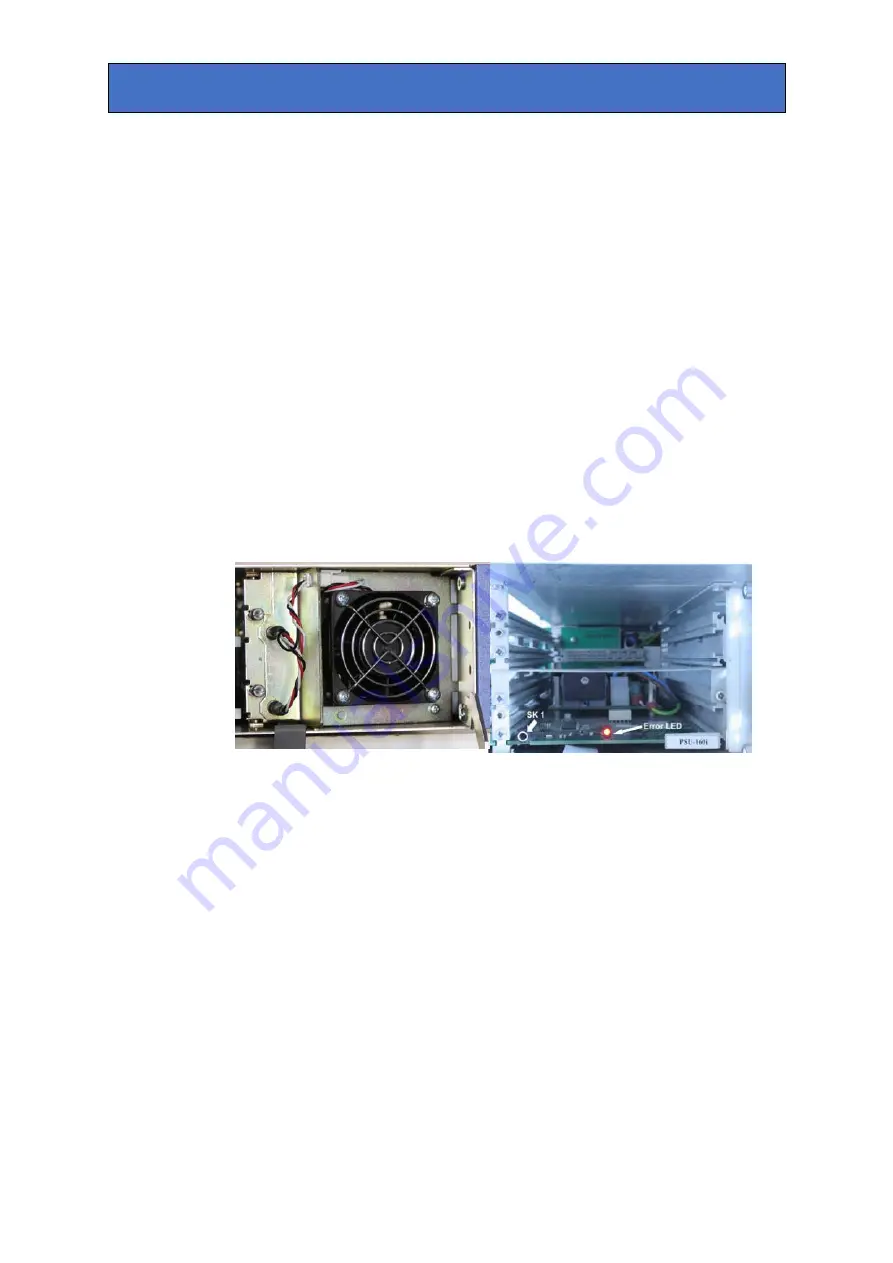
Removing the PSU fan assembly 

Lower PSU-160i – front view


In addition to the PSU and fan LEDs on the front control panel, there is also a 

red error  LED on the PSU. This LED will flash slowly if there is no fan speed 

signal present on the  fan connector SK1 when the PSU fan assembly is 

removed or if the PSU fan stops. 


The error LED will light up continuously if power rail levels are outside 

operational  limits. When the fan speed signal is present and power rails are 

normal the error LED is  unlit. 


Removing a PSU


To remove a PSU proceed as follows: 


Apply sideways pressure on the PSU handle towards the right and 

remove the  PSU by pulling it forward 


Take care when removing the lower PSU not to damage the panel ribbon cable 


Caution: 

There are no user serviceable parts inside the power supply module covers. The safety 

covers should not be removed even when the module is disconnected. 

Indigo PSU Manual R1.2 

24/05/2010 

8


Содержание Indigo PSU-160i

Страница 1: ...go frames Includes PSU 160i and PS 80i Crystal Vision Ltd Lion Technology Park Station Road East Whittlesford Cambridge CB22 4WL England Tel 44 0 1223 497049 Fax 44 0 1223 497059 sales crystalvision t...

Страница 2: ...11 Reading LED status and active display messages 11 Replacing the mains input fuses 12 Indigo 1 DP 14 3 1 Frequently asked questions 15 4 Specification 16 Revision1 Indigo PSU 160i and dual PS 55i in...

Страница 3: ...80 Watts power supply for the Indigo 1 DP frame All of the Indigo PSU s have a built in processor which communicates with the front panel display processor referred to as a PIC such information as pow...

Страница 4: ...Crystal Vision Introduction The Indigo 2 Crystal Vision frame with front control panel open The Indigo 4 Crystal Vision frame with front control panel open Indigo PSU Manual R1 2 24 05 2010 3...

Страница 5: ...to qualified service personnel Apart from procedures described in this manual there are no user serviceable parts within the frame If the frame requires any other servicing it should be returned to th...

Страница 6: ...ey should both be the same version i e 2 x 160i The PSU 160i is not compatible with similar PSUs used on FR2AV and FR1AV Frames Indigo 1 DP power supply module The Indigo 1 DP is fitted with a pair of...

Страница 7: ...odules are mounted into the Indigo 1 DP frame by way of a retained mother board This mother board which remains in situ contains the CPU alarm relay and low voltage fusing for the frame bays It is als...

Страница 8: ...from GREEN to OFF every 2 3 seconds to warn that the switch is set to one instead of two Warning These servicing instructions are for use by qualified personnel only To reduce risk of electric shock d...

Страница 9: ...free the fan connector plugs the PSU fan will stop and the front panel PSU FAN LED will change from green to red Removing the PSU fan assembly Lower PSU 160i front view In addition to the PSU and fan...

Страница 10: ...switch behind the control panel is set correctly for the number of PSUs installed to prevent redundant PSU warnings Refitting the fan assembly To replace the PSU fan assembly proceed as follows Offer...

Страница 11: ...e 2 pin 23 Remote 2 pin 5 Indigo 2 Indigo 4 Fourth Power Supply Relay Connections Description Pin number relay common open on fault close on fault Remote 4 pin 14 Remote 4 pin 23 Remote 4 pin 5 Indigo...

Страница 12: ...low Change the panel fan Indigo 4 may be upper or lower fan PSU Fan Yell Grn None Normal operation Red Psu fan speed low Change PSU fan Indigo 4 may be upper or lower fan PSU Yell Grn None Normal oper...

Страница 13: ...more details The PSU 150i 48V line fuse is located internally to the PSU module Replacing this fuse will involve dismantling the module See replacing PSU 150i 48V fuse Note The red LED built into the...

Страница 14: ...awer and reconnect the power cords Rear connectors showing IEC mains inputs and fuse tray with main and spare fuses If a fuse blows repeatedly this indicates a fault either in the associated power sup...

Страница 15: ...the same type and rating 5A 250V time delay 3 1 Frequently asked questions Why is the display black and or no LEDs illuminated Check that at least one frame PSU is functioning Check that the frame is...

Страница 16: ...tch at the rear of the front panel is set correctly for the number of power supplies installed Why does the LOWER PSU LED flash from green to off This will occur if two PSUs are fitted when the Two On...

Страница 17: ...ion Indigo PSU General Dimensions 268mm x 105mm x 38mm Power requirements 85 to 264 volts 47 to 400Hz Operating conditions 0 to 40 degrees C non condensing Ventilation front to sides without air filte...

Отзывы: