background image

Page 14

IQ-USM 810  

IQ Digital Processor / Digital Mixer

IQ-USM 810

 Reference Manual

4 Operation

The

  Crown IQ-USM 810 digital processor/digital

mixer is an IQ component that can be controlled and
monitored from a remote location via an IQ System,
and provides both audio processing and mixing in a
single package. Metering, gain, gating, filtering,
autoleveling, compression/limiting, delay, and
automixing are all available in an 8-IN/ 10-OUT mix
matrix.  All inputs have low noise microphone preamps
and switched phantom power. The unit can be con-
trolled using IQ for Windows either directly from a
computer or as an IQ component on an IQ Bus.  The
Multi-Function Control Port allows external control or
monitoring of functions within the box.  An internal Real
Time Clock allows full functional presets to be sched-
uled and implemented without any external control.

The following sections describe the IQ-USM 810’s
features and their operation. Where specified, some
features are accessed via controls located on the
unit itself; however, most of the features are config-
ured and controlled using IQ for Windows software.
If you are unfamiliar with IQ for Windows software,
please refer to the IQ for Windows Help files, visit the
Crown Audio website, or contact your Crown repre-
sentative or the Crown Technical Support Group (see
Section 7 for contact information).

4.1 Hardware Features

4.1.1 Selector  Buttons

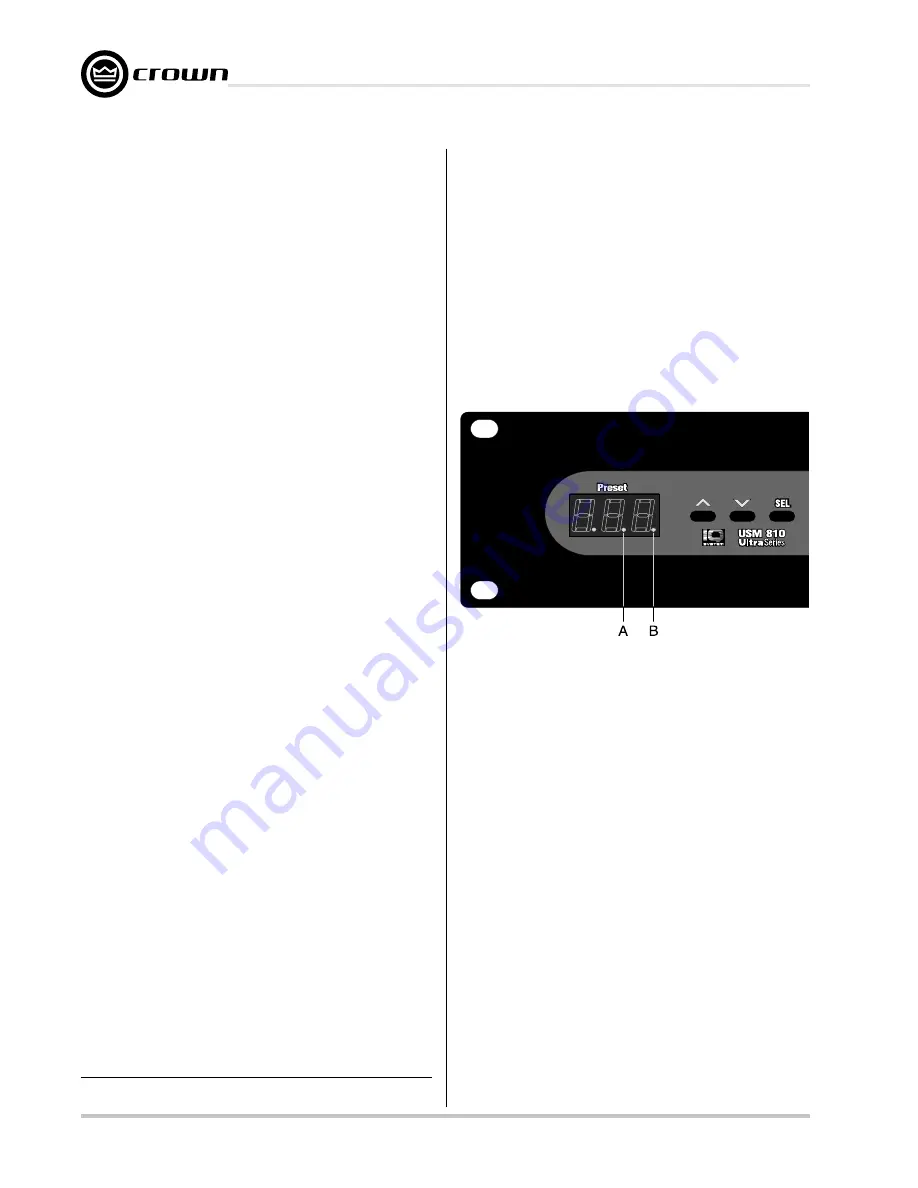
Three front panel buttons (Figure 4.1) are provided to
select presets and to change address and baud
rate. The SEL button, when pressed and held for
longer than 2 seconds, causes the display to cycle
through the available choices until it is released; first
to address select mode, then to baud rate select
mode, then back to preset select mode. Once the
SEL button is released, the up and down arrow but-
tons are used to adjust each parameter. When the
SEL button is released, the user has two seconds to
begin using the up or down arrow buttons before the
display changes back to default. When the param-
eter is adjusted to the desired value, press the SEL
button again to store the setting. See Section 3.1 for
information about selecting IQ address and baud
rate. Front panel control may be locked out via IQ for
Windows software.*

4.1.2 Digital Display

The three-segment digital display (Figure 4.1) serves
several useful functions. When power is first applied, it
displays an initialization sequence. Once the unit is
initialized, the display changes to Preset Mode, indi-
cating the presently selected preset. The display also
indicates the IQ address and baud rate when those
parameters are being adjusted. When a parameter is
changed, a small indicator (letter A in Figure 4.1) mo-
mentarily lights to show the parameter has been stored
in FLASH memory. Another small indicator (letter B in
Figure 4.1) is lit whenever any parameter is varied from
its value within the currently selected preset.

*  When front panel controls are locked out, the digital display reads "Lxx"

rather than the usual "Pxx" to indicate the locked status of the controls.

See Section 2 for locations of the following hard-
ware features and controls.

4.1.3 Enable Indicator

A blue front panel Enable indicator lights to show
that AC power is being supplied.

4.1.4 DATA Indicator

An amber front panel Data Signal Presence Indi-
cator (DATA) flashes whenever commands ad-
dressed to the IQ-USM 810 are received. To assist
with troubleshooting, an option that forces the
DATA indicator to remain lit is available through IQ
for Windows software.

4.1.5 Interface Indicator

A green front panel Interface indicator lights when
the IQ-USM 810 is being used as a system interface.
The control to set the IQ-USM 810 as an interface is
available through IQ for Windows software, allowing
only one interface per system.

Figure 4.1 Selector Buttons and Digital Display

Содержание IQ-USM 810

Страница 1: ...at 574 294 8000 This manual does not include all of the details of design production or variations of the equipment Nor does it cover every possible situation which may arise during installation oper...

Страница 2: ...arranty period that the new Crown product is free of defects in materials and workmanship We further warrant the new Crown product regardless of the reason for failure except as excluded in this Warra...

Страница 3: ...he provided plug does not fit into your outlet consult an electrician for replacement of the obsolete outlet 10 Protect the power cord from being walked on or pinched particularly at plugs convenience...

Страница 4: ...otection against harmful interference in a residential installation This equipment generates uses and can radiate radio frequency energy and if not installed and used in accordance with the instructio...

Страница 5: ...IQ USM 810 to the IQ System via the IQ Bus or directly to the host computer if the unit is to be used as the system interface or stand alone see Section 3 1 5 Turn off all amplifiers or other equipmen...

Страница 6: ...Status Display 15 4 1 7 Audio Inputs 15 4 1 8 Input Selector 15 4 1 9 Audio Input Gain Control 15 4 1 10 Main Audio Outputs 15 4 1 11 AUX Audio Outputs 15 4 1 12 IQ Bus Input Output Connector 15 4 1...

Страница 7: ...Control Port 23 4 6 1 Logic Digital Inputs DIN 1 8 23 4 6 2 Analog Inputs AIN 1 8 23 4 6 3 Digital Outputs 24 5 Technical Information 25 5 1 Technical Description 25 5 1 1 Audio 25 5 1 2 Control and...

Страница 8: ...ons further process the signal with individually adjustable signal delay and filters along with an Ambient Leveler and a high perfor mance Output Limiter for system protection All of the IQ USM 810 pa...

Страница 9: ...Page 9 IQ USM 810 IQ Digital Processor Digital Mixer IQ USM 810 Reference Manual Figure 2 1 IQ USM 810 Controls Connectors Indicators 2 Controls Connectors Indicators...

Страница 10: ...Q Bus will not be used the IQ USM 810 will need to be connected to a host computer so the firmware inside the unit can be configured After wards if computer control is not required the host computer c...

Страница 11: ...tact the Crown Techni cal Support Group see Section 7 for contact in formation 3 2 Connecting to the IQ Bus Step 2 The IQ Bus is a serial communication loop for transmiting IQ commands and data It pro...

Страница 12: ...Output to RJ 45 Input Figure 3 8 RJ 45 Output to RJ 45 Input Figure 3 4 RJ 45 Output to Barrier Block Input 3 2 2 Connect the IQ USM 810 to the IQ System via the IQ Bus The IQ components in an IQ Bus...

Страница 13: ...to control and or monitor the IQ USM 810 via the Control Port Figure 3 10 shows pin assignments for the Control Port See Section 6 2 for information on the operation of the Control Port and for examp...

Страница 14: ...are used to adjust each parameter When the SEL button is released the user has two seconds to begin using the up or down arrow buttons before the display changes back to default When the param eter i...

Страница 15: ...ing configuration and can be used for both input and output when a hub style IQ Bus wiring configu ration is implemented see Section 6 6 Drop out relays maintain loop integrity in the event power is r...

Страница 16: ...match that of the computer running IQ for Windows software The clock is used as a time reference for the Events Scheduling feature Internal capacitor storage allows the clock to run for up to 45 days...

Страница 17: ...orth 2nd order Bessel 3rd order Bessel 4th order Bessel and 4th order Linkwitz Riley Parametric Equalization Filter Description This filter boosts or cuts a relatively narrow frequency band like a ban...

Страница 18: ...commonly used to com pensate for the natural high frequency roll off of constant directivity horns Passband Gain Sets the amount of boost or cut for the filter Control range is 24 dB to 24 dB in 1 2...

Страница 19: ...d increments Delay each of the A B Processing Sections have an additional delay function Since the Input Gate sense is before the delay a delay at this point al lows the gate to act before the signal...

Страница 20: ...Priority Ducking to attenuate the mic gain by 20 dB Con trol range is from 10 milliseconds to 10 seconds in 10 millisecond steps Release Time sets the time required for Priority Ducking to increase t...

Страница 21: ...two separate A B pro cessing sections for a total of sixteen input signal processing paths The matrix mixer outputs are routed to the two Main outputs and eight Aux outputs The signal from either proc...

Страница 22: ...xpansion Ratio determines how much the gain of the output channel will increase for every increase in the ambient signal level above the Threshold setting A 4 1 Expansion Ratio setting will raise the...

Страница 23: ...led with normal or inverted logic Multi valued objects e g gains thresholds etc can be set to different settings for input transitions from low to high and high to low Bump Object s similar to Set Obj...

Страница 24: ...be controlled manually configured to indicate the state of a binary object or configured to indicate whether a particular preset is loaded There is one indicator and six controls for each output Pin S...

Страница 25: ...etrieve the audio from memory and do the required output processing The audio is then sent serially from the DSPs serial ports to the Output board The DSP processors have a 30 MHz clock while serial d...

Страница 26: ...ch combination on these inputs The inputs are current driven and will accept any DC volt age to 25VDC Figure 5 1 IQ USM 810 Circuit Block Diagram Analog Inputs Any fader in the unit can be controlled...

Страница 27: ...C to 240VAC 35VA nominal Protection if communication is lost the unit will con tinue to function with the last commands received RS232 Data Communication Baud Rate Selectable to 19 2 K 38 4 K 57 6 K o...

Страница 28: ...Page 28 IQ USM 810 IQ Digital Processor Digital Mixer IQ USM 810 Reference Manual Figure 5 2 IQ USM 810 Signal Flow Block Diagram...

Страница 29: ...Page 29 IQ USM 810 IQ Digital Processor Digital Mixer IQ USM 810 Reference Manual...

Страница 30: ...el of the input source Setting the source signal level to approximately 0 dBu will provide 20 dBu of headroom in the input preamp Some recommended settings are given in Figure 6 2 Balanced sources sho...

Страница 31: ...o both negative and ground input terminals Output Figure 6 4 Unbalanced Audio Input Wiring 6 1 2 Output Three terminal removable barrier block connectors are provided for audio output Figure 6 5 Both...

Страница 32: ...objects within the unit and are assignable to any combination of mute controls Pins 30 through 37 function as analog inputs and are assignable to any combination of fader controls Figure 6 8 shows pin...

Страница 33: ...ed space Another possible use for the Logic Input Control Mode is to sense switch closures along the path of a ride in a theme park to signal the ride s location and change to different presets accord...

Страница 34: ...data signal However in most cases interference is not a problem and since unshielded wire has lower capacitance it is a better choice for typical appli cations Minimize the total capacitance of a IQ...

Страница 35: ...loop are connected at a central patch panel see Figure 6 11 Typically RJ 45 style patch panels are implemented and allow the use of off the shelf pass Separate shielded pairs may be required for long...

Страница 36: ...rangements are required 7 1 1 Factory Service Shipping Instructions 1 Before sending a Crown product to the factory for service first call the Crown Service Depart ment for a return authorization RA n...

Страница 37: ...Page 37 IQ USM 810 IQ Digital Processor Digital Mixer IQ USM 810 Reference Manual THIS PAGE INTENTIONALLY LEFT BLANK...

Страница 38: ...amily Standard for Audio Video Audio Visual and Entertainment Lighting Control Apparatus for Professional Use Part 2 Immunity EN 61000 4 2 1995 Electrostatic Discharge Immunity Environment E2 Criteria...

Страница 39: ..._____________________________________________ ______________________________________________________________________________ ___________________________________________________________________________...

Страница 40: ......

Отзывы: